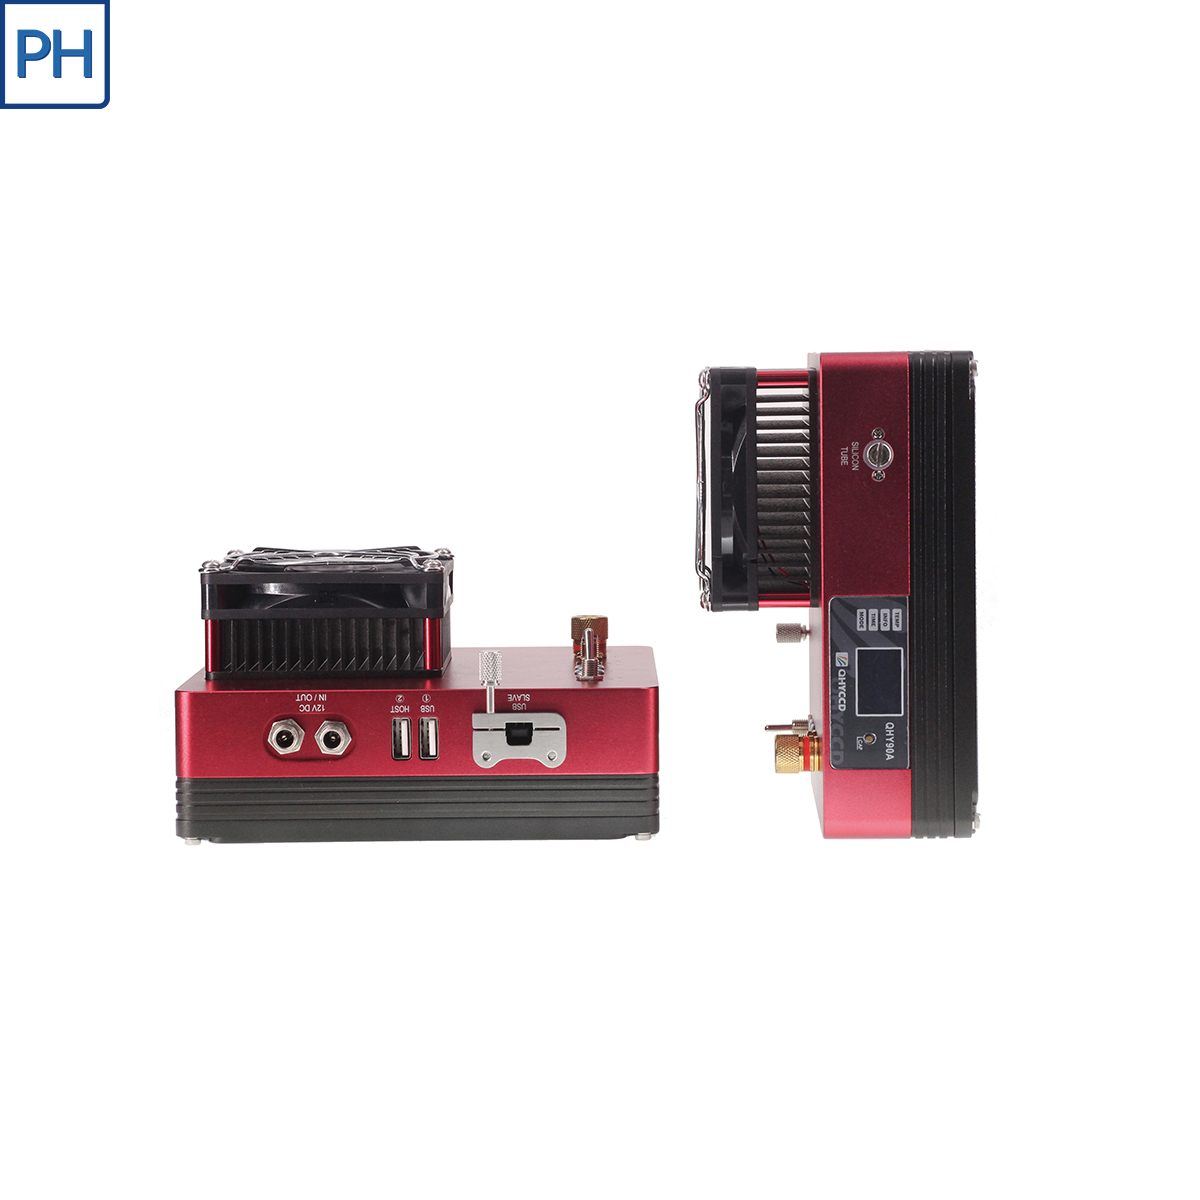
“A” Series camera family. “A” stands for “ALL-IN-ONE”. The camera includes a built-in motor driven filter wheel and natively supports the QHYOAG while consuming a minimum of back focus, precious for some optical systems.
In addition to the filter wheel and OAG, the “A” series camera also offers an internal USB2.0 hub providing two USB host ports and a USB to dual RS232 converter. A guiding camera, mount and electric focuser can be connected directly to this camera instead of the computer to reduce cable clutter and the chance of signal loss due to the long cables. A single USB cable controls all of the peripherals.
The camera uses a single 12V IN power port. The power socket is threaded for a solid connection that will not accidentally disconnect. There is another socket connected in parallel with the input that can be used to supply 12V OUT to other devices.
Each “A” series camera has a mechanical shutter that has a butterfly shape for automatically capturing dark frames. The shutter is directly driven by a motor with no other moving parts. The working life is almost unlimited. The shutter has two sides that block light and open spaces in between. The fan shape of the blades creates even-illumination when opening, and even-darkness when closing for dark frames. This feature is of great benefit when taking flat frames or making photometric observations.
QHY695A
The QHY695A uses the Sony ICX695 ExView II CCD, a 1-inch, 6 megapixels sensor with a peak QE close to 80%. The QHY695A has very low read noise, typically around 4e-. The two-stage TEC, reducing the sensor temperature to -40C below ambient, and the extremely low thermal noise of this CCD, combine to give this camera its legendary clean images.
The QHY695A has a built-in motor driven filter wheel for automatic sequencing of color or narrowband imaging. It supports both an 8-position, 1.25-inch filter carousel and a 7-position, 36mm filter carousel making it possible to install an entire deep sky filter set LRGBHaOIIISII at the same time.
QHY90A
The QHY90A is an 8.6 megapixel integrated cooled CCD camera using the popular KAF-8300 4/3-inch monochrome CCD. This sensor has an array of 3358 x 2536 pixels at 5.4um. The image area is a generous 17.9mm x 13.5mm. The QHY90A has a built-in seven-position filter wheel that will hold 36mm round unmounted filters. an entire set of LRGB Ha OIII SII can be loaded at one time.
QHY16200A
The QHY16200A uses the ONSEMI 16.2MP KAF-16200 CCD. The APS-H format is suitable for most telescopes, including SCT’s that cannot fully illuminate a 35mm frame without some vignetting or distortion at the edges. It is also suitable for commonly available 2-inch filters. The larger sensor size provides nearly twice as many pixels as the popular KAF-8300. The QE is similar to or higher than 8300 and the 37ke- full well capacity is almost 50% greater than the 8300’s 25.5ke-. yielding a dynamic range about 1.5X greater than the 8300.
The QHY16200A is available in two configurations. The filter wheels available for the QHY16200A accept 2″ mounted filters, or 50mm unmounted round filters, in carousels with 5 or 7 positions.
QHY09000A
The QHY09000A cameras is large format astronomical CCD camera using the well-known 9.3 Megapixel KAF-09000 CCD. The image area is just over 36mm x 36mm for both sensors. This model has a seven position built-in motorized filter wheel that holds 50mm x 50mm square filters needed for this sized CCD.
The camera use an even-illumination mechanical shutter for photometric quality darks and flats. The KAF−09000 image sensor is a redesigned version of the popular KAF−16801 and a brother to the KAF-16803 but with larger pixels in the same size package. The re-design included enhancements that specifically target the needs of high performance applications. Improvements include enhanced quantum efficiency for improved DQE at higher spatial frequencies, lower noise for improved contrast in areas of high density, and anti-blooming protection to prevent image bleed from over exposure in regions outside the area of interest. The sensor utilizes the TRUESENSE Transparent Gate Electrode to improve sensitivity compared to the use of a standard front side illuminated polysilicon electrode, as well as microlenses to maximize light sensitivity.
Specifications
Model
QHY695A
QHY90A
QHY16200A
QHY09000A
CCD Sensor
SONY ICX695 ExviewII CCD
KAF8300
KAF16200 APS-H (Default: Grade 2) Full Frame CCD
KAF09000
Color / Mono
Mono Only
Mono Only
Mono Only
Mono Only
Pixel Size
4.54um*4.54um
5.4um*5.4um
6.0um*6.0um
12um*12um
Resolution
2758(H)*2208(V)
3358(H)*2536(V)
4540(H)*3630(V)
3056(H)*3056(V)
Effective Pixels
6 mega
8.6 mega
16.2 mega
9.3 mega
Effective Image Area
14.6mm(H)*12.8mm(V)
Typeical 1-inch
17.96mm(H)*13.52mm(V)
Typical 4/3inch
27.0mm*21.6mm
APS-H format
36.7mm*36.7mm
Build-in Filter wheel
8 position 1.25inch or 7 position 36mm
7 position 36mm
QHY16200A-CFW5: Five Position 2inch/50mm round filter wheel
QHY16200A-CFW7: Seven Position 2inch/50mm round filter wheel
7 position 50mm square filter
Readout Type
Progressive Scan
AD Sample Depth
16bit
Fullwell
15-20ke-
>25.5ke
41ke-
110ke-
0.7e-/ADU at lowest Gain
0.05e-/pixel/second@ -20C
Readout Noise
4e-5e
9e-
10e-
11 e-
Pixel Binning
1×1,2×2,4×4
Exposure Time
1ms-10000sec
Cooling System
Dual Stage TEC Cooler (-40C to -45C below ambient)
Shutter Type
Electric Global Shutter plus mechanical shutter
OAG Interface
Six M3 screw thread
Power Consumption
0% TECpower 8w, 50% TEC power 16.5 w, 100% TEC power 27 w
Non-volatile memory / In camera storage
User accessible non-volatile internal built-in EEPROM memory capable of storing several small frames for calibration routines, stellar ROI frames for analysis of exoplanet investigation, occultations, atmospheric seeing measurement, focus, optic analysis etc. For maximum internal storage of images we recommend using an SD card or memory stick attached to the USB 2.0 port in the camera.
Build-in Anti-Dew Heater
Yes
Telescope Interface
M42/0.75 Female Thread
M42/0.75
M54/0.75
M62/0.75
Back Focal Length
33mm(±0.5)
30mm(±0.5)
CFW5 version:34mm(±0.5)
CFW7 version:41.5mm(±0.5)
44.5mm
Weight
1367g
1335g
1550g (CFW5),
2330g (CFW7)
3121g
Reference Price
USD2899
USD2699
QHY16200A-CFW5 with OAG USD3999 (with class2 sensor)
QHY16200A-CFW7 with OAG USD4399 (with class2 sensor)
User Guide
This user guide mainly take QHY695A as example. However, it can also be applied to all A series cameras.
Filter installation
1. Use the screwdriver included in the box to remove the screws on the topside of the camera.
2. You can see the filter wheel after opening the top cap. You can install 36mm filters and fix them with screws and washers. Please make sure that filters and screws used for fixing the filters do not touch the top cap and photoelectric position detector.
3. After you’ve finished installing the filters, you can turn on the camera and connect the camera to your PC with USB cable to make sure the filter wheel can work properly. Note that the filter wheel use photoelectric position detector to determine the position of the filter, so make sure you are not exposing the filter wheel to strong light when you are testing if it can work properly, otherwise the strong light may affect the photoelectric position detector.
4. Install the top cap.
Peripheral Ports
Serial ports
QHY695A provides two serial ports, which are connected to the built-in USB hub through FTDI.USB to Serial chip. These two serial ports provide standard RS232 signal level (±10V). You can use it to connect your camera to electric focuser and even equatorial mount. But note that this signal level is different from TTL signal level used in EQMOD. If you want to connect your camera to equatorial mount through EQMOD, A signal level convertor between TTL and RS232 is needed.After you finished installing the drivers, the serial ports drivers should also be installed. You can check its COM number in the device manager in the Windows so that you can use it in your application software.Serial port cable is optional accessory, and QHYCCD is developing many types of serial port cable. You can contact QHYCCD to know if there’s serial port cable you need.The pin arrangement is already shown in the picture above.
Trigger ports
There are a trigger-in port (left) and trigger-out port (right). Trigger-in port is a pulse input port. The camera does not start exposure until it receives a pulse from its trigger-in port. Trigger-out port output a indicative signal during the exposure cycle. These two ports use optocoupler. If you want to use these two ports, you can consult QHYCCD for detail method for electric connection.Grounding port
Keep the camera in good contact with the earth is the premise that the entire shooting system can work safely and properly. So QHY695A provides a grounding port. This port is connected to the GND on the PCB in the camera, and the GND is also the cathode of the 12V power supply. The grounding wire is included in the package, you can use it to connect the camera to other equipment (Metal case of the equatorial mount or metal case of PC) so that they have common ground. If you have no experience about it, please consult professional electrician.
Caution: Never connect the grounding port to any electrical socket or outlet, otherwise, electrical shock may happen.12V power ports
These two ports are connected in parallel, so you can either one of these two as power input port and use the other one as a power output port for other devices that need 12V power supply.USB type-A ports
These two ports are USB expansion ports connected to the built-in USB hub, you can use it to connect with guide camera or other USB devices. This two ports can output 500 mA current. To reduce the power load of the internal circuit, it’s recommended to reduce the use of current.QHY A series Cameras have a USB hub board in them. And these two USB type-A ports along with these two serial ports aforementioned are all branched out by the USB hub board. However, in some particular condition, it results in conflict and the camera will stop working. For example, in the condition where there equatorial mount you are using also has a built-in hub or where you used a USB hub already. In this case, you need to install the USB Hub bypass board (small red- colored board) included in the package.USB type-B port
This port is used to connect the camera to the computer.
Driver Download
Before Start: Input Voltage Requirements
The camera requires an input voltage between 11V and 13.8V. If the input voltage is too low the camera will stop functioning or it may reboot when the TEC power percent is high, causing a drain on the power. Therefore, please make sure the input voltage arrived to the camera is adequate. 12V is the best but please note that a 12V cable that is very long or a cable with small conductor wire may exhibit enough resistance to cause a voltage drop between the power supply and the camera. The formular is: V(drop) = I * R (cable). It is advised that a very long 12V power cable not be used. It is better to place the 12V AC adapter closer to the camera.
First connect the 12V power supply, then connect the camera to your computer via the USB3.0 cable. Make sure the camera is plugged in before connecting the camera to the computer, otherwise the camera will not be recognized. When you connect the camera for the first time, the system discovers the new device and looks for drivers for it. You can skip the online search step by clicking “Skip obtaining the driver software from Windows Update” and the computer will automatically find the driver locally and install it. If we take the 5IIISeries driver as an example (shown below), after the driver software is successfully installed, you will see QHY5IIISeries_IO in the device manager.
Please note that the input voltage cannot be lower than 11.5v, otherwise the device will be unable to work normally.
Install "All-In-One" System Pack
All-in-one Pack supports most QHYCCD models only except PoleMaster and several discontinued CCD cameras.
Since most of the contents of All-in-one package are plug-ins that support third-party software, the third-party capturing software that you want to use must be installed before the All-in-one package. Otherwise the program will report an error.
ALL-IN-ONE Pack contains:
System Driver, which is necessary for the camera operation and must be installed.
WDM Broadcast Driver, which can provide a live signal to Obs and other live software, you can install it if you have such needs like opeing a live show.
EZCAP_QT , which is developed by QHYCCD and can be used in QHY devices tests, and management of updates. So even if you won’t use EZCAP_QT for capturing, we suggest you install it.
Ascom driver, which is necessary for the camera used in Ascom (the latest version of Ascom is 6.6).
The two sorts of Ascom CFW Drivers correspond to two methods of controling the filter wheel: USB control and camera serial control. It is recommended that both drivers should be installed if you have a filter wheel.
CP210X_VCP is a serial driver. Some computers come with the driver, but the computer without the driver may be failed of controling the filter wheel.
SDKs for Third-party Software: Just pick and install the corresponding SDK according to the software you want to use. Don’t forget to check whether the software you are using is 32-bit or 64-bit and select the right SDKs.
SHARPCAP is also included in the pack, you can choose 32-bit or 64-bit to install. This is authorized by SHARPCAP.
QT LIB is a plug-in to ensure that 64-bit software can exeuate normally on some computers with poor compatibility.
Difference between Stable version and Beta Version: Beta version is the latest version, which gives priority to support for the latest products (the stable version may not be compatible with those yet), and has some of the latest optimized ,but experimental features. The stable version is older than the beta version but more stable, so it is recommended for beginners who are not using the latest products.
Don’t let the camera connect to the computer during the All-in-one pack installation process; connect it to the computer after all the installation is complete.
Using in EZCAP_QT
EZCAP_QT is the software developed by QHYCCD. This software has the basic capture function for QHYCCD deep sky cameras. You can use the camera with its built-in filter wheel in this software.
1. install EZCAP_QT
2. Connect the device to 12V power supply. Connect the cam to your computer with USB2.0 cable.
3. Run EZCAP_QT. Select “Connect” in Menu->Camera. If the camera is successfully connected. The title of EZCAP_QT will display the camera firmware version and the camera ID as shown below.
4. Before you click “connect”, make sure you can see the cam in the device manager on Windows. Sometimes if you click “connect”, you may see the warning shown in the picture below.
That doesn’t necessarily mean that the camera and your computer are not connected. In this case, you can just wait for a minute and click ‘connect’ again, then you can see it will be connected successfully. This is because it usually takes a while to load its firmware into your computer.
5. In Menu->Camera Setup, Click “Temp Control” and set the CCD sensor temperature. You can enable the “Auto Control” and set the target temperature. For example here we set the temperature to -10C. The CMOS temperature will come to -10C very fast (in about 2-3minute). If you want to close the TEC, you can select “TEC OFF”. If you just want to set the TEC power but not the temperature. You can select “Manual” and then set the percent of the TEC power.
6. You can select which filter you are going to use by changing the position of filter wheel as shown in the following picture.
7. You can use the preview tab to do preview. And use the focus tools to do focus. Then use the capture tab to capture image.
8. In EZCAP_QT there is a planner for image tasking. You can capture a series images by using the table below.
Using in ASCOM platform
You can connect many softwares that support ASCOM. Currently A Series only supports normal ASCOM connection and does not support the ASCOM VIDEO connection. Please note that A Series always transfer maximum bit depth by ASCOM to make the best DSO imaging performance. The image format is 16bit width and patch zero on low bit.
MaxIM DL
1. First you have to make sure that both ASCOM Platform and ASCOM driver have been installed. If not, please install it first.
2. Start MAXIMDL
3. Follow the instructions shown below to finish the setup
Normally, you can set the gain=15 and offset=132 to start. Keep clicking “Okay” to return to Camera Control window
4. The following instructions are going to show you how to configure the built-in filter wheel in MAXIMDL.
Click “Setup Filter” in the Camera Control window
Sequence Generator Pro
Sequence Generator Pro is an extremely powerful image capture suite. It can perform many complex tasks in order to meet your imaging needs. After you connect your gears and configure Sequence Generator Pro properly, you can go to sleep and see images in the morning.
To use QHY695A in Sequence Generator Pro, you can follow the instructions listed below.
1. Open sequencer by clicking the button as shown in the picture below
2. Select “QHYCCD-Camera-Capture”, and click the “Chain” icon to connect
3. Click the “wrench” icon to set up your camera
4. Select “QHYCCD FilterWheel”, click the “Chain” icon to connect
5. Similarly, click the “wrench” icon to set up your filter wheel
Note that before you select QHYCCD Filter wheel as the filter and click the red connect button, you should also make sure you’ve downloaded and installed the ASCOM Filters Plug for the built-in filter wheel, you’ve plugged in the 12V power supply cable, and the initialization of filter wheel has been finished.
For more information, you can check its tutorials on the “Help” tab
Since Sequence Generator Pro is based on profiles philosophy of your gear to perform sequence automatically is recommend to configure a proper profile to get the best from the software. You can use the same settings show above for this task. Please refer to Sequence Generator Pro manual for further information about profiles.
FAQ
How to clean the CCD sensor and the optic windows of the camera?
Usually you can use flat fielding calibration to eliminate the shadow resulted from dust. It’s not recommended to open the CCD chamber to clean the CCD on your own. Because if you do it in a place where there are still lots of dust, your effort may backfire. Besides, during the process of cleaning, you may scratch the CCD, and you may damage the internal circuit when you open the camera.
QHYCCD provides CCD clean service. The cleaning fee is 100 USD per time and it doesn’t include the shipping cost.How to protect the cooler?
The cool can lower the CCD temperature to a value that’s almost 40 degrees centigrade below the ambient temperature. So you need to be careful to avoid thermal shock, which refers to when the cooler’s temperature rises or fall dramatically, the cooler is subjected to strong internal stress due to contraction principle. Drastic thermal shock can shorten cooler’s service life or permanently break it.
So when you begin to adjust the CCD temperature, you should avoid setting “Cooler Power” to its maximum value, and you should gradually turn up the “Cooler Power” value. When you turn off the power, if the “Cooler Power” value is very big, you should gradually turn it down before turn off the power.
What’s small display on the camera for?
The OLED display is used for display certain formation related to the shooting. It is directly driven by application program. So it may display different information or doesn’t display anything at all based on different application programs. Currently all application program don’t support this display, please wait for latest application program that supports this display.What is defect columns?
You may see one or more vertical columns whose top pixel is a bright dot. Normally speaking such columns are not defect column. It is resulted from one pixel with high thermal current. All the pixels below that pixel will be affected by it as thermal current is transferred through that pixel.This pixel can be removed by dark frame calibration. If they cannot be eliminated entirely, you can solve this problem by using some astronomical image processing software. These software will replace that column with the average value of its surrounding columns.Aside from the columns we just talked about, you may see one or more black columns which is not full sensitive to the light or it is dim to light. This is the defect column and it cannot be removed by dark frame calibration.The following image shows a typical “defect” columns caused by a hot pixel, which is not very bright and it is usually not considered as a defect column. It will be gone after dark frame calibration.The picture below shows a typical defect column with low CTE or zero CTE. This is a defect column.You have to use the some defect tools to remove it.
Camera Maintenance
Drying the CCD Chamber
The CCD sensor is located in a CCD chamber. This chamber is airproof and connect to the socket of the silicone gel tube (drying tube) on one side of the case. If there is moisture and it causes the CCD sensor glass to get dew. You can use the silicone gel tube (drying tube) included in the package to dry it. Please put the effective silicone gel into the silicone gel tube. Make sure to put a small amount of cotton inside to prevent the silicone gel get into the CCD chamber. The process of drying usually needs 24 hours.
Avoid CCD chamber optic window get dew
If the environment humidity is very high, the optic window of the CCD chamber may get dew. The cam has the build-in heat board on this optic window to heat the optic window to avoid it. In most conditions it can take effect. If the optic window still get dew please try the following method:
1. Avoid the CCD Camera face down to ground. The cold air is heavy than warm air, if you put the camera facing down to the ground, the cold air is easy to get the optic window and cause it very cold and get dew;
2. Increase the temperature of the CCD sensor. You can increase the CCD sensor temperature a little to prevent the optic window get dew;
3. Check if the heat board is working. If the heat board is not working, the optic window easily get dew. Normally the heat board can get about 65-70C in +25C environment. If it is not so warm, the problem can be the damaged heat board. You need to contact QHYCCD to replace one heat board.