

Overview
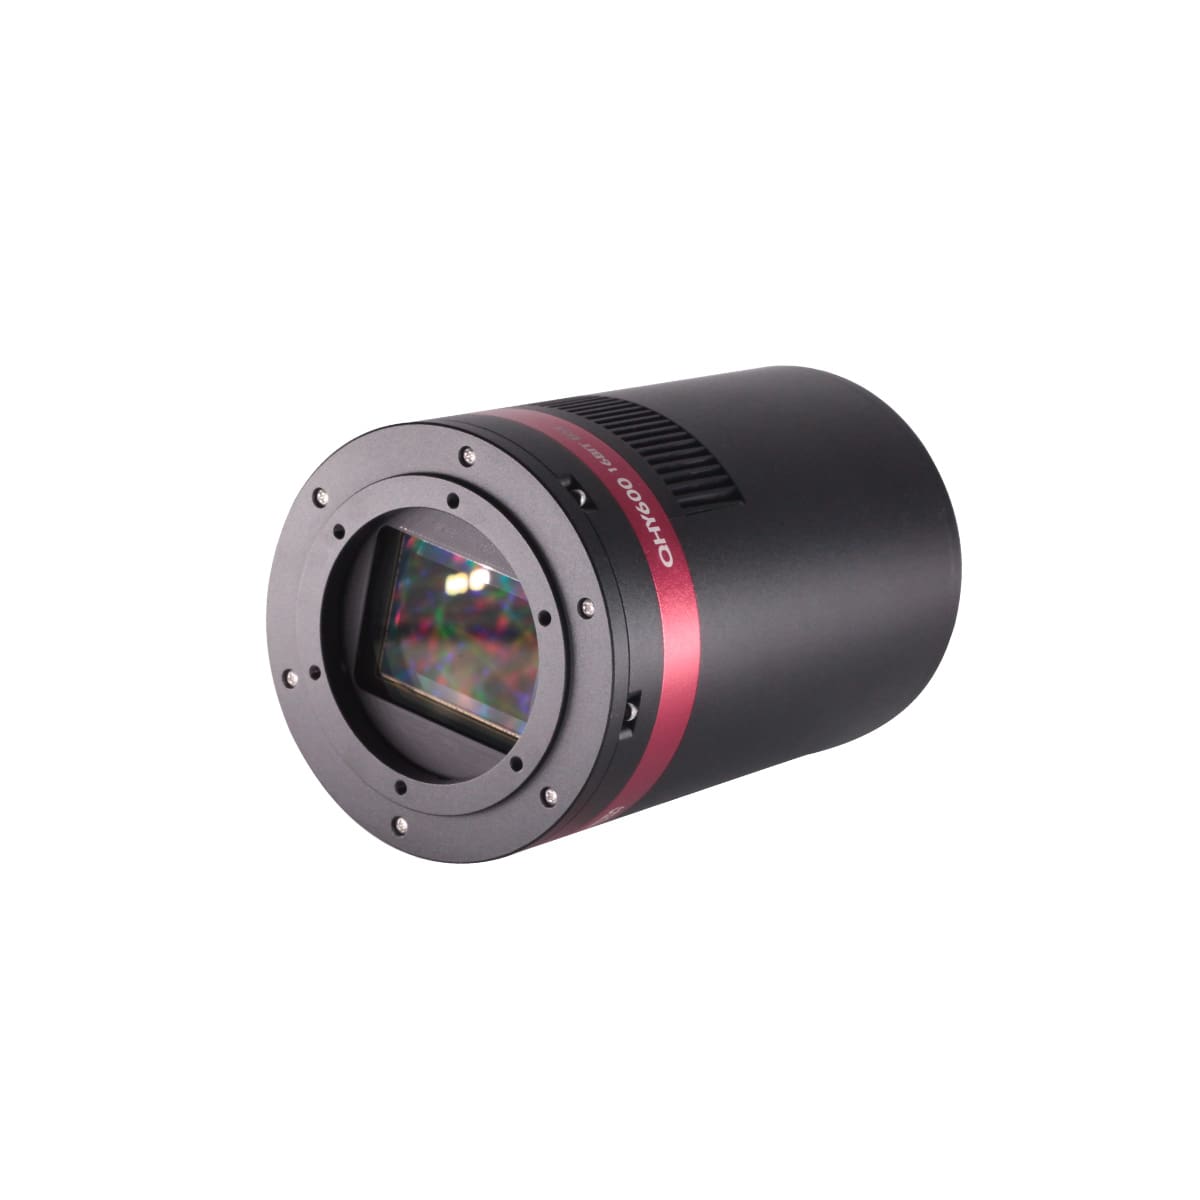
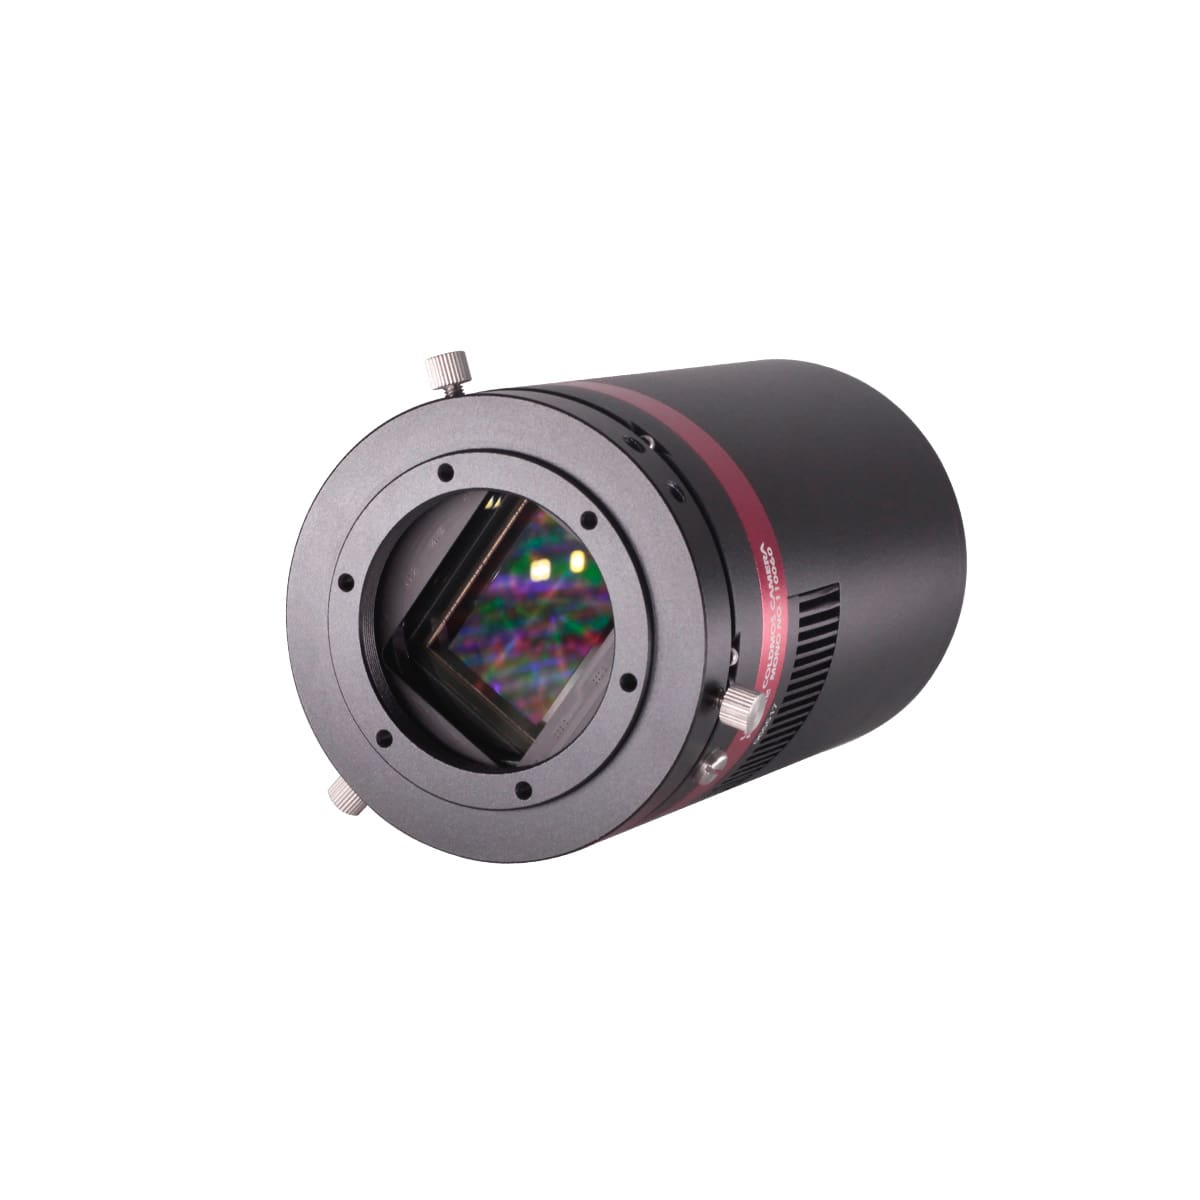
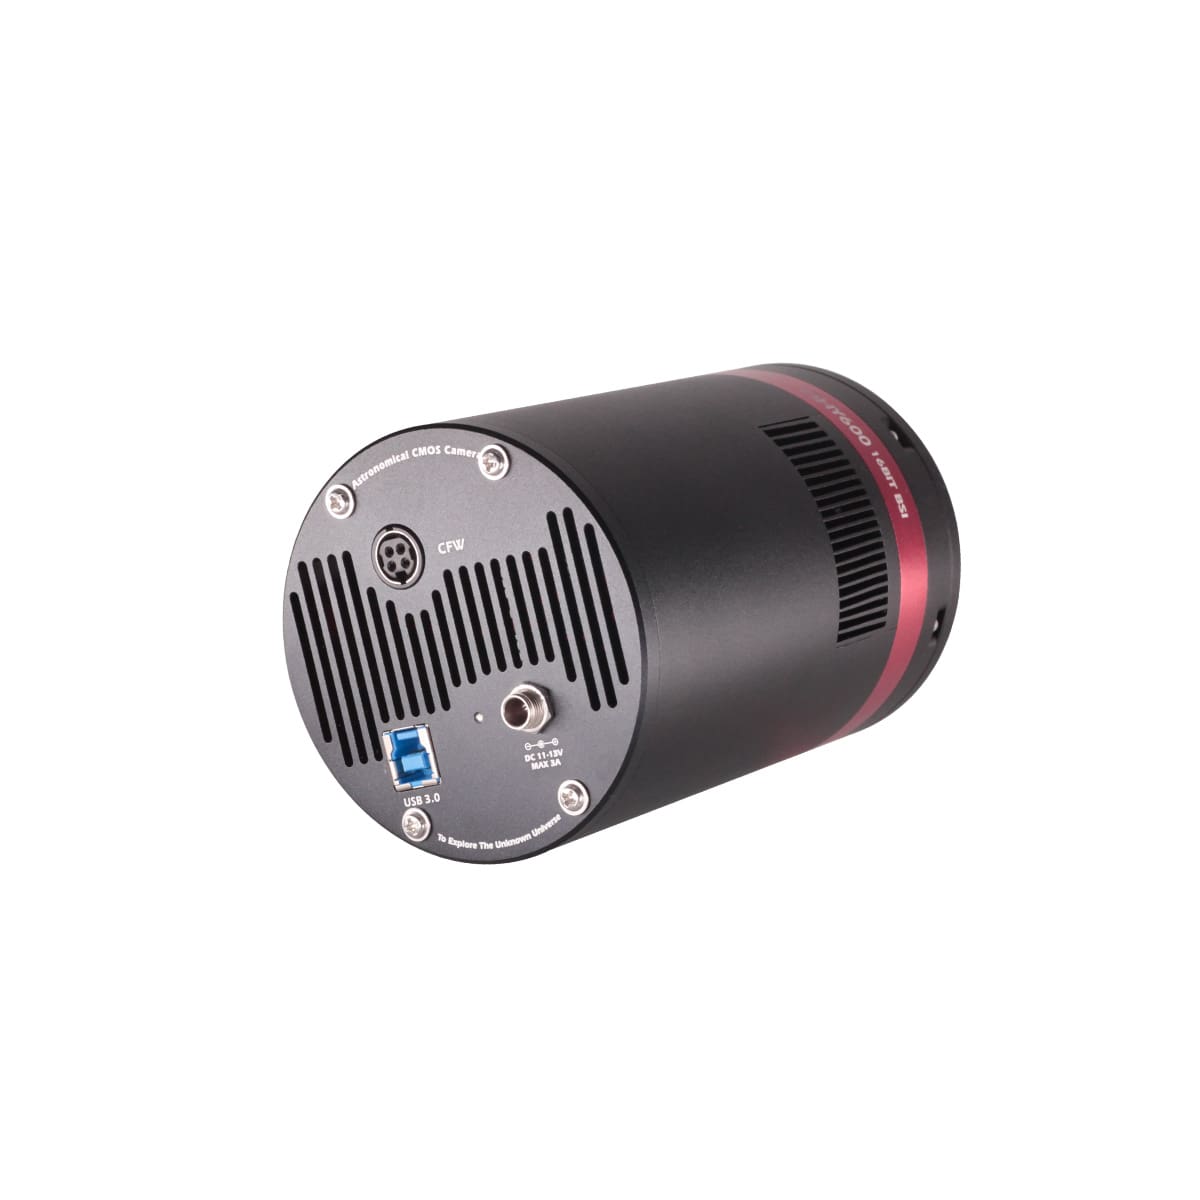
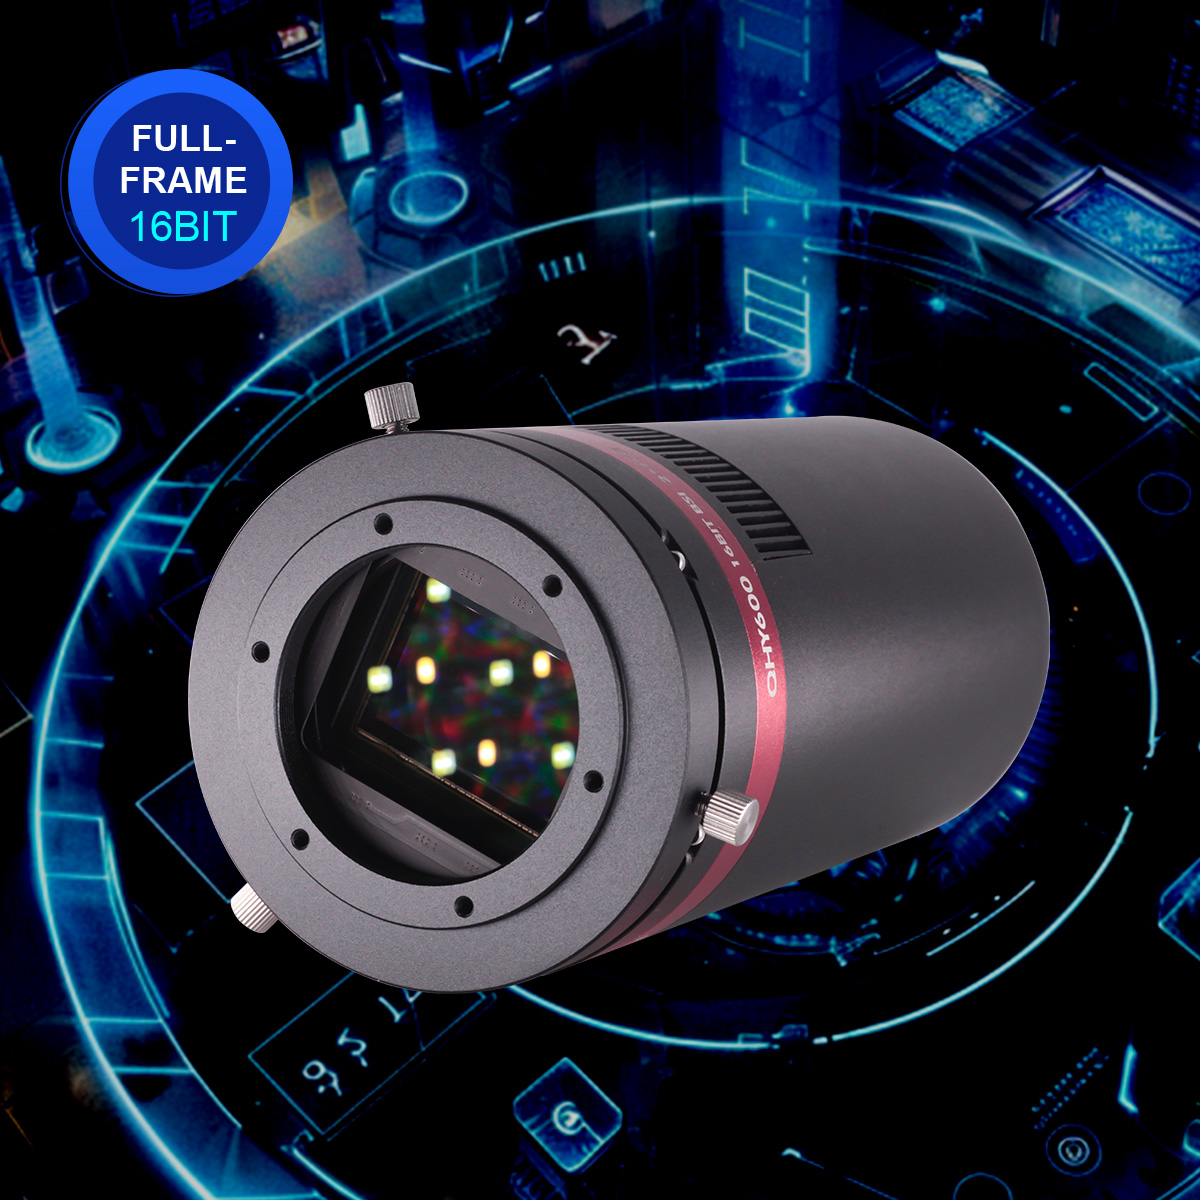
With the advantage of low readout noise and high-speed readout, CMOS technology has revolutionized astronomical imaging. A monochrome, back-illuminated, high-sensitivity, astronomical imaging camera is the ideal choice for astro-imagers. The QHY600 Series uses SONY IMX455, a BSI full frame (35mm format) sensor with 3.76um pixels and native 16-bit A/D. This sensor is available in both monochrome and color versions. The QHY600 Series ends the days of non-16bit cooling CMOS cameras and it ends the days non-full frame (and larger) monochrome cooling CMOS cameras.
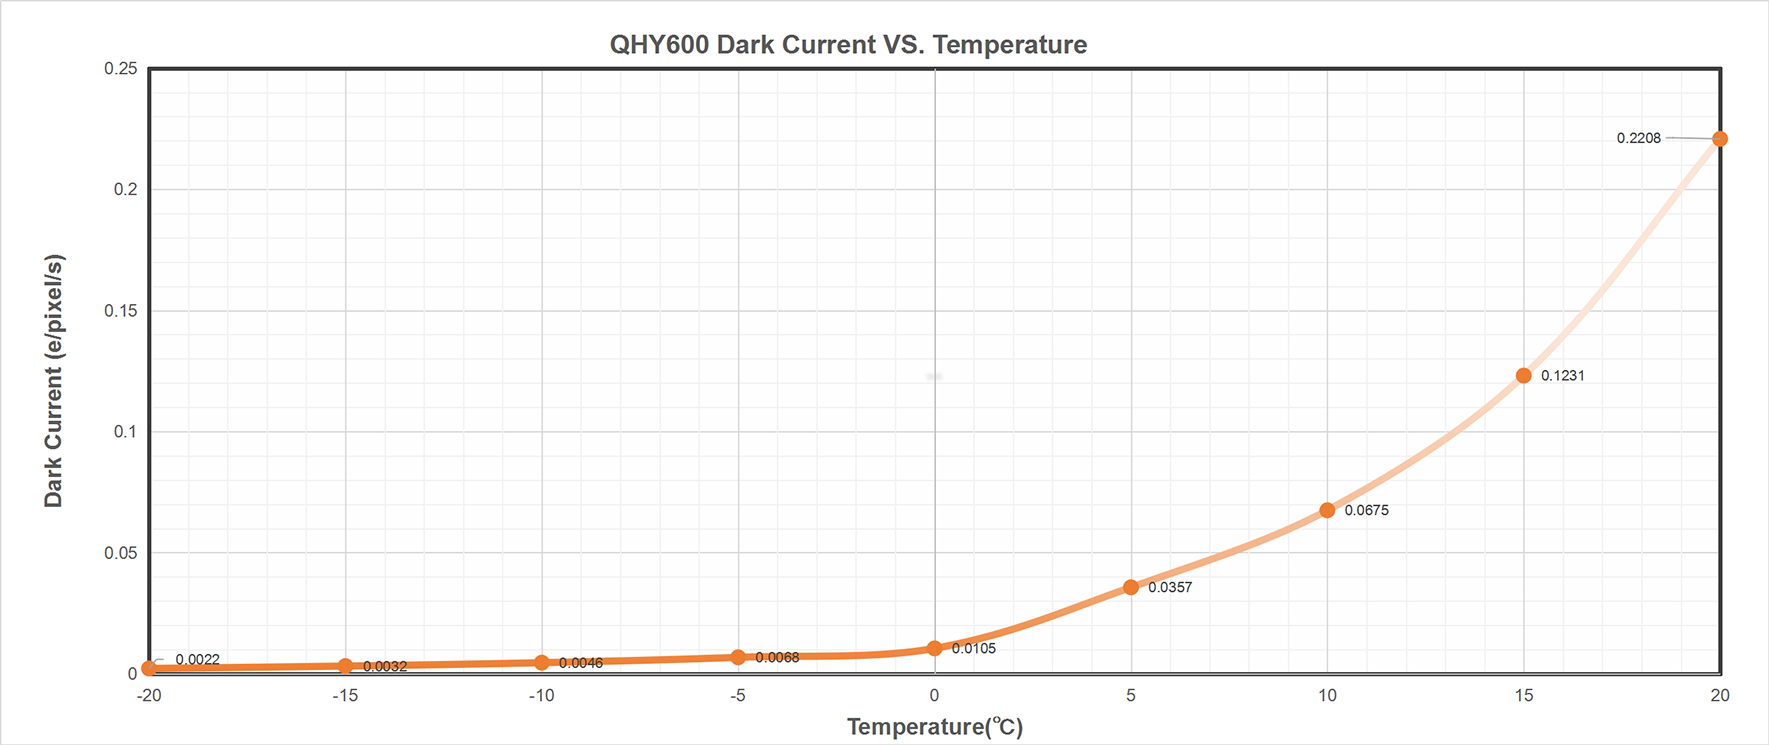
- Extremely low dark current (0.002e/p/s@-20C) using SONY’s Exmor BSI CMOS technology.
- Zero amplifer glow.
- Only one electron of read noise at high gain and full resolution and 4FPS readout speed. One electron of read noise means the camera can achieve a SNR>3 at only 4 to 6 photons. This is perfect performance when conditions are photon limited, i.e., short exposures, narrow band imaging, etc., making this large area sensor ideal for sky surveys, time domain astronomy, fluorescence imaging, DNA sequencing and microscopy.
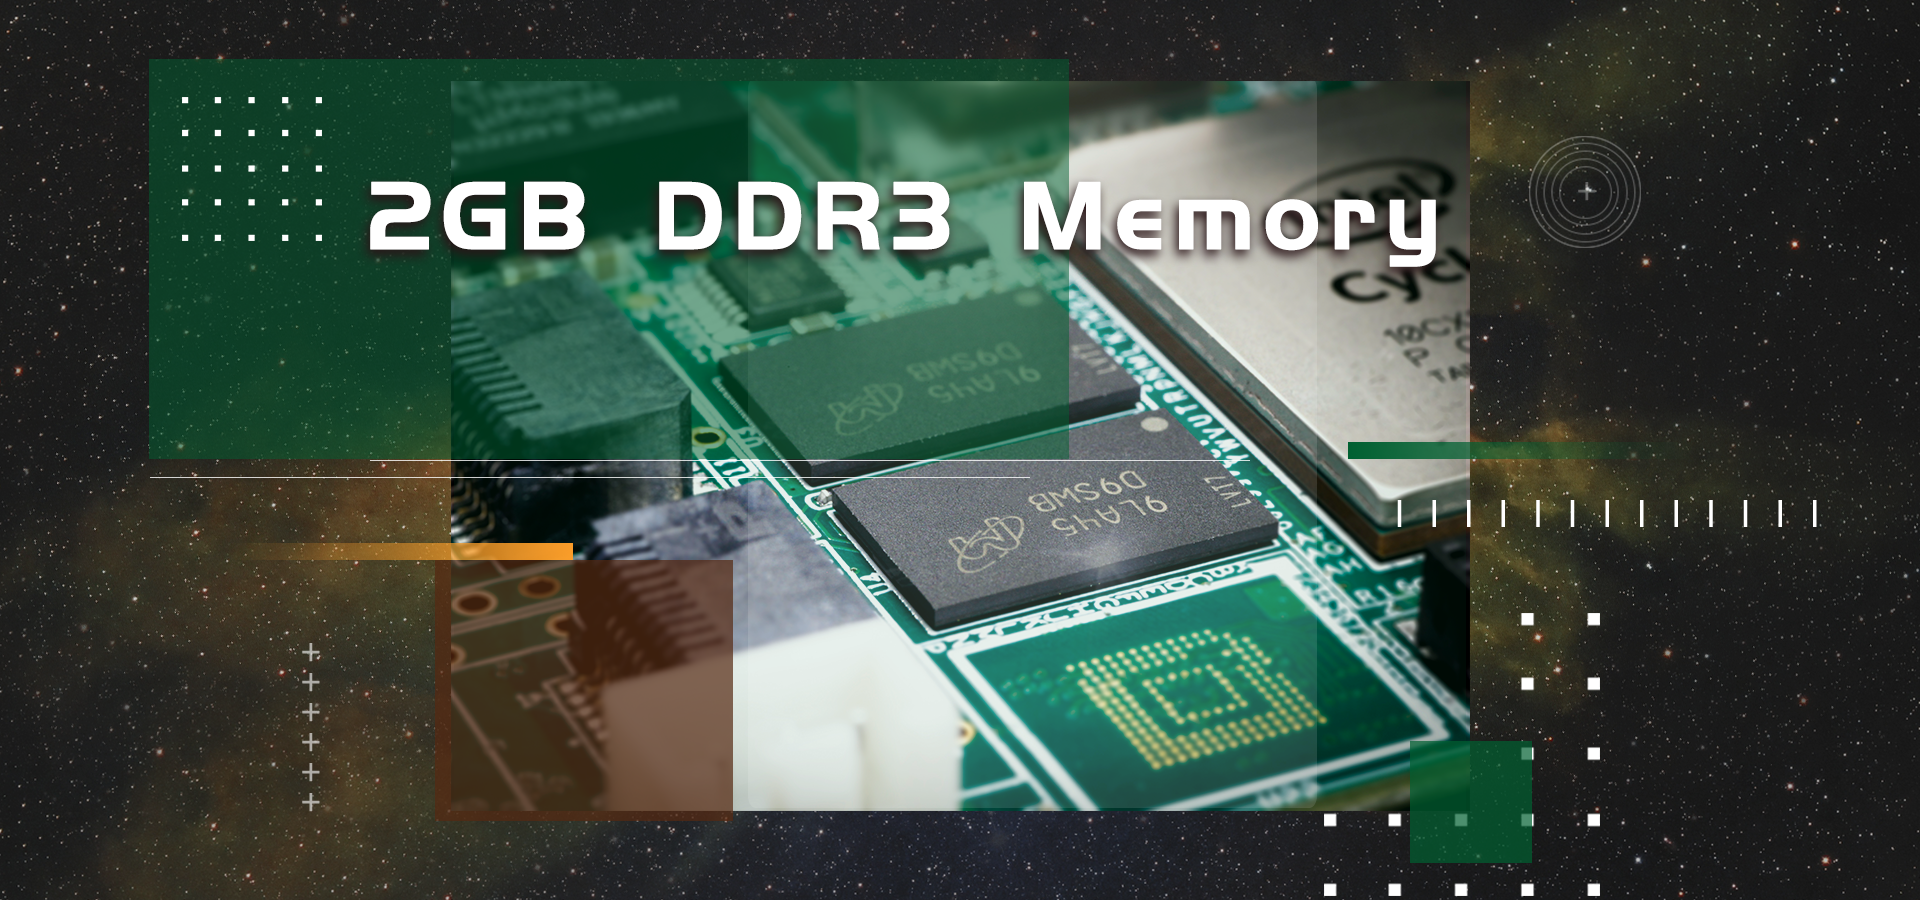 In order to provide smooth uninterrupted data transfer of the entire 60MP sensor at high speed, the QHY600 Series (except QHY600M-PH L) have 2GB DDR3 image buffer. The pixel count of the latest generation of CMOS sensors is very high resulting in greater memory requirements for temporary and permanent storage. When using some computers that do not have fast processors or have poor support for USB 3.0, the computer can’t transfer high-speed data well, and the data is often lost. The DDR can buffer a lot of image data and send it to the computer. Even if the USB 3.0 transmission frequently gets suspended, it will ensure that data is not lost.
For example, the QHY600 sensor produces about 120MB of data per frame. The data band-width is also increased from the original 16-bits to the current 32-bits. Transferring such a large file sizes necessarily requires the camera to have sufficient memory. This large image buffer meets the needs of high-speed image acquisition and transmission of the new generation of CMOS, making shooting of multiple frames smoother and less stuttered, further reducing the pressure on the computer CPU.
 Native 16 bit A/D: The new Sony sensor has native 16-bit A/D on-chip. The output is real 16-bits with 65536 levels. Compared to 12-bit and 14-bit A/D, a 16-bit A/D yields higher sample resolution and the system gain will be less than 1e-/ADU with no sample error noise and very low read noise.
 BSI: One benefit of the back-illuminated CMOS structure is improved full well capacity. In the back- illuminated sensor the light is allowed to enter the photosensitive surface from the reverse side. In this case the sensor’s embedded wiring structure is below the photosensitive layer. As a result, more incoming photons strike the photosensitive layer and more electrons are generated and captured in the pixel well. This ratio of photon to electron production is called quantum efficiency. The higher the quantum efficiency the more efficient the sensor is at converting photons to electrons and hence the more sensitive the sensor is to capturing an image of something dim.
 TRUE RAW Data: In the DSLR implementation there is a RAW image output, but typically it is not completely RAW. Some evidence of noise reduction and hot pixel removal is still visible on close inspection. This can have a negative effect on the image for astronomy such as the “star eater” effect. However, QHY Cameras offer TRUE RAW IMAGE OUTPUT and produces an image comprised of the original signal only, thereby maintaining the maximum flexibility for post-acquisition astronomical image processing programs and other scientific imaging applications.
 Zero Amplify Glow: This is also a zero amplifer glow camera.
 Cooling & Anti-dew Control: In addition to dual stage TE cooling, QHYCCD implements proprietary technology in hardware to control the dark current noise. The optic window has built-in dew heater and the chamber is protected from internal humidity condensation. An electric heating board for the chamber window can prevent the formation of dew.
 Sealing Technology: Based on almost 20-year cooled camera design experience, The QHY cooled camera has implemented the sealing control solutions. The sensor itself is kept dry with our silicon gel tube socket design for control of humidity within the sensor chamber. By the way, there’s no oil leaking.
QHY600Series Naming Rules and Introduction
QHY600 Naming Rules
PH–Photographic Grade. Mainly for astrophotographers.
Pro–Scientific Grade. Mainly for scientific institutions. Since 2023, the Pro series has been divided into Pro I and Pro II series; the original “Pro” models will be replaced by “Pro I” models.
Pro I–Upgraded from the previous Pro series, it has a 2*10G fiber interface with a shorter body length.
Pro II–Based on Pro I models, it provides another two CameraLink interfaces.
M–Monochrome.
C–Colored.
L–Lite version is only available in PH Grade. Its body length becomes shorter, and the built-in memory storage is 1GB instead of 2GB. Mono only.
SBFL–has a shorter back focal length.
LQ–supports liquid cooling.
Sensor Grade: All monochrome cameras (except the Lite version) are equipped with Industrial-Grade sensors, while the others are equipped with Consumer-Grade sensors.
| Grade | Body Length | Back Focal Length | Cooling Method | Buffer | 2*10g | CameraLink | Note | |
| QHY600PH L | Photographic | 123mm | 17.5+6mm(CAA) | Air Cooling | 1GB DDR3 | – | – | |
| QHY600PH | Photographic | 142mm | 17.5+6mm(CAA) | Air Cooling | 2GB DDR3 | – | – | |
| QHY600PH SBFL | Photographic | 138mm | 14.5mm | Air Cooling | 2GB DDR3 | – | – | |
| QHY600PH EB | Photographic | 185mm | 17.5+6mm(CAA) | Air Cooling | 2GB DDR3 | – | – | Discontinued |
| QHY600Pro | Scientific | 185mm | 17.5+6mm(CAA) | Air Cooling | 2GB DDR3 | Yes | – | Replaced by Pro I |
| QHY600Pro SBFL | Scientific | 181mm | 14.5mm | Air Cooling | 2GB DDR3 | Yes | – | Replaced by Pro I |
| QHY600Pro LQ | Scientific | 185mm | 17.5+6mm(CAA) | Liquid Cooling | 2GB DDR3 | Yes | – | Replaced by Pro I |
| QHY600Pro SBFL LQ | Scientific | 181mm | 14.5mm | Liquid Cooling | 2GB DDR3 | Yes | – | Replaced by Pro I |
| QHY600Pro I | Scientific | 142mm | 17.5+6mm(CAA) | Air Cooling | 2GB DDR3 | Yes | – | |
| QHY600Pro I LQ | Scientific | 142mm | 17.5+6mm(CAA) | Liquid Cooling | 2GB DDR3 | Yes | – | |
| QHY600Pro I SBFL | Scientific | 138mm | 14.5mm | Air Cooling | 2GB DDR3 | Yes | – | |
| QHY600Pro I SBFL LQ | Scientific | 138mm | 14.5mm | Liquid Cooling | 2GB DDR3 | Yes | – | |
| QHY600Pro II | Scientific | 142mm | 17.5+6mm(CAA) | Air Cooling | 2GB DDR3 | Yes | Yes | |
| QHY600Pro II LQ | Scientific | 142mm | 17.5+6mm(CAA) | Liquid Cooling | 2GB DDR3 | Yes | Yes | |
| QHY600Pro II SBFL | Scientific | 138mm | 14.5mm | Air Cooling | 2GB DDR3 | Yes | Yes | |
| QHY600Pro II SBFL LQ | Scientific | 138mm | 14.5mm | Liquid Cooling | 2GB DDR3 | Yes | Yes |
Introduction of "SBFL" Version
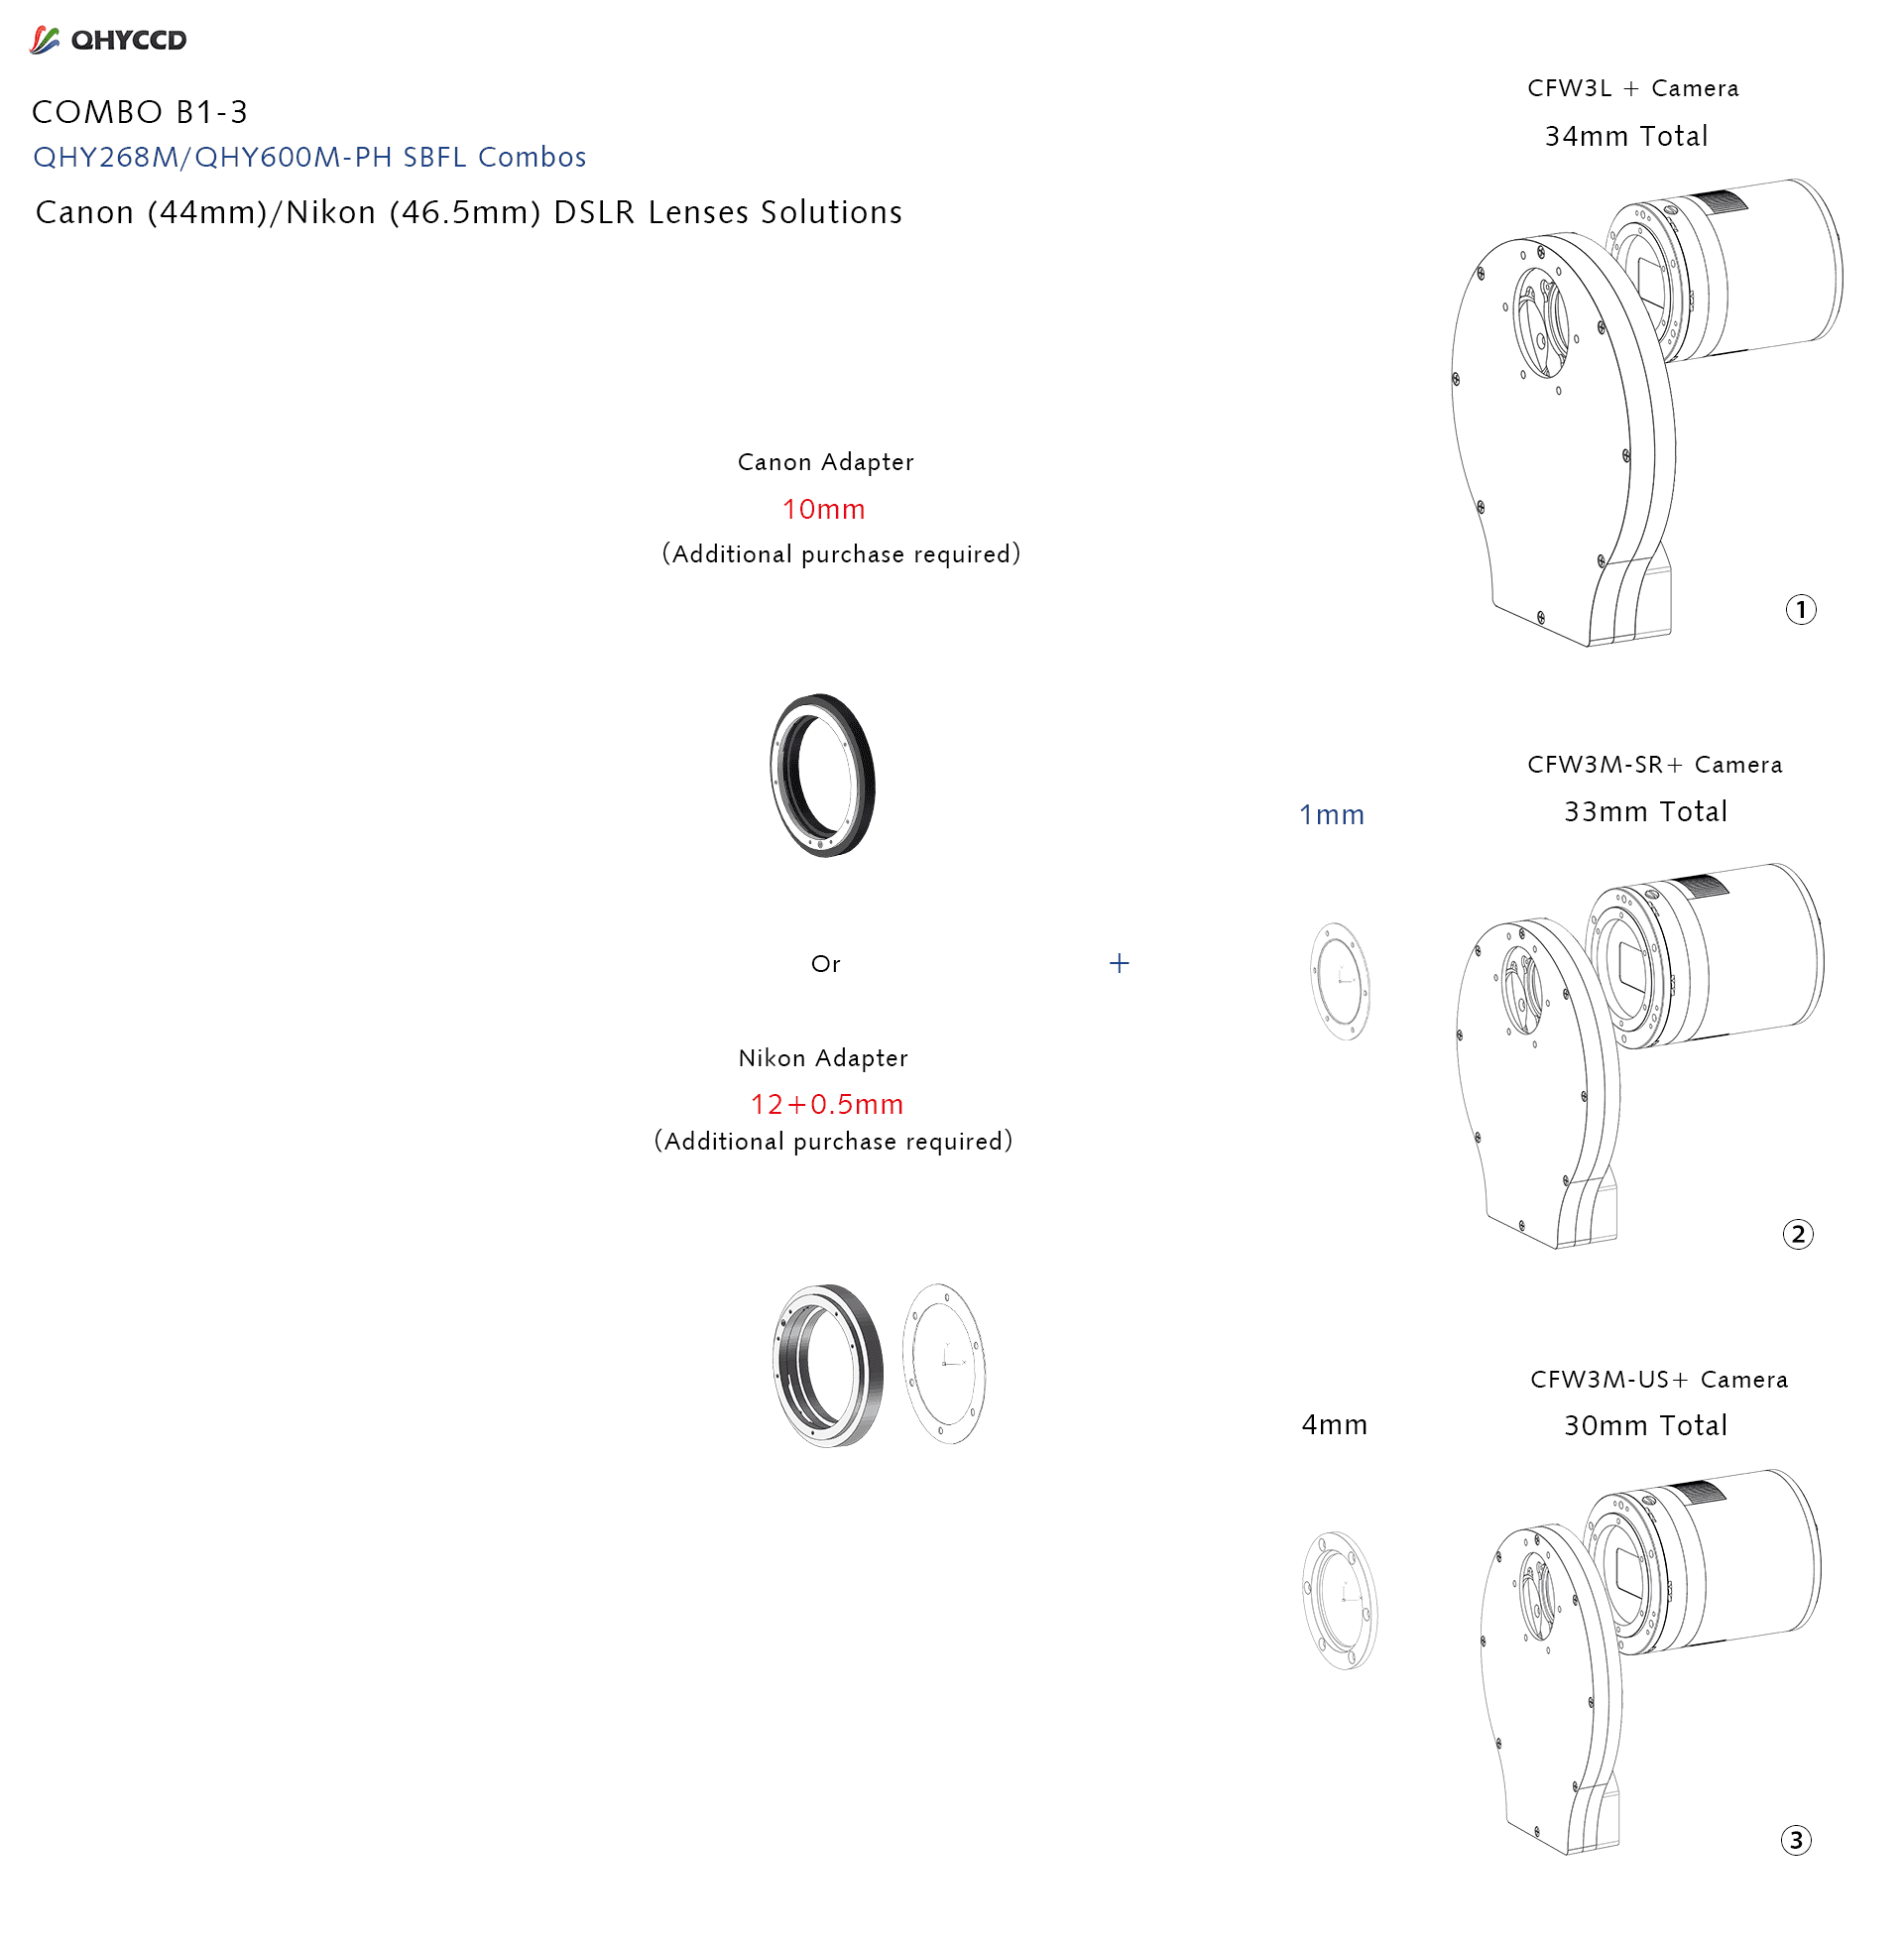
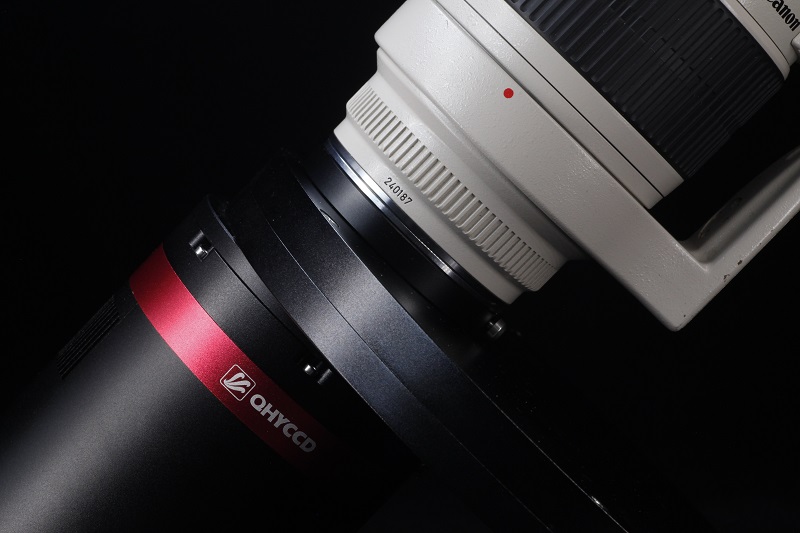 SBFL (Short back-focal length version) models are specially designed for DSLR lens users or those who has special requirment of short back focal length. This version has a special front part version which has 14.5mm B.F.L only (The B.F.L consumed equals 12.5mm when connecting QHYCFW. About the defination of “BFL Comsumed” and our adapter system please view: https://www.qhyccd.com/astronomical-camera-adapter-bfl-solution/). A model with “SBFL” suffix can easily match Canon/Nikon lens even with filter wheel. On the side of this adapter there is a 4mm hole to connect air pump through plastic pipe in case of the dewing glass when necessary.
Introduction of "LQ" Version
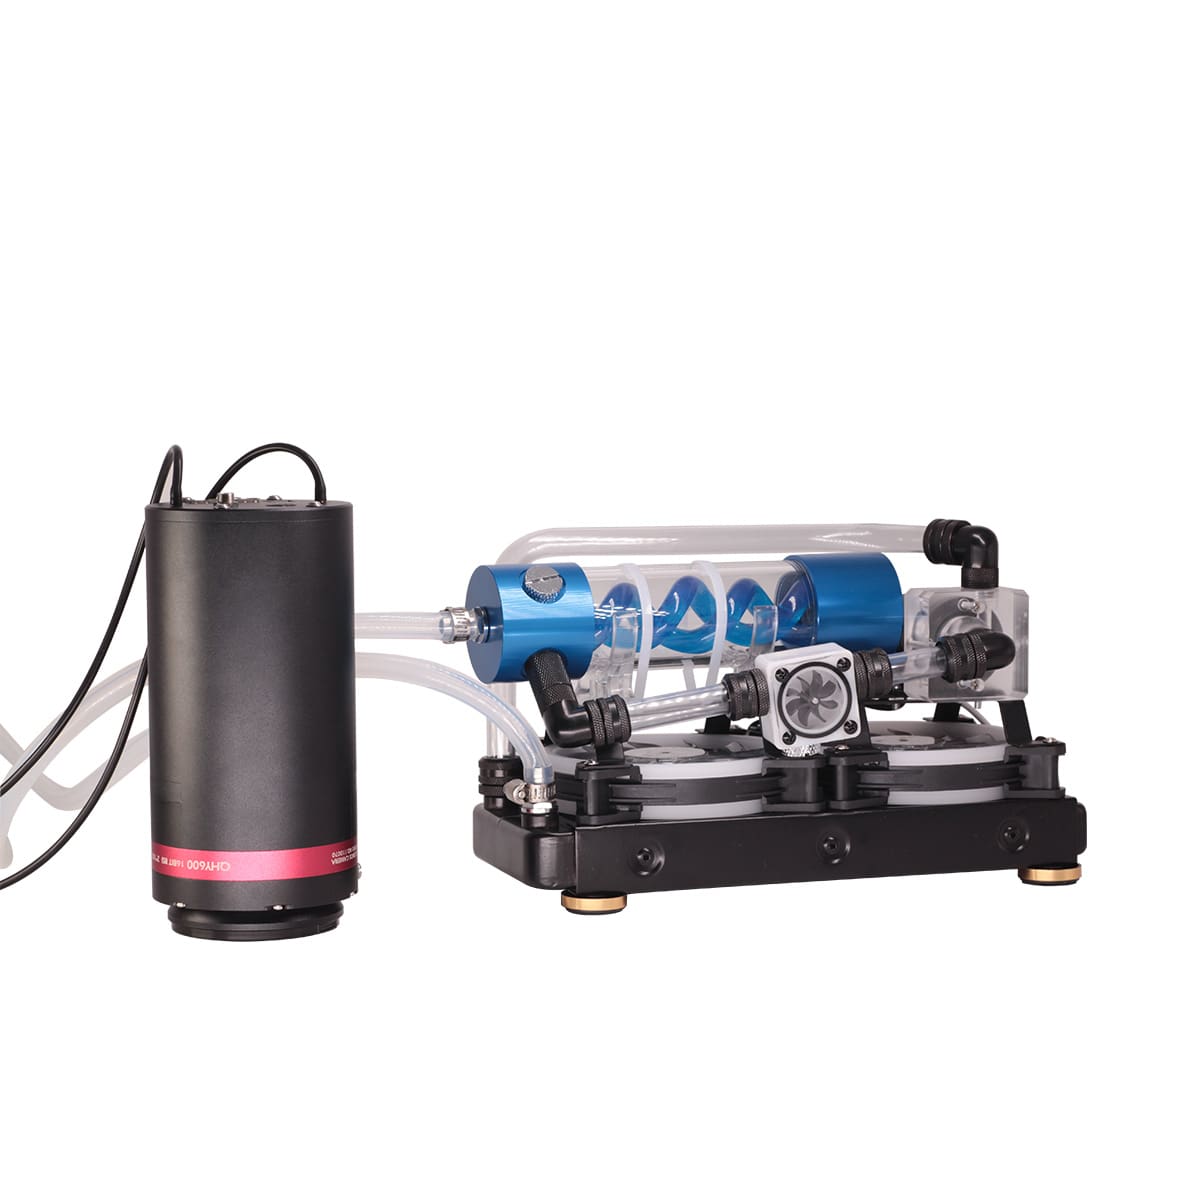
A model with “LQ” suffix supports Liqiud cooling. Since LQ models need customization, please contact the QHYCCD sales department. Compared to air cooling, liquid cooling offers the following advantages:
More efficient cooling. When using ambient temperature pure water for water cooling, the maximum cooling temperature is about 10 degrees Celsius lower than that of air cooling. QHYCCD is improving its support for ultra-low temperature liquid cooling.
No vibration. No matter how high-quality the fan is, it is inevitable to generate some image jitter. The water-cooling version does not have moving mechanical parts that cause camera vibration, thus avoiding negative effects on the image.
No turbulent hot air. For certain cameras that need to be installed in front of the optical system, such as Schmidt-Cassegrain telescopes, the hot air generated by air cooling systems may cause slight interference with the optical path. Water cooling does not produce this kind of impact.
Advanced Functions
Multiple Readout Modes
Multiple Readout Modes are special for QHY 16-bit Cameras (QHY600/268/461/411). Different readout modes have different driver timing, etc., and result in different performance. See details at “Multiple Readout Modes and Curves” Part.
Random change thermal noise suppression function
You may find some types of thermal noise can change with time in some back-illuminated CMOS cameras. This thermal noises has the characteristic of the fixed position of typical thermal noise, but the value is not related to the exposure time. Instead, each frame appears to have its own characteristics. The QHY600/268/461/411 use an innovative suppression technology that can significantly reduce the apparent level of such noise.
UVLO Protection
UVLO(Under Voltage Locking) is to protect the electronic device from damage caused by abnormally low voltages.
Our daily life experience tells us that the actual operational voltage of an electrical device must not significantly exceed the rated voltage, otherwise it will be damaged. For such precision equipment as cameras, long-term work at too low input voltage can also be detrimental to the working life of the camera, and may even make some devices, such as power manager, burn up due to long-term overload. In the all-in-one driver and SDK after 2021.10.23 stable version, the camera will give a warning when the input voltage of the camera is below 11V.
Optimizing USB Traffic to Minimize Horizontal Banding
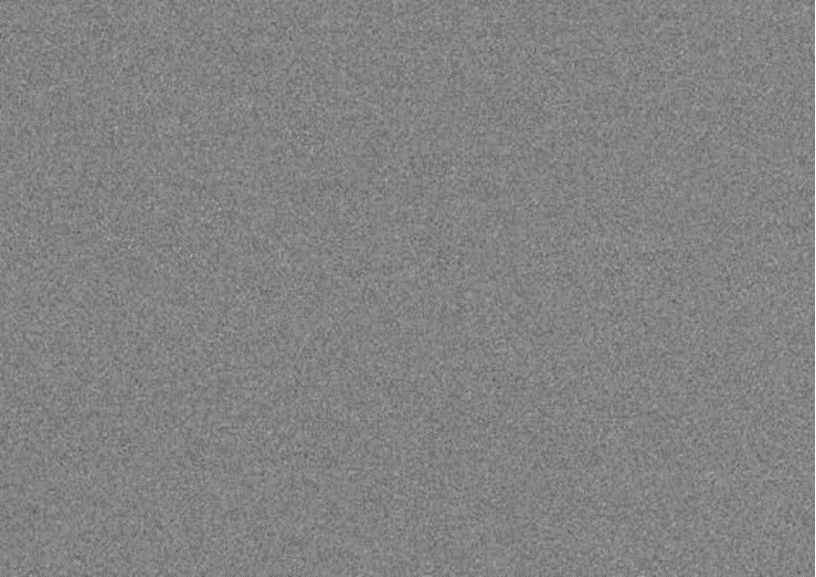
It is common behavior for a CMOS sensor to contain some horizontal banding. Normally, random horizontal banding can be removed with multiple frame stacking so it does not affect the final image. However, periodic horizontal banding is not removed with stacking so it may appear in the final image. By adjust the USB traffic in Single Frame mode or Live Frame mode, you can adjust the frequency of the CMOS sensor driver and it can optimize the horizontal banding appeared on the image. This optimized is very effective to remove the periodic banding in some conditions.
A typical Periodic Horizontal Noise under certain USB_TRAFFIC values.
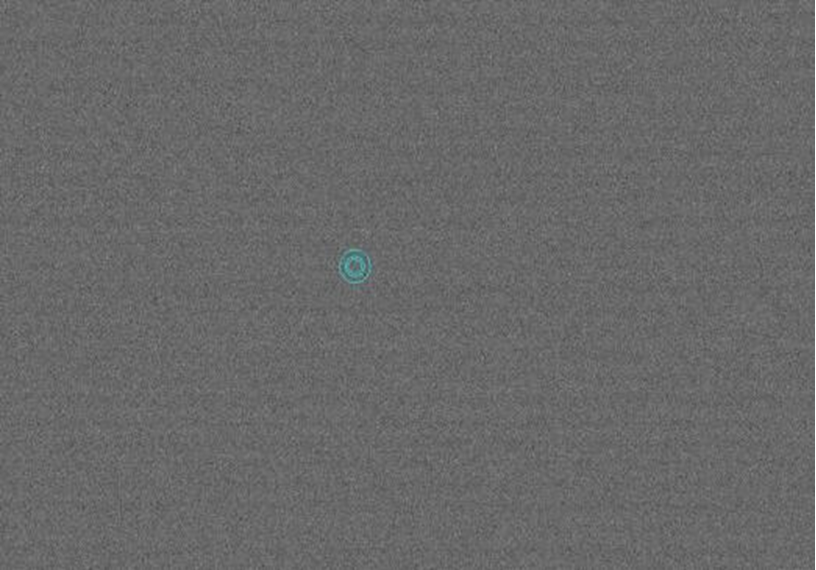
After Adjusting the USB Traffic to avoid the periodic horizontal noise.
Reboot the camera by power off and on
The camera is designed to use the +12V to reboot the camera without disconnecting and reconnecting the USB interface. This means that you can reboot the camera simply by shutting down the +12V and then powering it back on. This feature is very handy for remote controlling the camera in an observatory. You can use a remotely controlled power supply to reboot the camera. There is no need to consider how to reconnect the USB in the case of remote control.
User Images
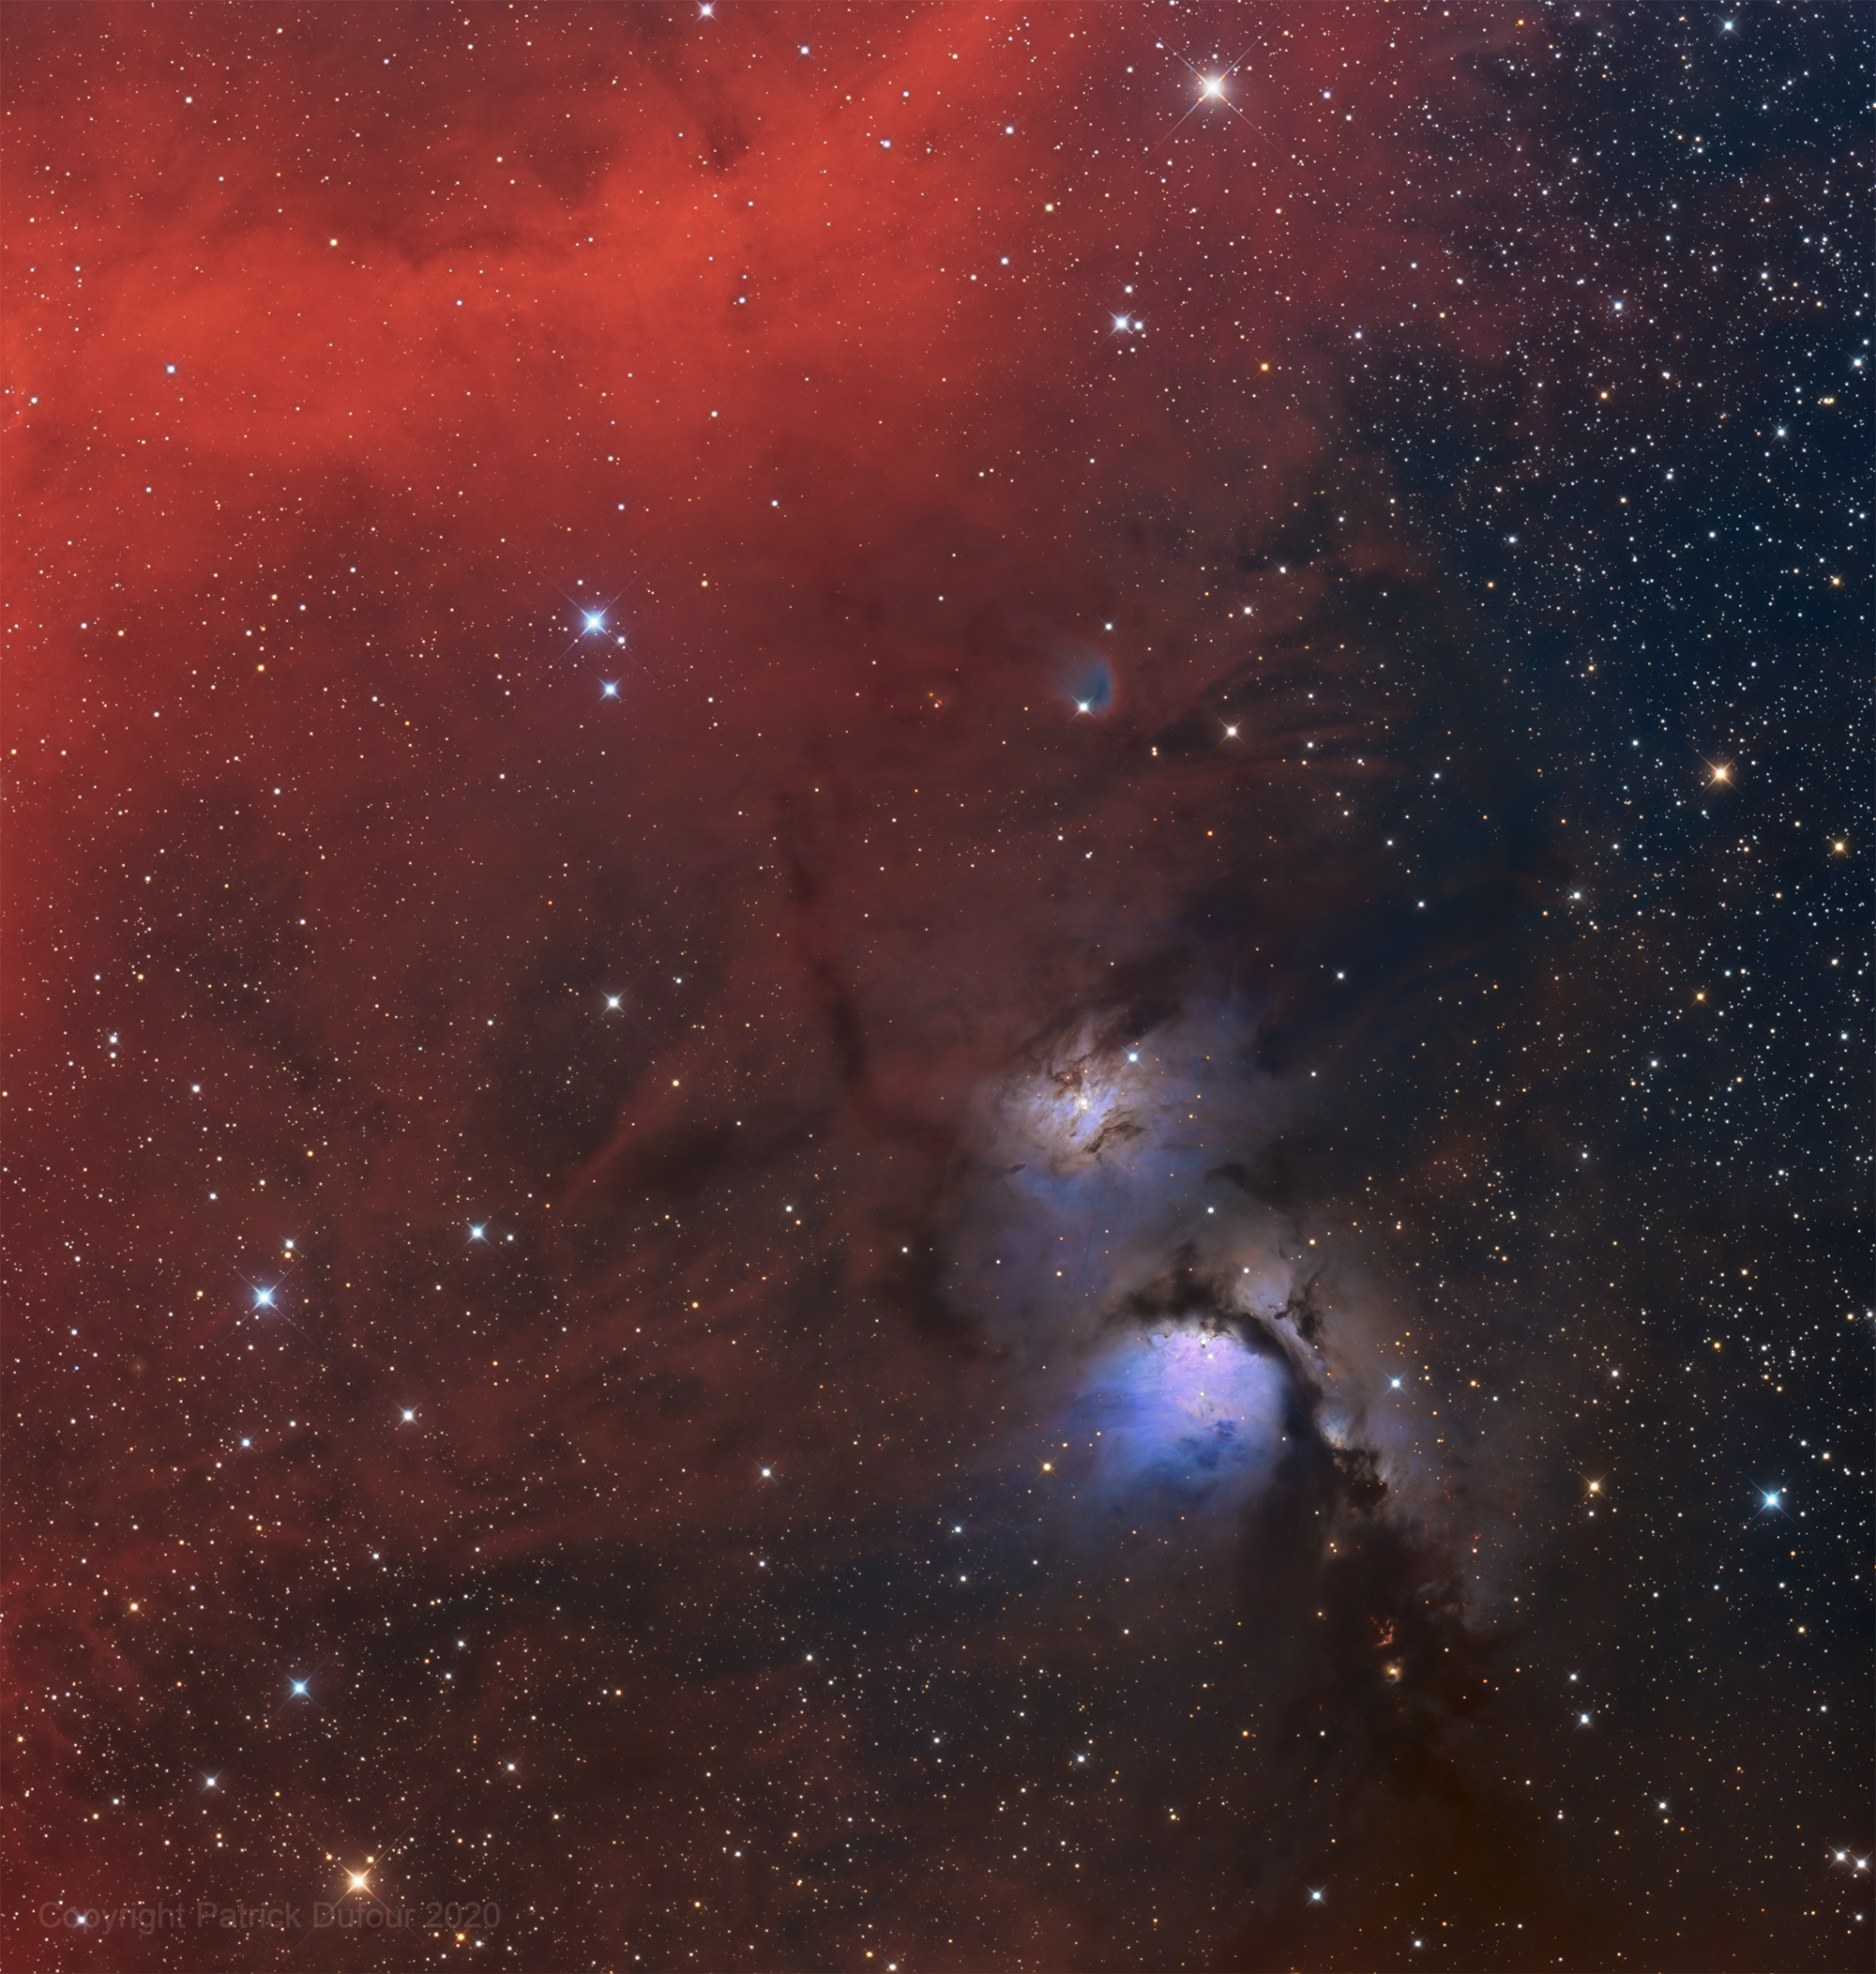
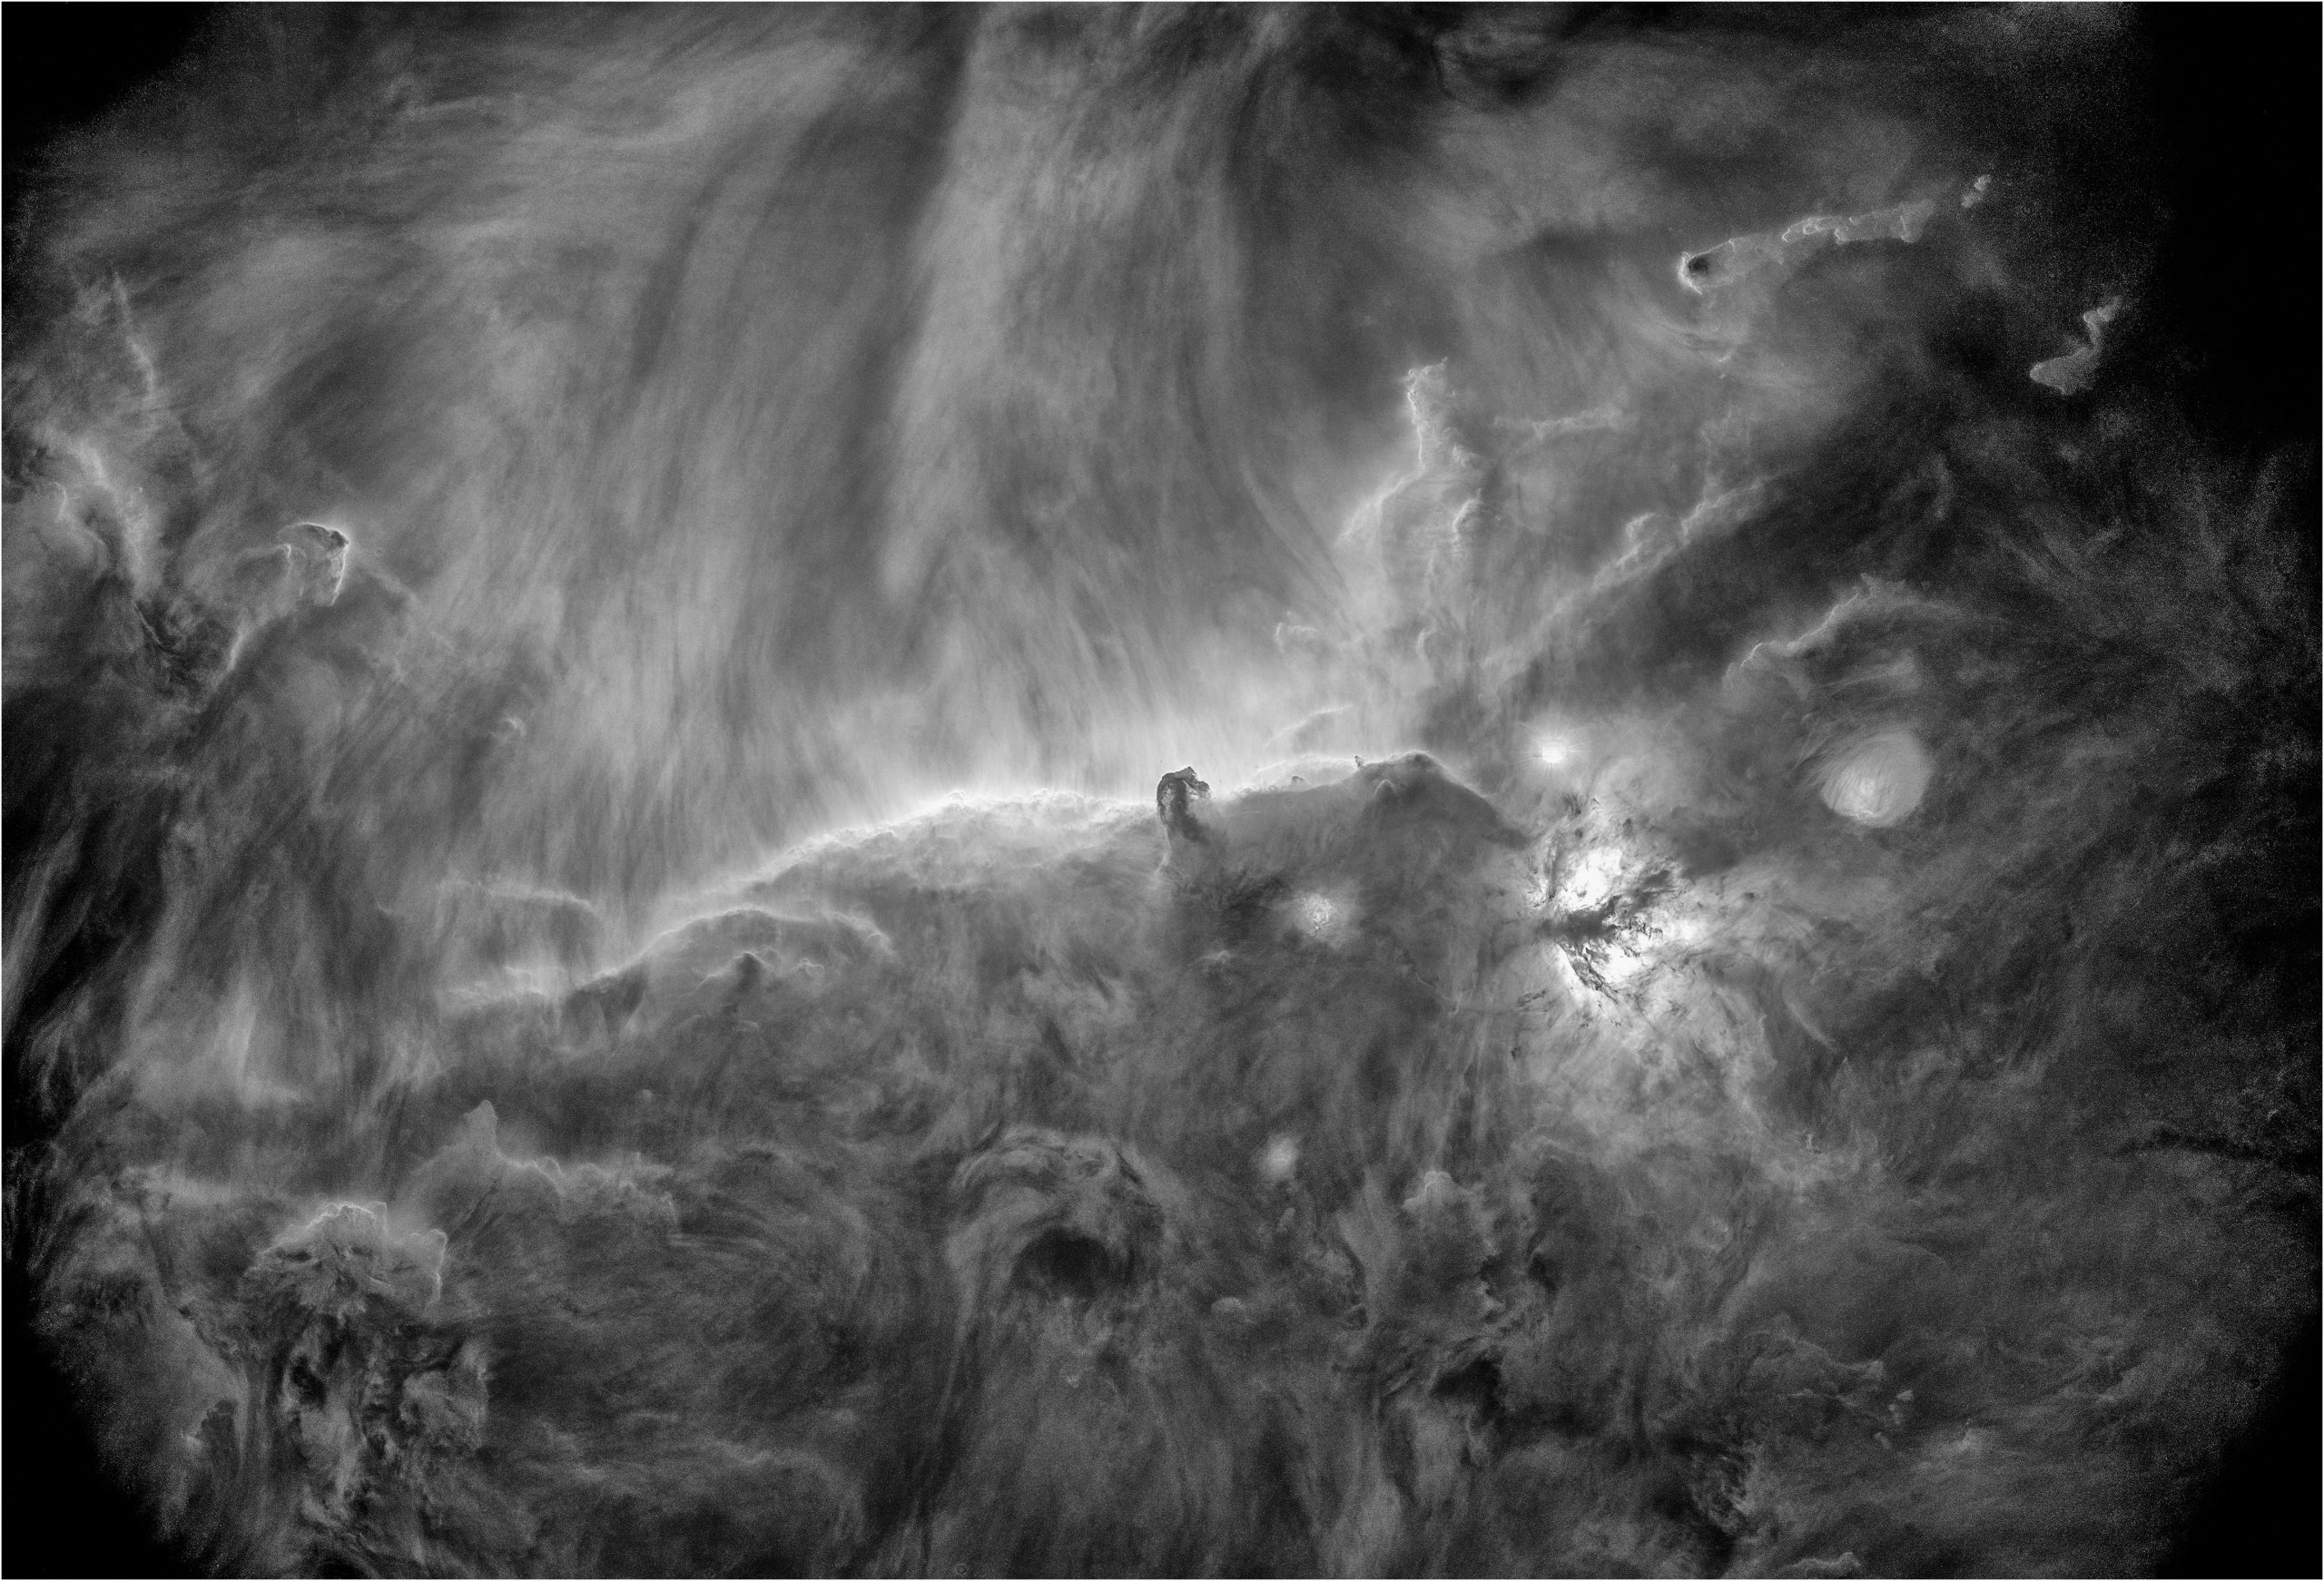
Specifications
| Model | QHY600PH (Photographic Ver.) QHY600PH SBFL (Short Back Focal Length Ver.) |
| CMOS Sensor | SONY IMX455 |
| Mono/Color | Both Available |
| FSI/BSI | BSI |
| Pixel Size | 3.76um x 3.76um |
| Effective Pixel Area | 9576*6388(9600*6422 with overscan and optically black area) |
| Effective Pixels | 61.17Megapixels |
| Sensor Size | Full Frame (36mm x 24mm) |
| A/D Sample Depth | Native 16-bit (0-65535 greyscale) A/D |
| Full Well Capacity (1×1, 2×2, 3×3) | Standard Mode >51ke- / >204ke- / >408ke- Super Full Well Mode >80ke- / >320ke- / >720ke- |
| Frame Rate | Full Resolution: 4.0FPS (8-bit output) ; 2.5FPS (16-bit output) ROI: 7.2FPS@9600×3194, 22.5FPS@9600×1080, 28FPS@9600×768, 47FPS@9600×480, 160FPS@9600×100 |
| Readout Noise | 1.0e- to 3.7e- (Standard Mode) |
| Dark Current | 0.0022e-/p/s @ -20℃ 0.0046e-/p/s @ -10℃ |
| Exposure Time Range | 40us – 3600sec |
| Unity Gain* | 25 (PH Mode, or Extended Full Well Mode) 56 (High Gain Mode) *Learn more at the introduction of “Readout Modes”. |
| Amp Control | Zero Amplifer Glow |
| Firmware/FPGA remote Upgrade | Support via Camera USB port |
| Shutter Type | Electric Rolling Shutter |
| Computer Interface | USB3.0 |
| Built-in Image Buffer | 2GB DDR3 Memory |
| Cooling System | Dual Stage TEC cooler: – Long exposures (> 1 second) typically -35℃ below ambient – Short exposure (< 1second) high FPS, typically -30℃ below ambient(Test temperature +20℃) |
| Optic Window Type | AR+AR High Quality Multi-Layer Anti-Reflection Coating |
| Anti-Dew Heater | Yes |
| Telescope Interface | Support M54 or M48 (Combined with adapters ) |
| Back Focal Length | QHY600PH: 17.5mm+6mm (CAA) QHY600SBFL: 14.5mm(±0.2) *Learm more: https://www.qhyccd.com/adapters/ |
| Weigth | About 850g |
Linearity Test
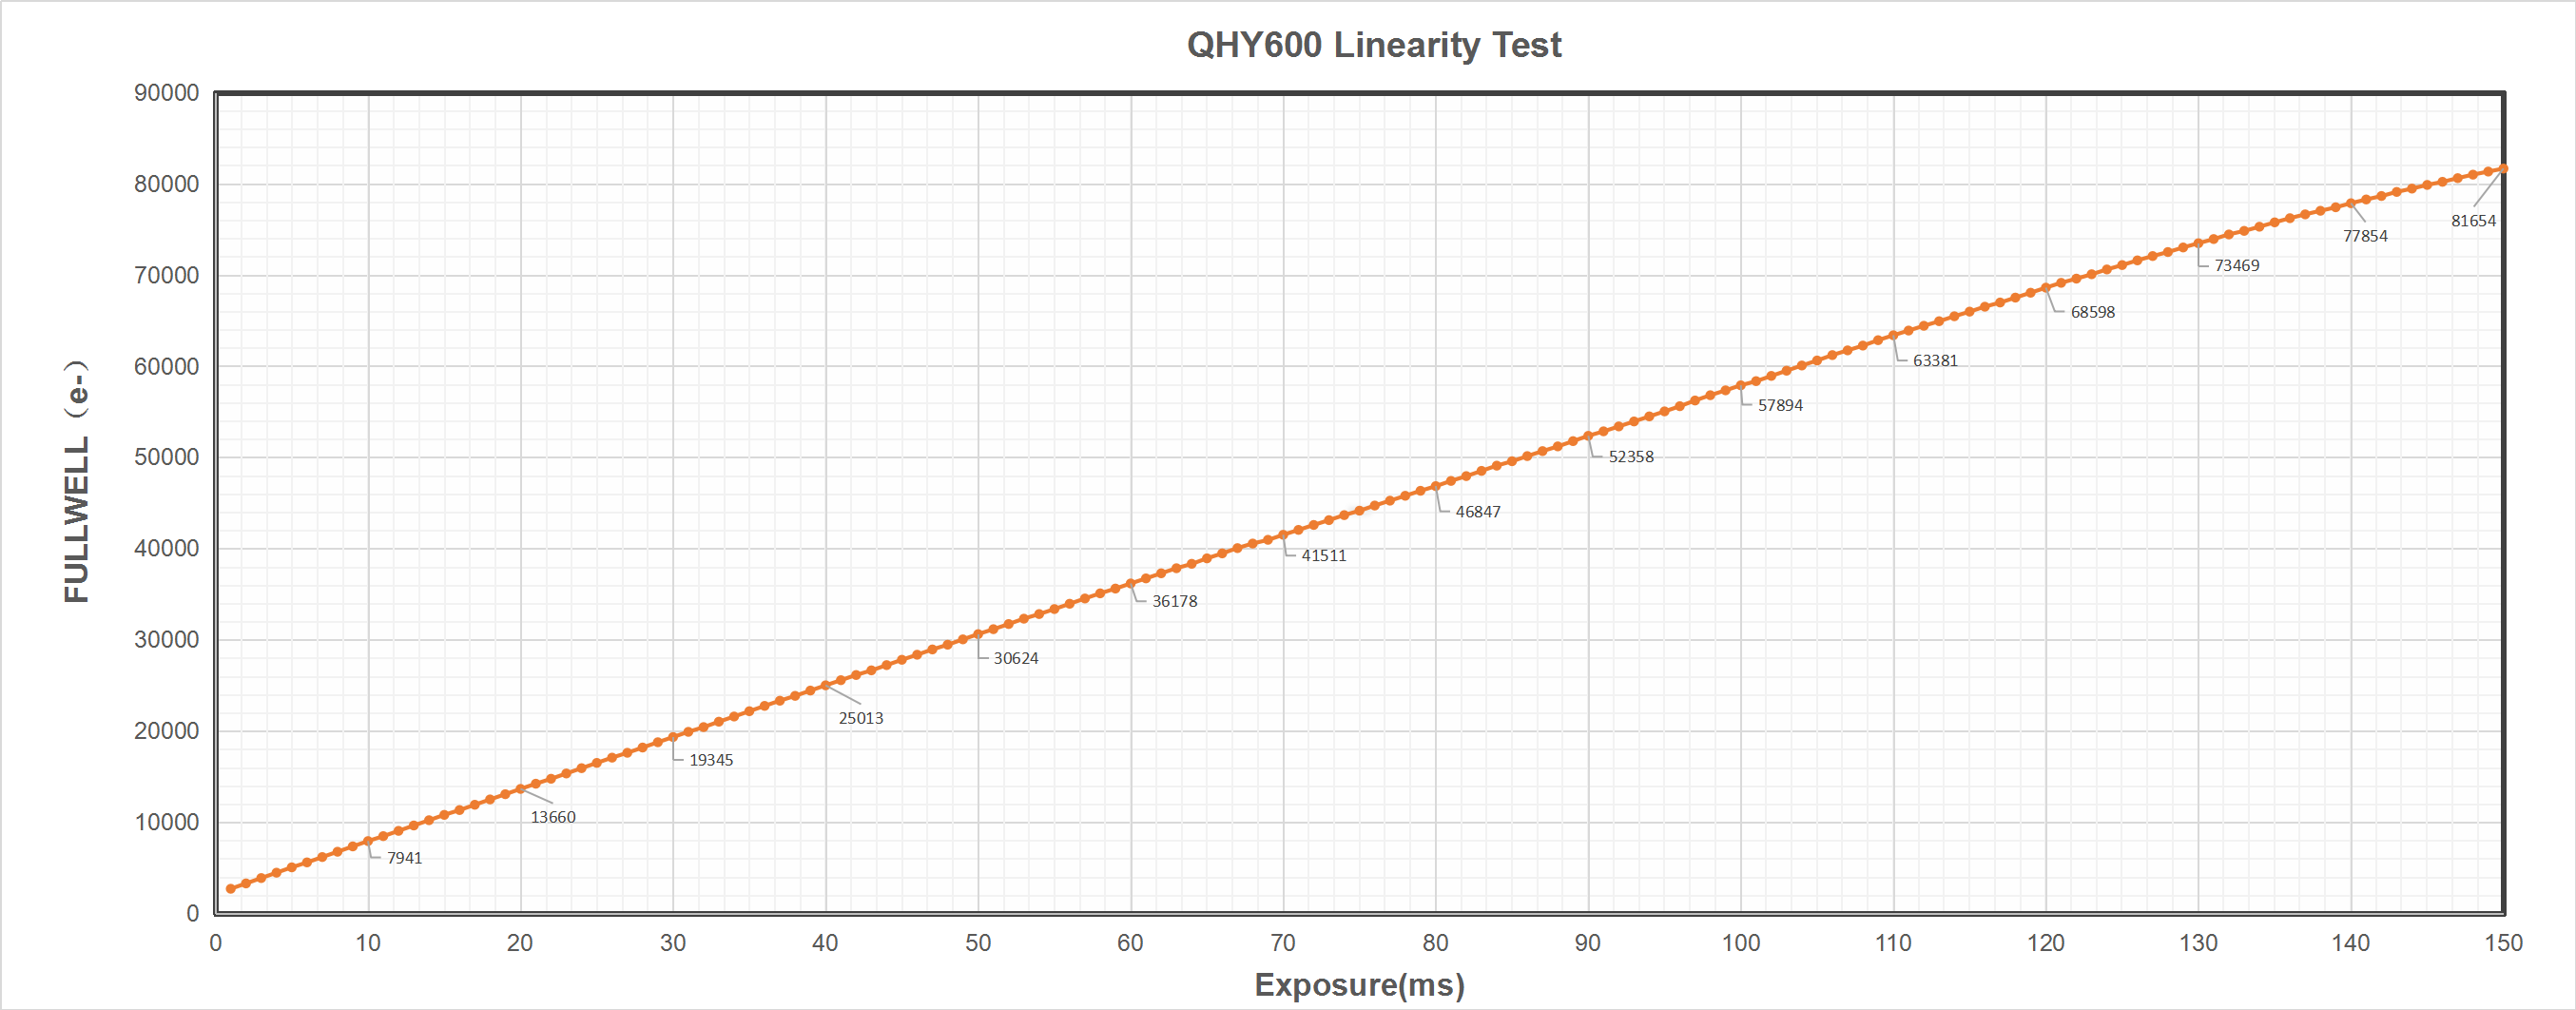
We did a test for the QHY600 under the ultra high fullwell mode. The results is quite good to show a good linearity response range up to 73ke-. The results can be found here:
QHY600 linear test results show good linearity up to 73000e-. This is in readout modes # 0 and # 2. Gain = 0. In the linear fit graph we deleted the data above 73000e- and got R ^ 2 = 0.9998.
At very short exposure times below 20ms the value is quite small and may be flicker induced by the tablet.
Mechanical Dimensions
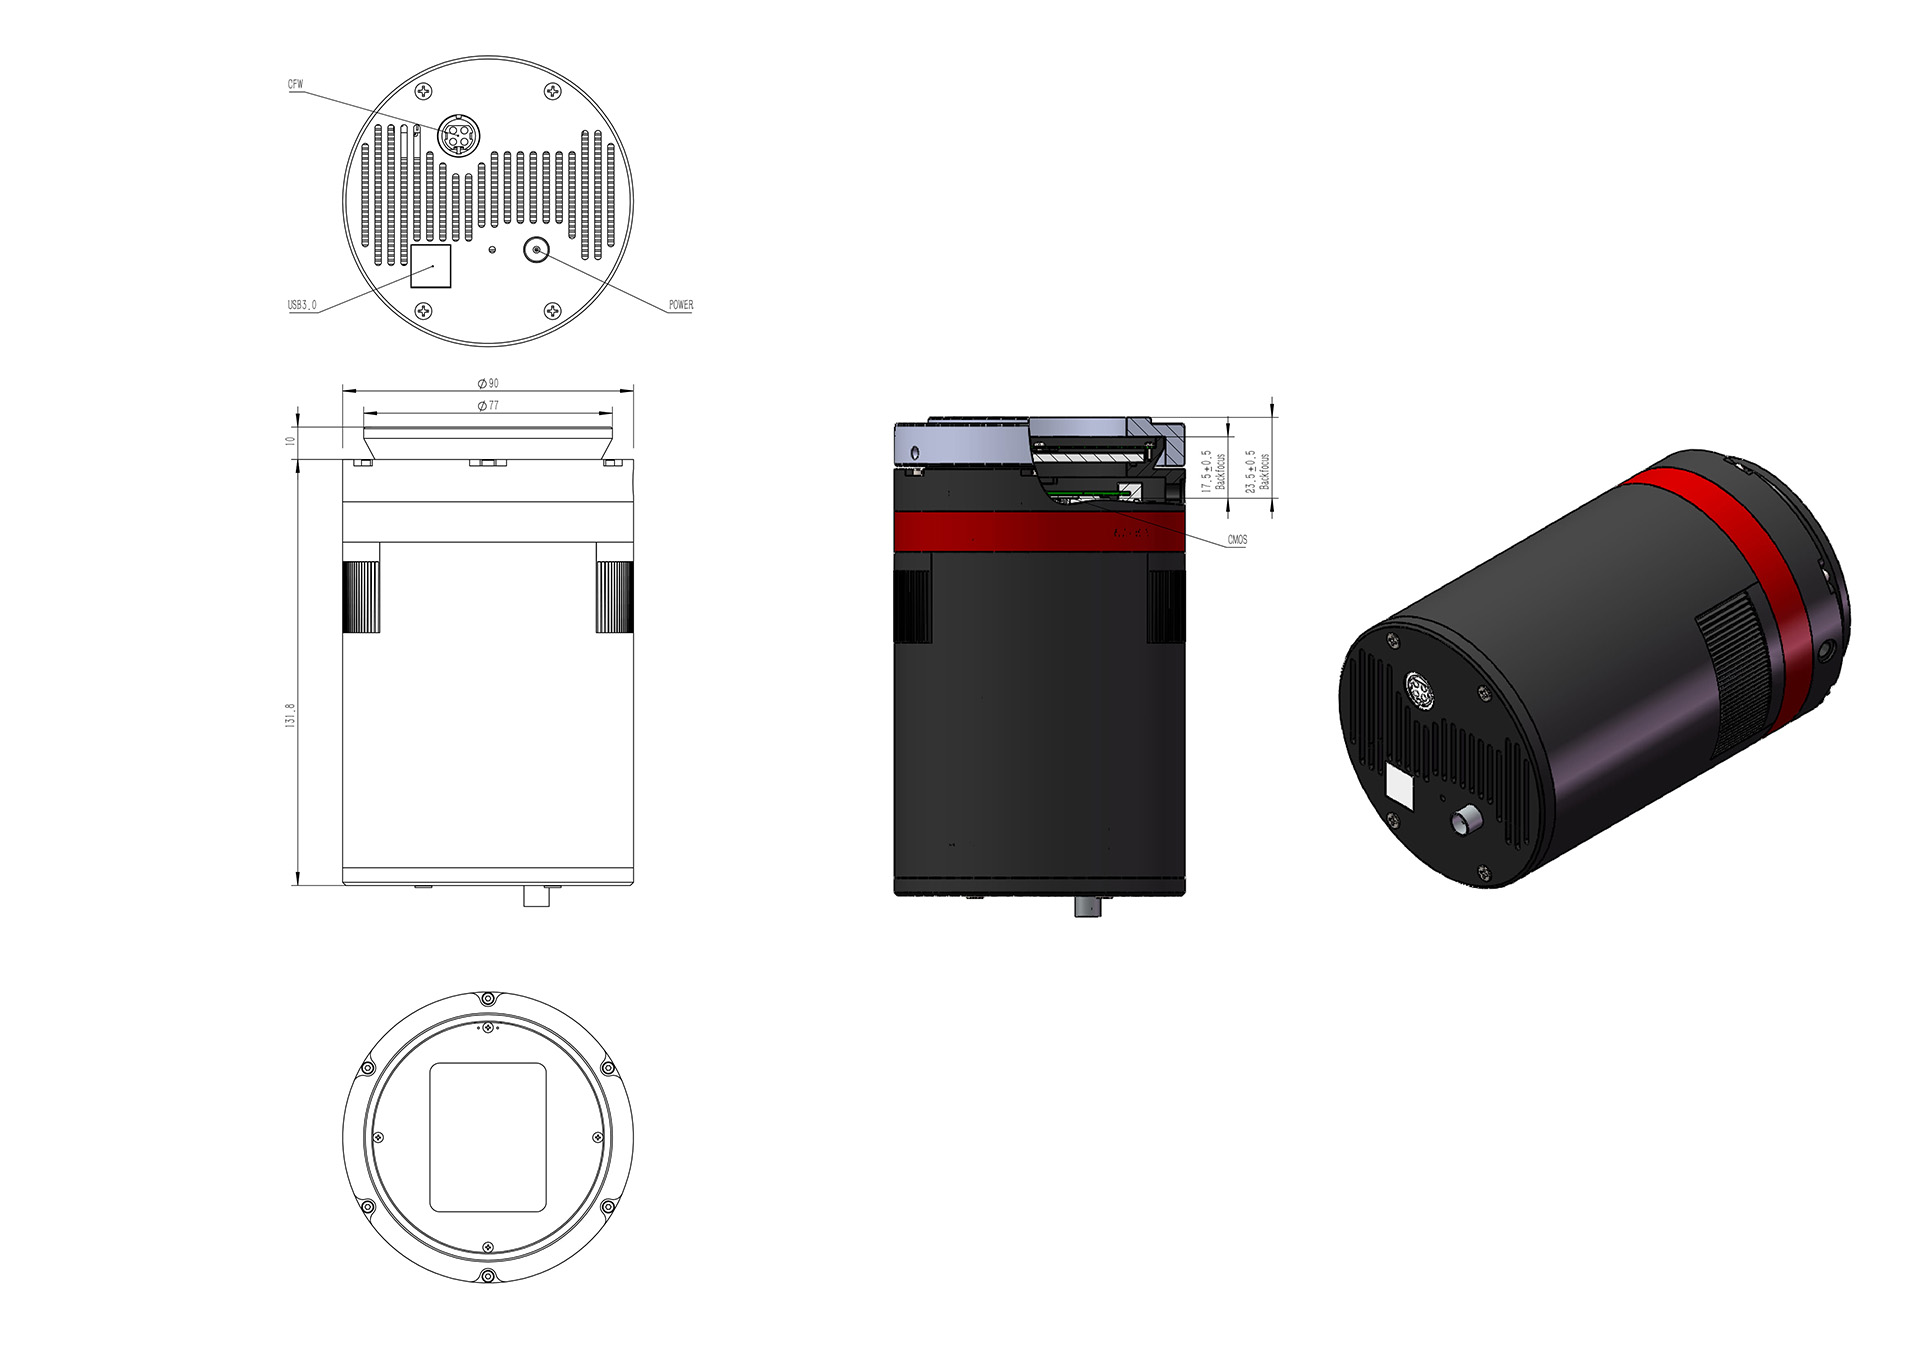
QHY600 PH
QHY600PH-SBFL
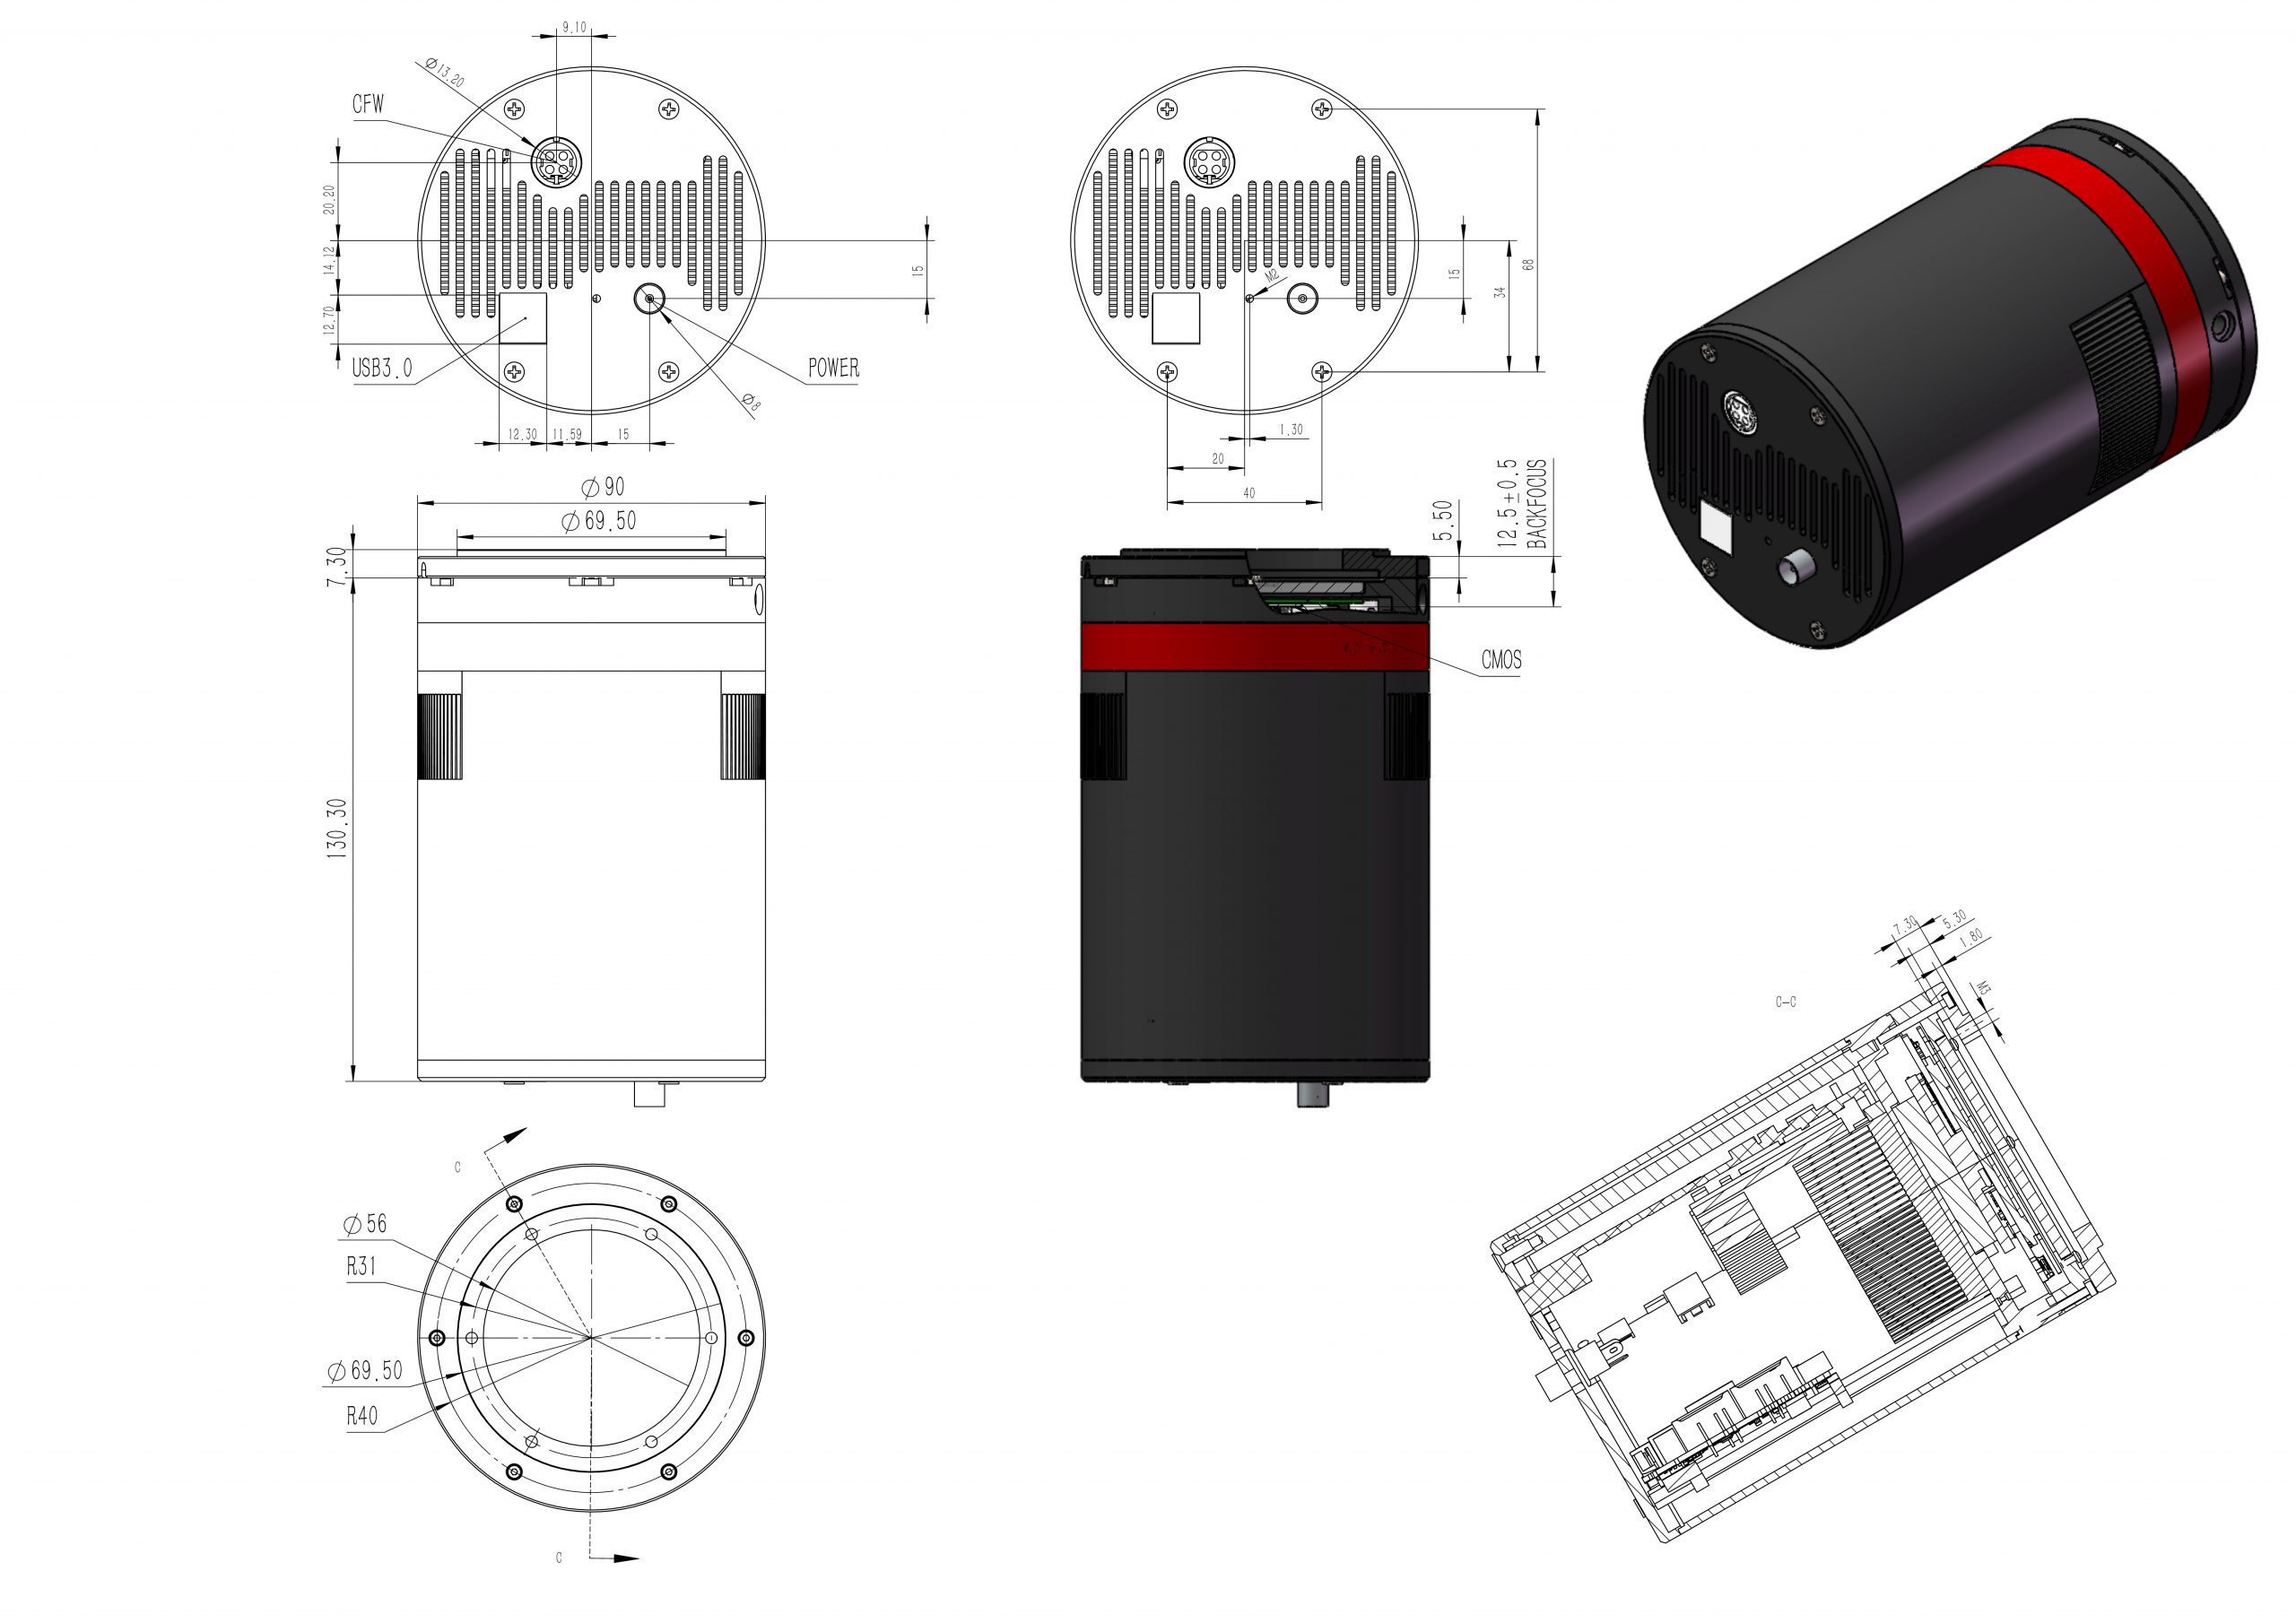
Image Area Layout
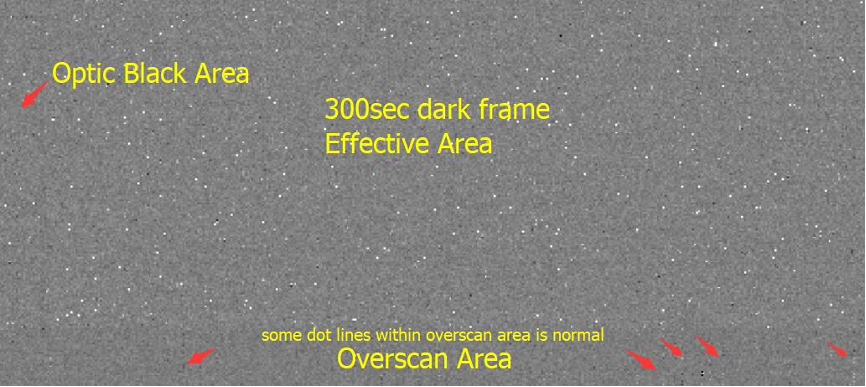
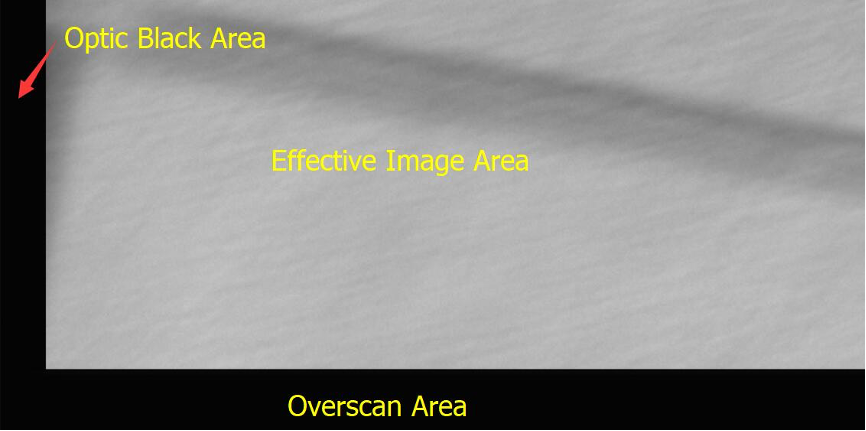
The QHY600 can output the whole active area of the sensor, including the optically black pixels and the overscan area. The total image size including the optically black area area is 9600 x 6422 pixels. The optically black area is on the left of the image and the overscan area is on bottom of the image.
The difference of optically black area and overscan area is that the optically black area includes the dark current during a long exposure while the overscan area does not include the dark current during an exposure. Neither the optically black area nor the overscan area respond to light, so they are regarded as the “non-effective” area of the sensor.
In the bottom of the overscan area you may find some vertical series of dots in single frame that can become vertical lines after stacking. One of the reasons for this is that the FPN calibration results represented in the overscan area can’t be found in the effective image area.
The following picture is the left bottom corner of a 300 second dark image. You can see these dots in the overscan area. The optically black level area and overscan area are usually used for precise calibration of an image and for calibration of an image without using a bias frame or dark frame, or for some scientific applications. Because the optically black and overscan areas are not part of the effective image area, QHYCCD does not guarantee the signal quality in these areas. If you do not use these areas, you can select the option “Ignore overscan area” in the ASCOM driver or select a ROI of effective area in SharpCAP.
Multiple Readout Modes and Curves
Readout Mode #0 (Photographic Mode)
Readout Mode #1 (High Gain Mode)
Readout Mode #2 (Super Fullwell Mode)
Readout Mode #3 (Extend Fullwell Mode-2CMS)
Readout Mode #4 (Photographic Mode-2CMS)
Readout Mode #5 (High Gain Mode-2CMS)
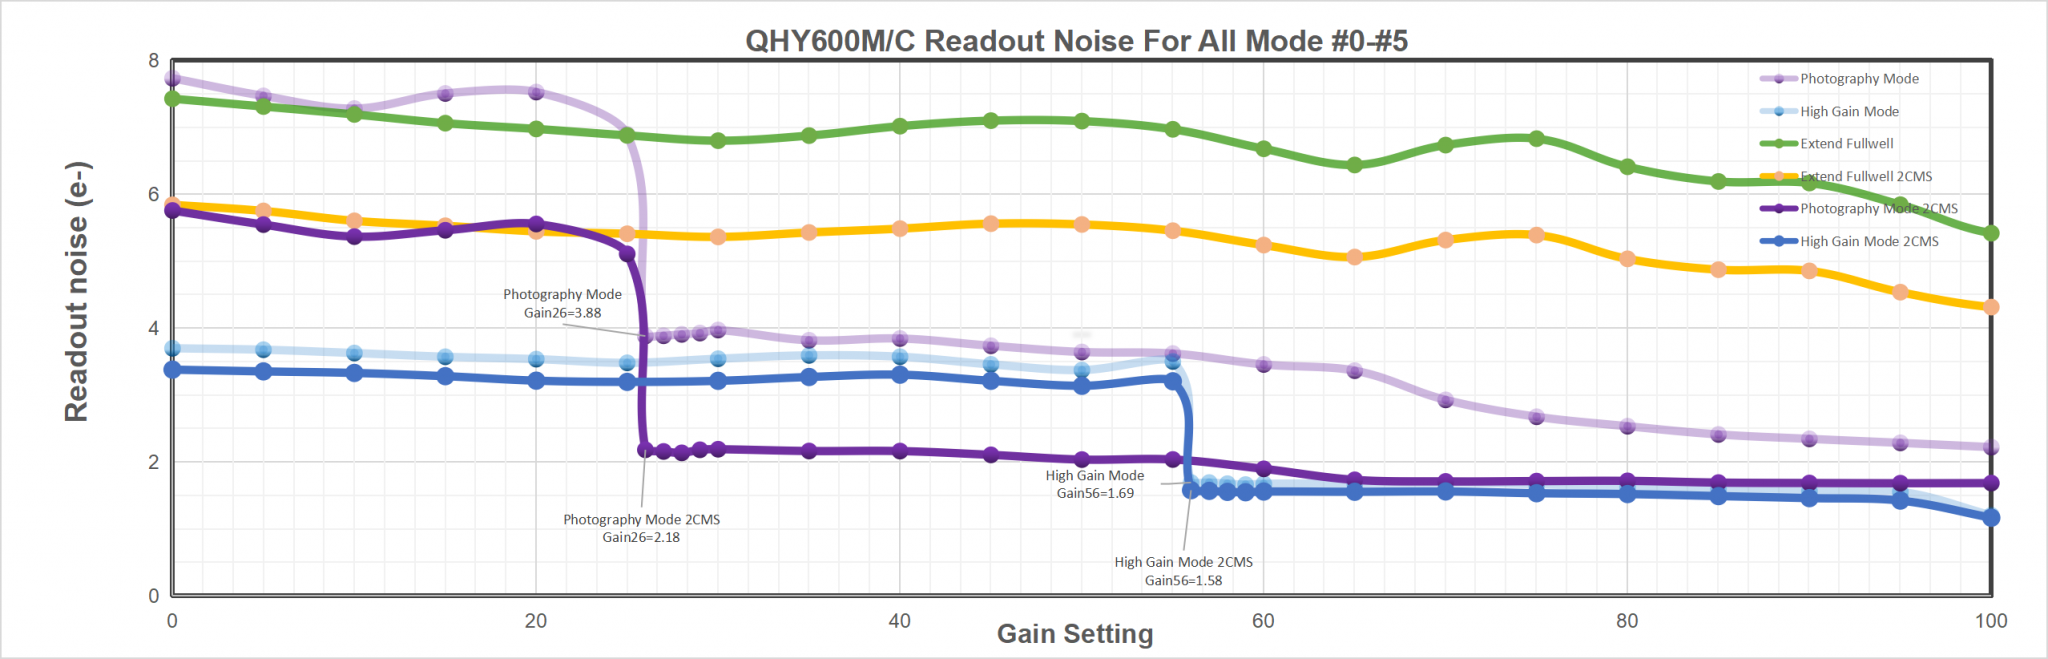
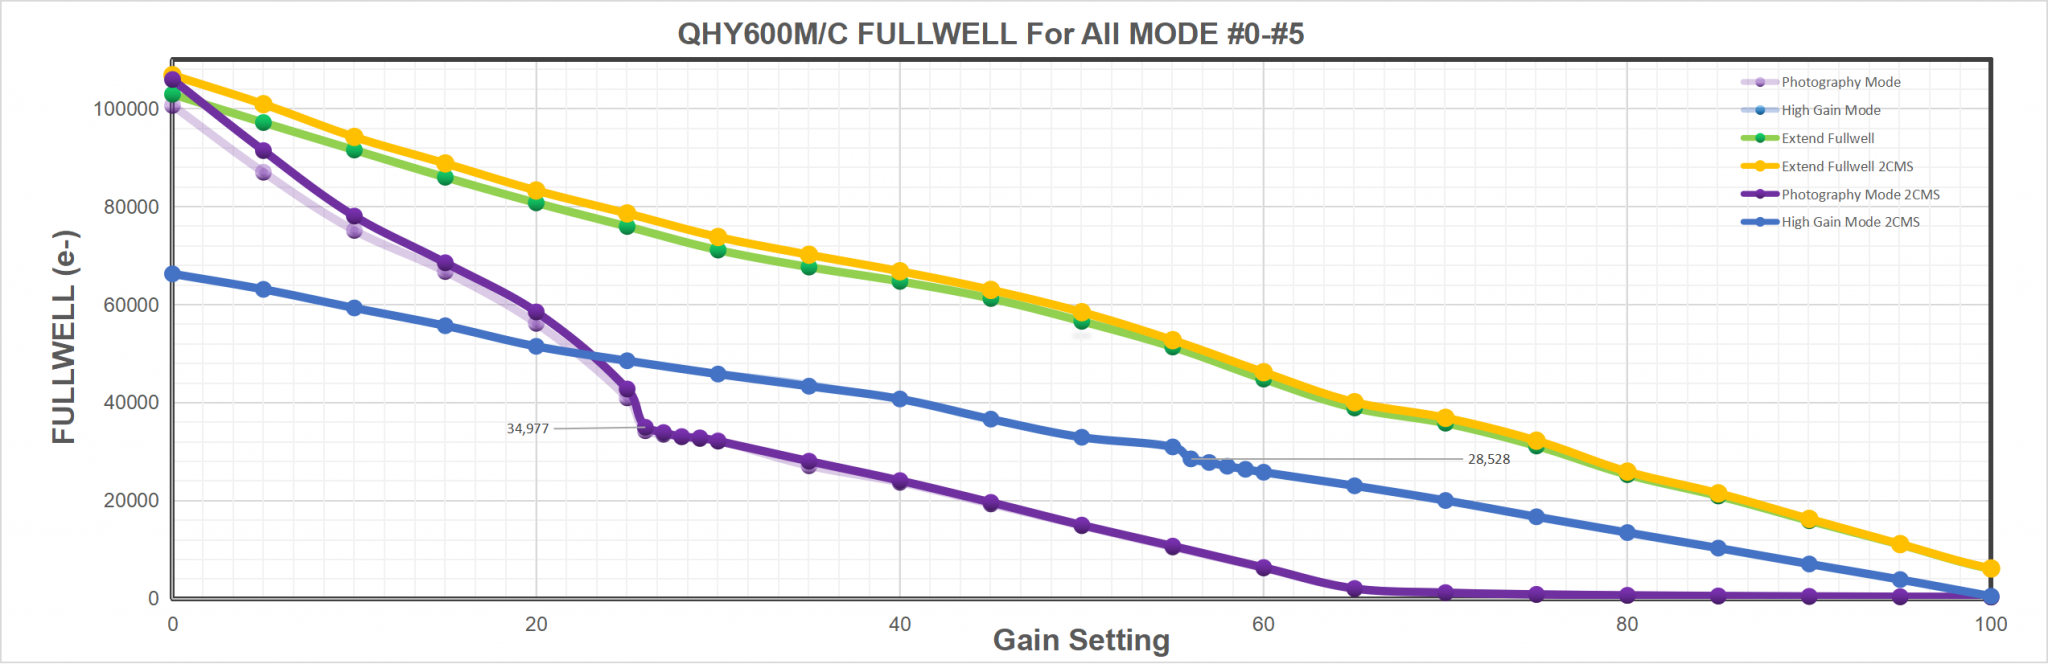
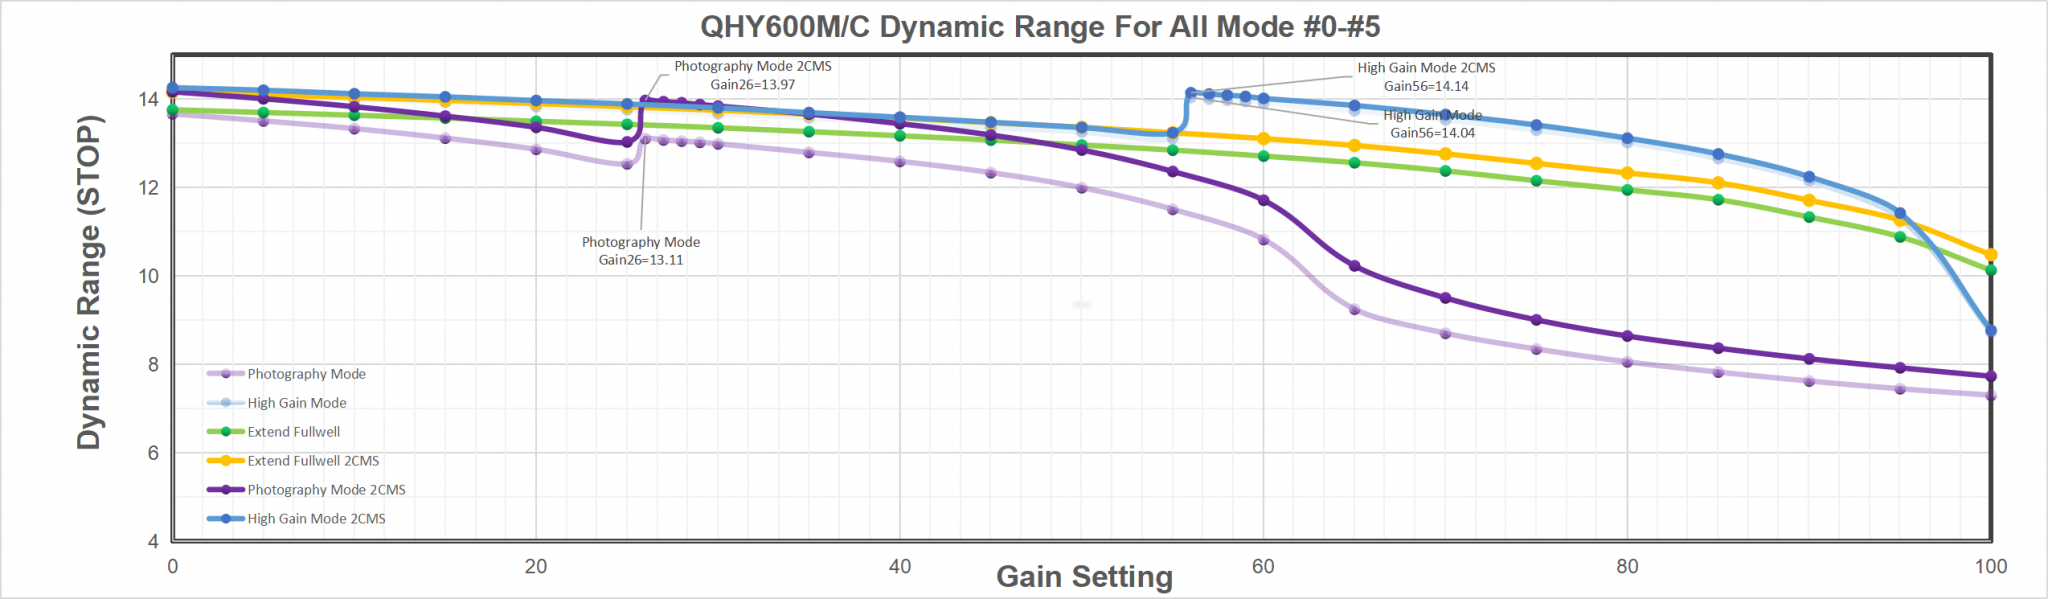
The curve shows absolute QE
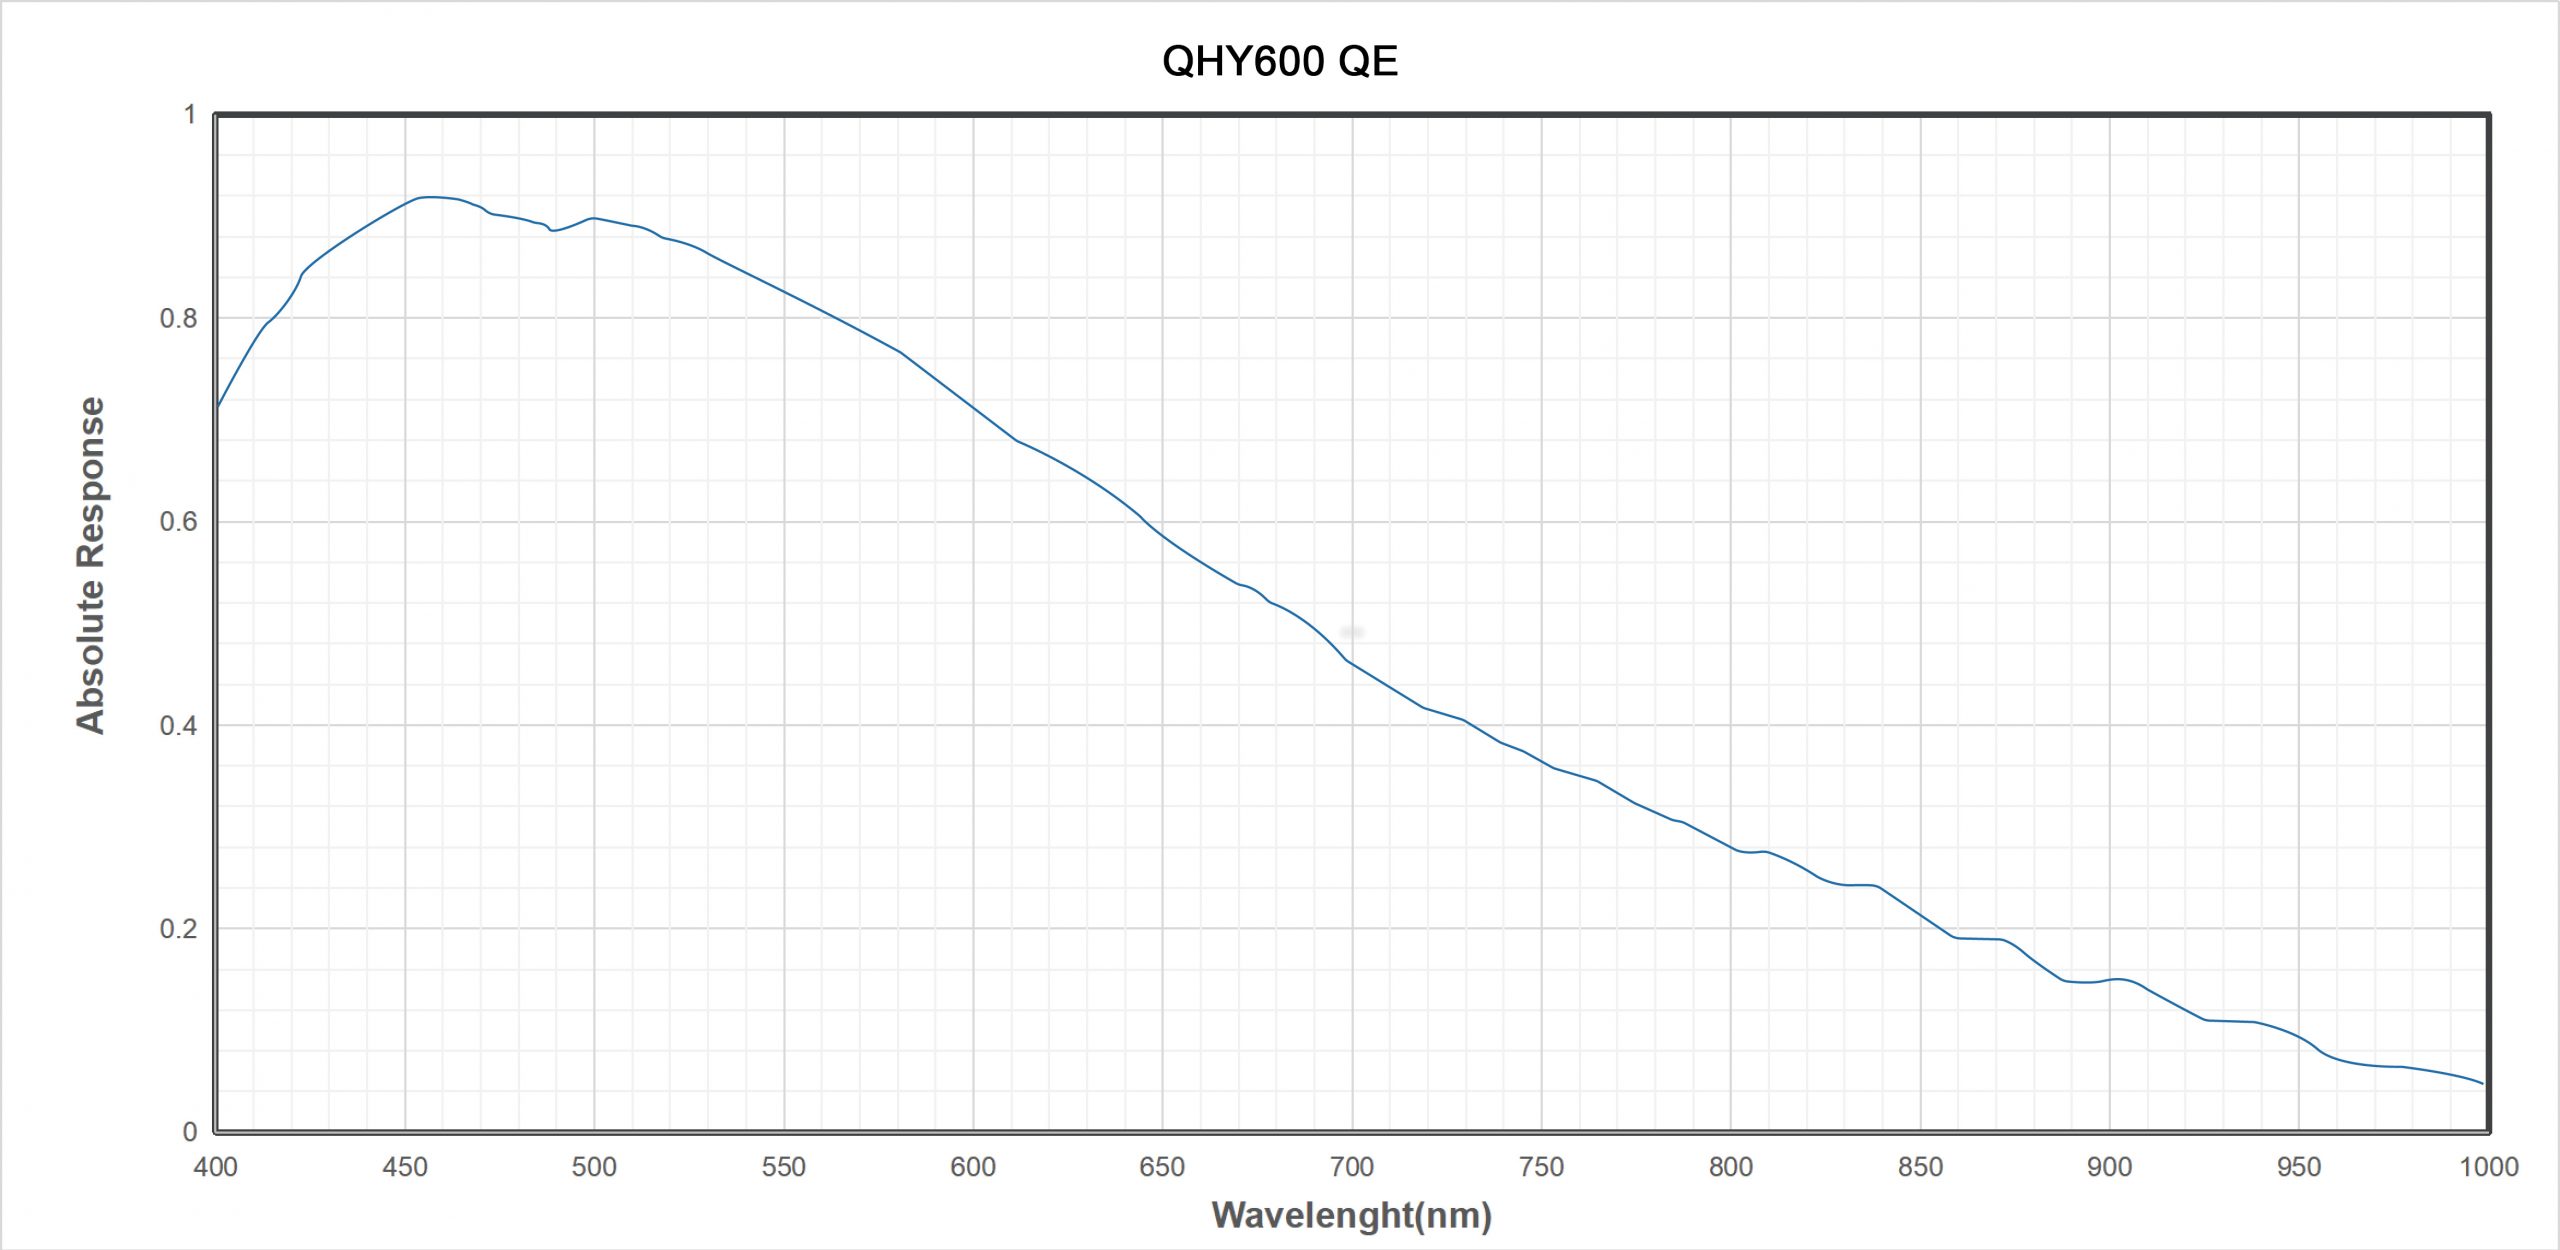
Multiple Readout Modes are special for QHY 16-bit Cameras (QHY600/268/461/411). Different readout modes result in different performance. These readout modes are currently supported in the ASCOM, SharpCap and N.I.N.A.
Photographic DSO Mode (Mode #0)
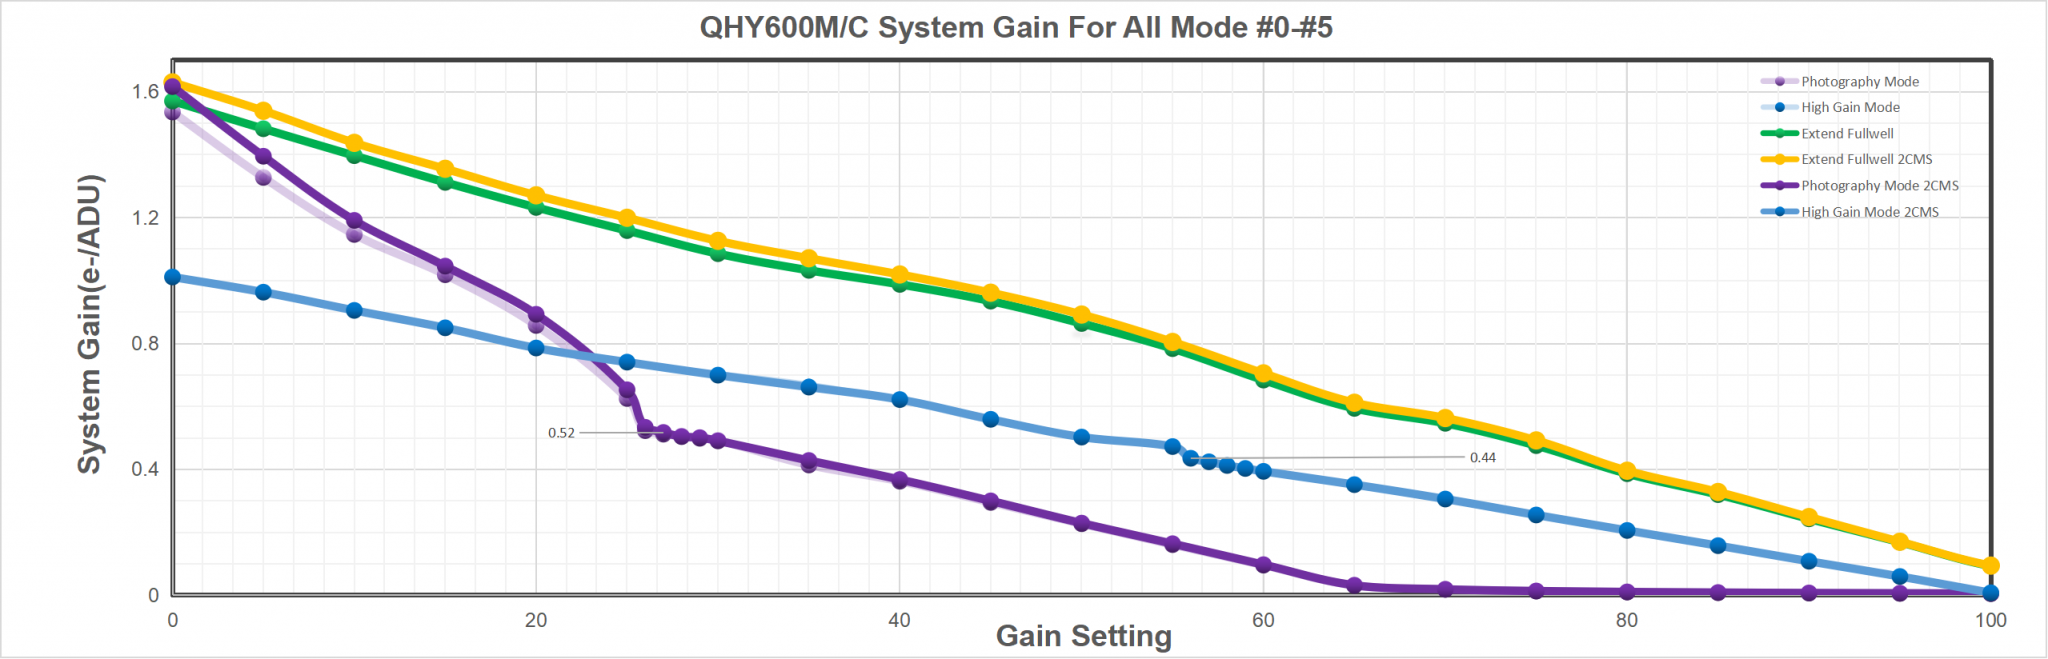
This mode is suitable for most DSO imaging situations. Since there is a drop in the noise between Gain 25 and Gain 26 (unity gain), we recommend it as default gain setting; however, gain0 is also good enough for a 16-bit sensor.
High Gain Mode (Mode #1)
This mode is something like double native iso of some new digital cameras, whose danamic range can greatly incerase at the vary high iso value, like iso800, iso3200, etc. The high gain mode provide such improvement for QHYCCD 16bit cameras. We recommend you choose this mode when you have to capture at high gain, for example, a vary dark object. Please note the switch point of HGC/LGC of QHY600/268/461 is 56. That means you must set Gain 56 to make the best of it.
Extended Fullwell Mode (Mode#2)
With a pixel size of 3.76um, these sensors already have an impressive full well capacity of 51ke. Nevertheless, QHYCCD has implemented a unique approach to achieve a full well capacity higher than 51ke- through innovative user controllable read mode settings. In Extended Fullwell Mode, the QHY600 can achieve an extremely large full-well charge value of nearly 80ke- and the QHY268 can achieve nearly 75ke-. Greater full-well capacity provides greater dynamic range and large variations in magnitude of brightness are less likely to saturate.
2CMS Modes
Extended Fullwell Mode-2CMS (Mode#3)
Photographic DSO Mode-2CMS (Mode#4)
High Gain Mode-2CMS (Mode#5)
Based on the three basic modes above, 2CMS mode can greatly reduce readout noise by secondary sampling while keeping the same full well value and system gain. We prefer 2CMS modes than basic modes in astrophotography. By the way, the recommend gain values are the same as their basic modes.
Accessories (What's in the box)
| Name | Amount |
| Camera | 1 |
| Locking Power Cable | 1 |
| USB3.0 Cable | 1 |
| 12V Power Adapter | 1 |
| AV Power Cable | 1 |
| Desiccaant Tube | 1 |
| M54 to 2” Nosepiece | 1 |
| Adapter Kit Instrustion | 1 |
| Drive Download Instruction | 1 |
| Adapter Kit | C1 (QHY600M-PH) D1 (QHY600C-PH) B1 (QHY600M-PH SBFL) |
Combos & Adapters
QHY600M-PH+CFW3L+(OAGM)
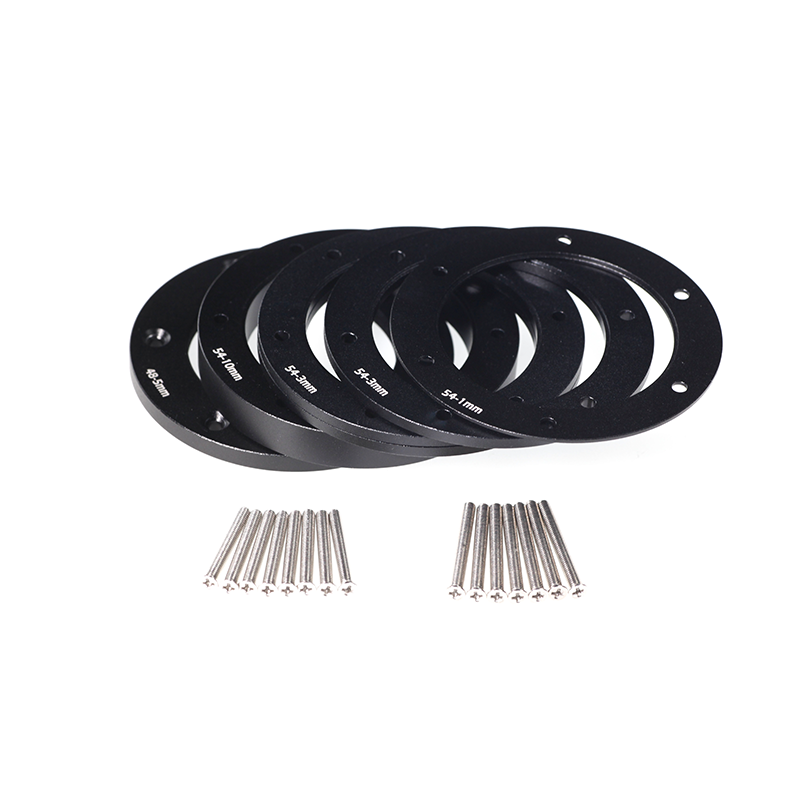
Since June 2023, we are adding a 5mm spacer with M54 threads into Adapter kit C1. This addition gives the user a choice of terminating the output in either M48 or M54 threads. Since C1 are standard accessories included with the camera, this addition has no affect on the price list.
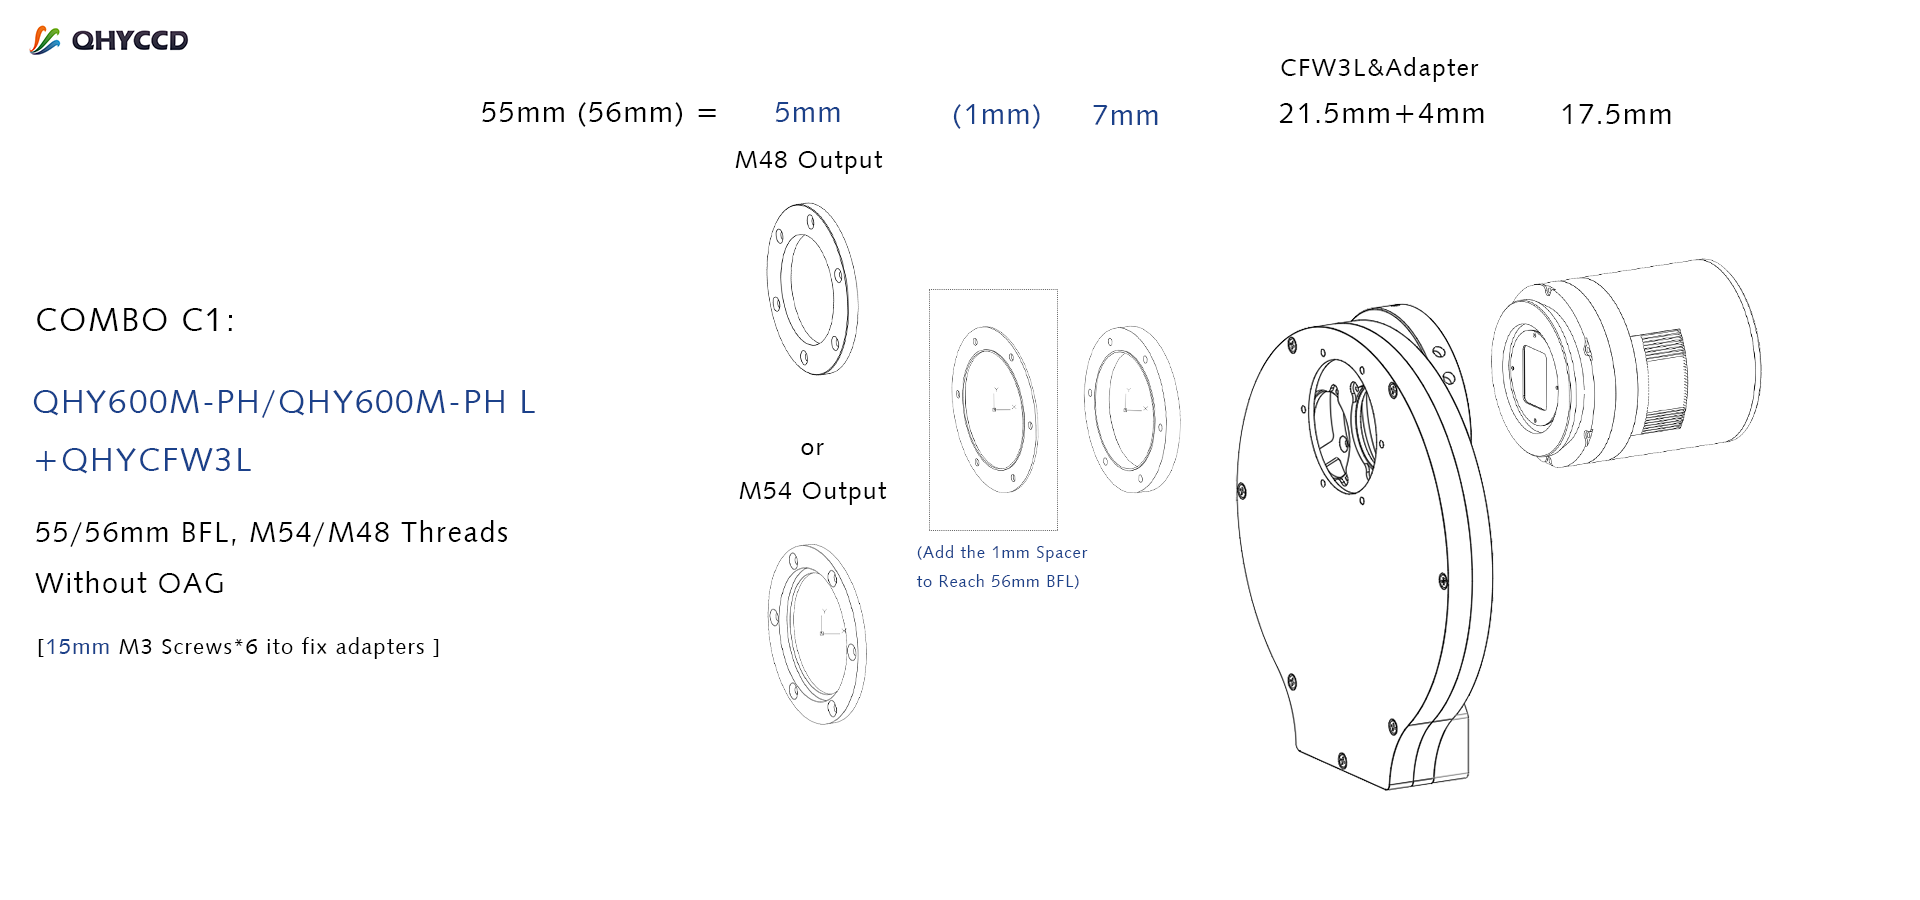
Note:
Combo C1 is the solution without OAG. The QHY600M-PH or QHY600M-L with CFW3L and OAG result in a backfocus greater than 55mm. Therefore, if you must limit this BF distance to 55mm due to a corrector lens or DSLR lens, we recommend the QHY600M-PH SBFL.
If you need more than 7 x 50mm filter positions for the QHY600, you can use the CFW3XL filter wheel with 9 x 50mm filter carousel.
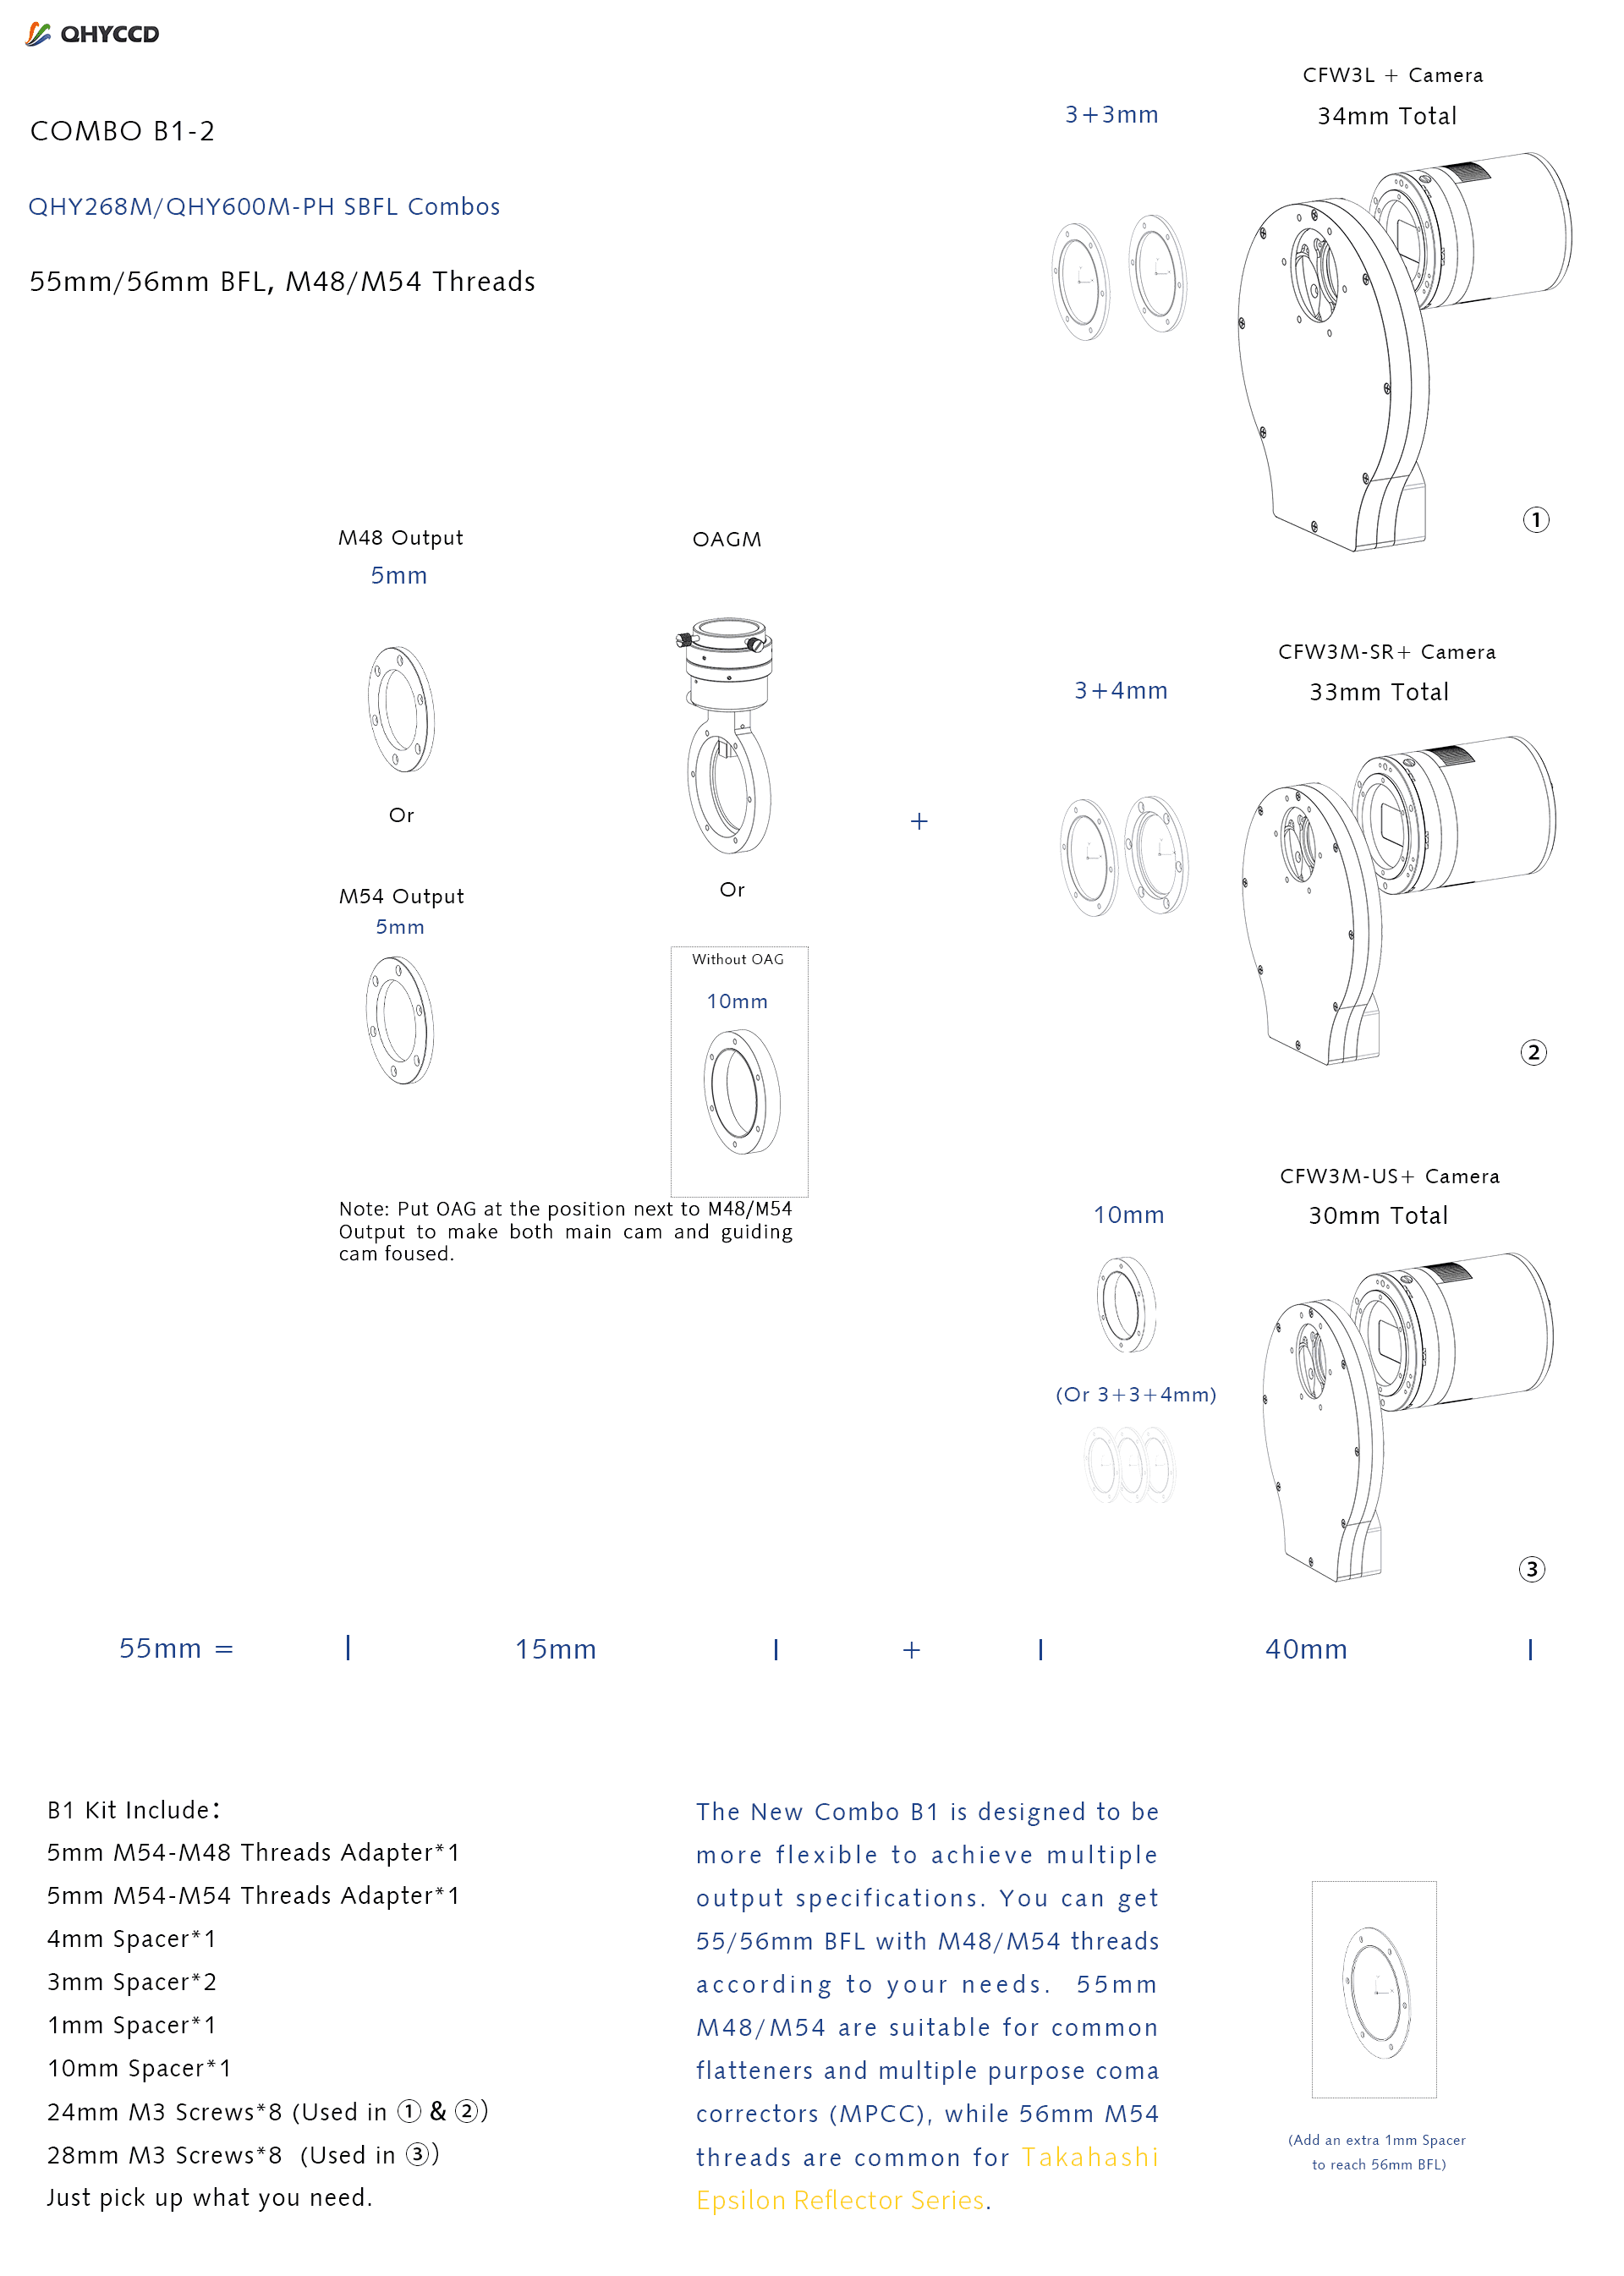
QHY600M-PH SBFL+CFW3L+(OAGM)
The New Combo B1 is designed to be more flexible to achieve multiple output specifications. Since June 2023, we are adding a 5mm spacer with M54 threads into Adapter kit B1. This addition gives the user a choice of terminating the output in either M48 or M54 threads. You can get 55/56mm BFL with M48/M54 threads according to your needs. Since are standard accessories included with the camera, this addition has no affect on the price. 55mm M48/M54 are suitable for standard flatteners and multiple purpose coma correctors (MPCC), while 56mm M54 threads are common for Takahashi reflectors.
Note: Please position the OAG as far forward as possible (for example, placing it under the M48 thread), and extend the OAG prism slightly outward to ensure simultaneous focus for both the main camera and the guiding camera.
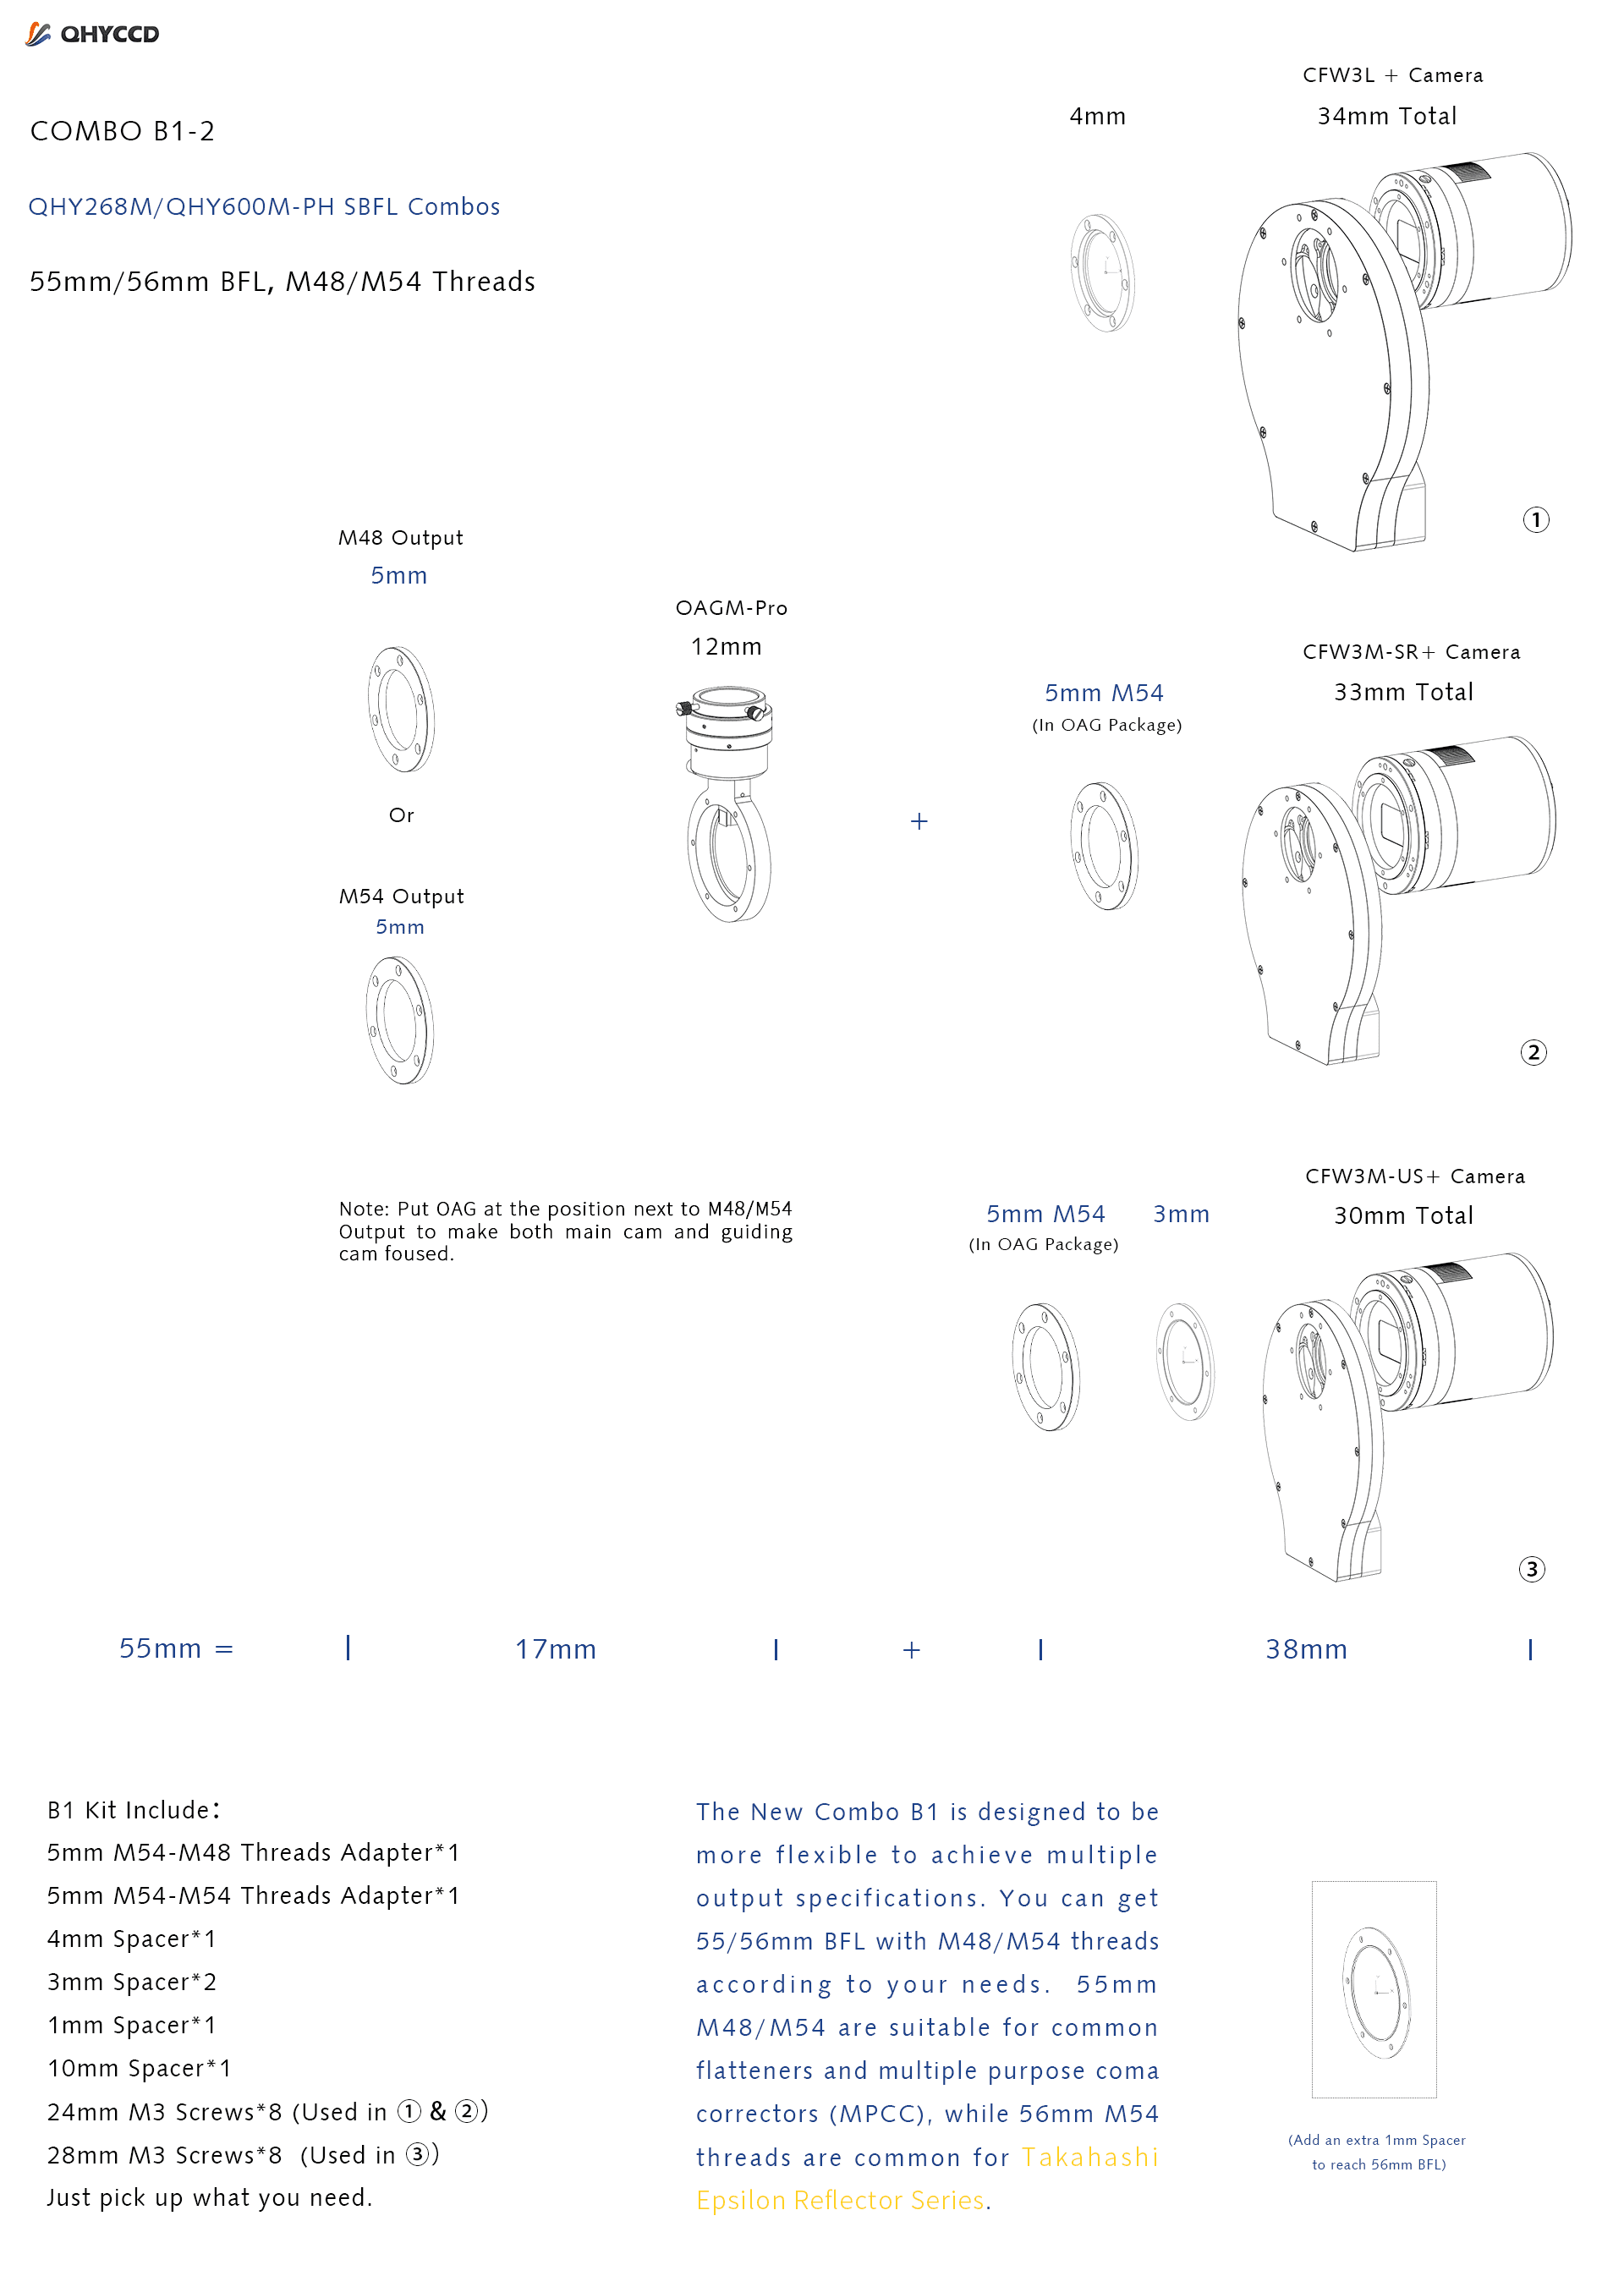
In 2023, we launched the new version of the QHYOAGM-Pro with a larger prism. Its thickness is 12mm, so it is necessary to reduce the spacer thickness by 2mm in the COMBO above while keeping the rest part unchanged.
The QHY600M-PH SBFL and QHY268M with CFW3L filter wheel can fit an optional Canon EF or Nikon F Lens Adapter without additional spacers. Smaller filter wheels may require additional spacers.
User Guide: How to Start the Camera
Install “All-In-One” Driver&SDK Pack
Before Start: Input Voltage Requirements
The camera requires an input voltage between 11V and 13.8V. If the input voltage is too low the camera will stop functioning or it may reboot when the TEC power percent is high, causing a drain on the power. Therefore, please make sure the input voltage arrived to the camera is adequate. 12V is the best but please note that a 12V cable that is very long or a cable with small conductor wire may exhibit enough resistance to cause a voltage drop between the power supply and the camera. The formular is: V(drop) = I * R (cable). It is advised that a very long 12V power cable not be used. It is better to place the 12V AC adapter closer to the camera.
First connect the 12V power supply, then connect the camera to your computer via the USB3.0 cable. Make sure the camera is plugged in before connecting the camera to the computer, otherwise the camera will not be recognized. When you connect the camera for the first time, the system discovers the new device and looks for drivers for it. You can skip the online search step by clicking “Skip obtaining the driver software from Windows Update” and the computer will automatically find the driver locally and install it. If we take the 5IIISeries driver as an example (shown below), after the driver software is successfully installed, you will see QHY5IIISeries_IO in the device manager.
Please note that the input voltage cannot be lower than 11.5v, otherwise the device will be unable to work normally.
Install "All-In-One" System Pack
All-in-one Pack supports most QHYCCD models only except PoleMaster and several discontinued CCD cameras.
Download Page: https://www.qhyccd.com/download/
Video Tutorial: https://www.youtube.com/embed/mZDxIK0GZRc?start=1
- Since most of the contents of All-in-one package are plug-ins that support third-party software, the third-party capturing software that you want to use must be installed before the All-in-one package. Otherwise the program will report an error.
- ALL-IN-ONE Pack contains:
- System Driver, which is necessary for the camera operation and must be installed.
- WDM Broadcast Driver, which can provide a live signal to Obs and other live software, you can install it if you have such needs like opeing a live show.
- EZCAP_QT , which is developed by QHYCCD and can be used in QHY devices tests, and management of updates. So even if you won’t use EZCAP_QT for capturing, we suggest you install it.
- Ascom driver, which is necessary for the camera used in Ascom (the latest version of Ascom is 6.6).
- The two sorts of Ascom CFW Drivers correspond to two methods of controling the filter wheel: USB control and camera serial control. It is recommended that both drivers should be installed if you have a filter wheel.
- CP210X_VCP is a serial driver. Some computers come with the driver, but the computer without the driver may be failed of controling the filter wheel.
- SDKs for Third-party Software: Just pick and install the corresponding SDK according to the software you want to use. Don’t forget to check whether the software you are using is 32-bit or 64-bit and select the right SDKs.
- SHARPCAP is also included in the pack, you can choose 32-bit or 64-bit to install. This is authorized by SHARPCAP.
- QT LIB is a plug-in to ensure that 64-bit software can exeuate normally on some computers with poor compatibility.
- Difference between Stable version and Beta Version: Beta version is the latest version, which gives priority to support for the latest products (the stable version may not be compatible with those yet), and has some of the latest optimized ,but experimental features. The stable version is older than the beta version but more stable, so it is recommended for beginners who are not using the latest products.
- Don’t let the camera connect to the computer during the All-in-one pack installation process; connect it to the computer after all the installation is complete.
Connect DSO Imaging Software (e.g. NINA)
Before using software, make sure you have connected the cooling camera to the 12V power supply and connected it to the computer with a USB3.0 data cable. If it’s an uncooled camera, 12V power is not needed. We recommend 64-bit Software, like SharpCAP x64 , N.I.N.A x64. etc., especially when you’re using 16bit cameras.
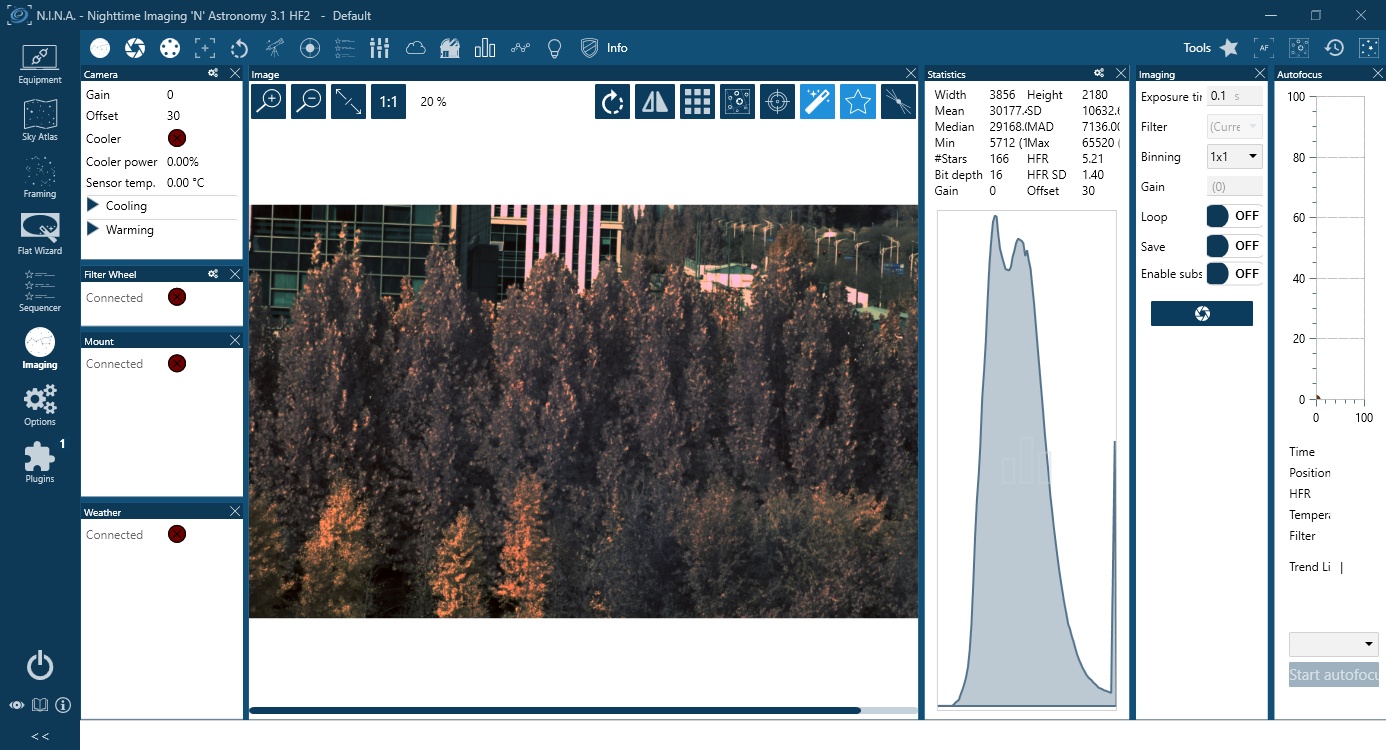
NINA supports direct connection via the QHY plugin as well as connection through the ASCOM driver. The following instructions assume a direct connection using the QHY plugin.
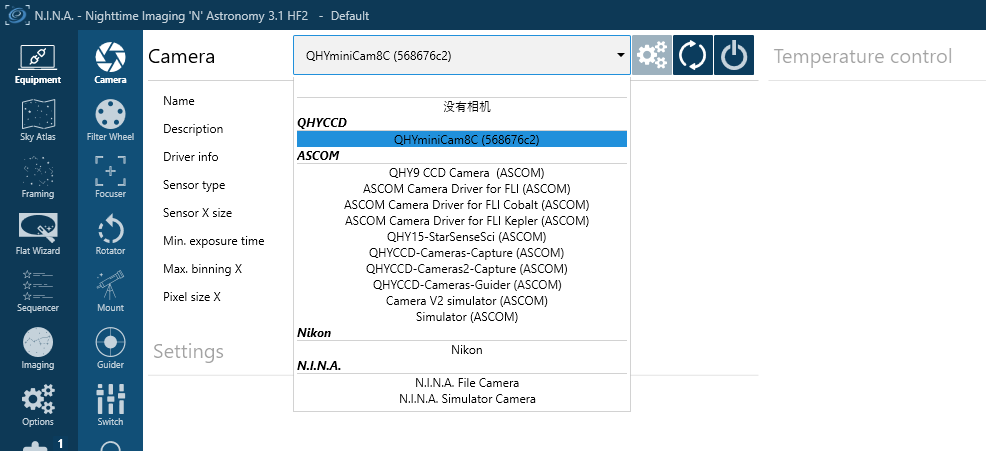
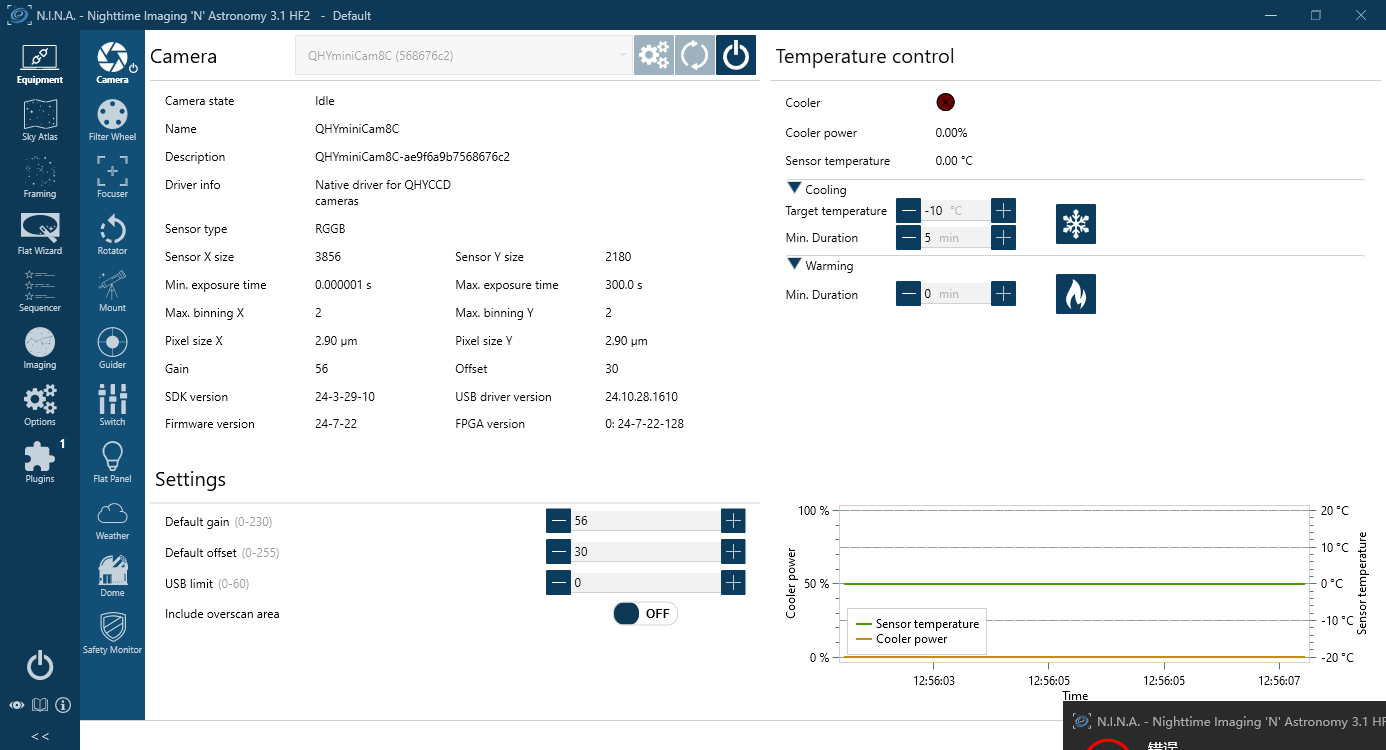
Set the Target temperature.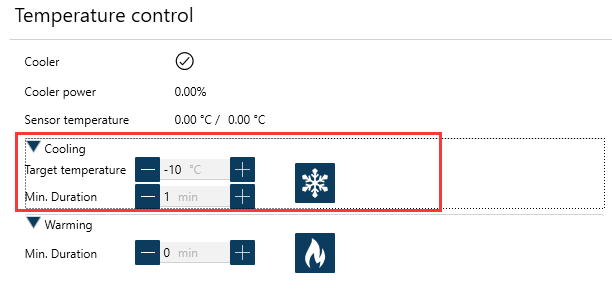
Set exposure time and start the shooting.
Connect Planetary Imaging Software (e.g. SharpCap)
The instructions below are based on SharpCap 3.1
- Launch SharpCap.
Click Camera in the menu bar and select your camera.
If the software and drivers mentioned above have been installed correctly, the image will appear automatically. And the frame rate can also be seen in the lower-left corner of the software window, as shown below.

- Main Interface Functions:
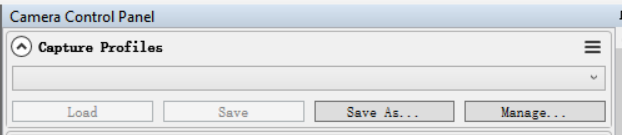
Capture Profiles
Preset management.
After SharpCap is restarted, the default settings are restored. If you frequently use one or more specific parameter configurations, you can adjust the parameters as needed and then click Save to store them as a preset. The preset can be directly recalled the next time you open the software.
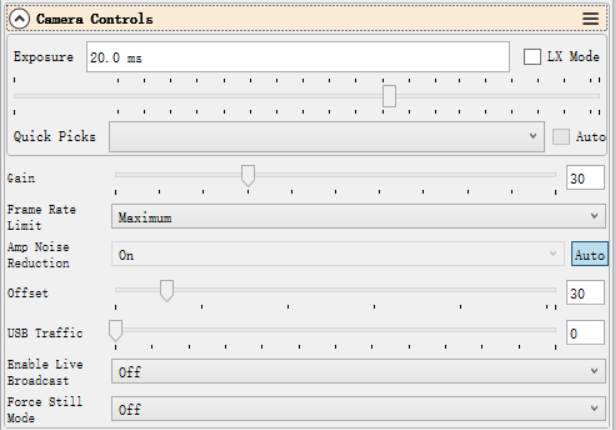
Exposure
Sets the exposure duration. When LX Mode is enabled, the single-frame exposure time can be extended to longer values.
Gain
Equivalent to the ISO setting on a standard digital camera. Higher gain values result in higher sensitivity.
Frame Rate Limit
Limits the maximum frame rate. By default, no limit is applied. Users can set the limit manually if needed.
Offset
Adjusts the bias level. Even when the camera is completely covered, the image may not appear perfectly black. By adjusting the offset value, a more optimal dark frame can be achieved. The Histogram can be used to verify the adjustment.
USB Traffic
Controls the data transfer speed (frame rate). When set to 0, the camera operates at its maximum frame rate.
Enable Broadcast Mode
Enables the broadcast driver. For detailed usage instructions, please refer to the documentation available on the download page.
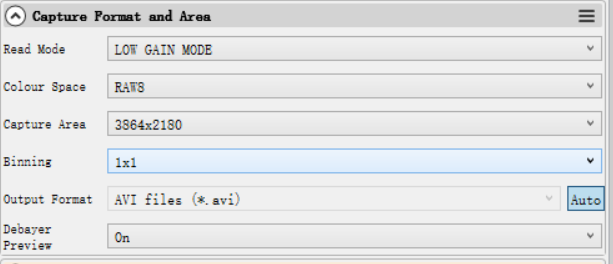
Read Mode
Some camera models support high-gain and low-gain readout modes.
Color Space
Select the output format.
Raw8 / Raw16 are 8-bit or 16-bit formats. Images and videos saved in Raw8 or Raw16 format will be monochrome, even when using a color sensor. Color information must be restored through debayering during post-processing.
RGB24 is a non-RAW format that outputs color images directly, but requires more storage space.
Capture Area
Select the resolution used for image capture.
Binning
Enable pixel binning for image capture.
Output Format
Select the output file format.
Debayer Preview
When this function is enabled, the live preview will be displayed in color even if a RAW format is selected. Please note that the saved images will still be monochrome.
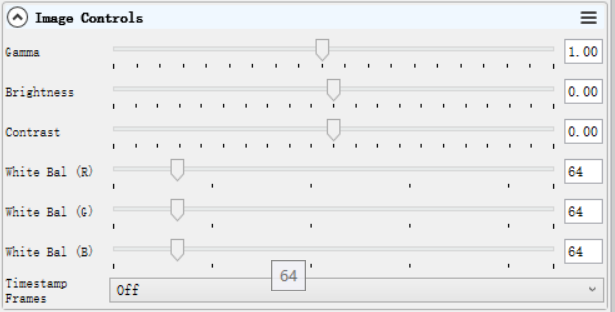
Gamma, Brightness, Contrast
Under normal operating conditions, we recommend leaving these settings unchanged.
White Balance (R/G/B)
This function is used for white balance calibration on color cameras. For detailed calibration instructions, please refer to the corresponding section on the color camera page.
This function is not required for monochrome cameras.
Histogram
The histogram is an important image reference tool. It can be used to check whether the white balance is set correctly, whether the offset value is appropriate, and whether the image is overexposed.
Its operating principle is the same as that of the histogram used in standard DSLR cameras.

Thermal Controls
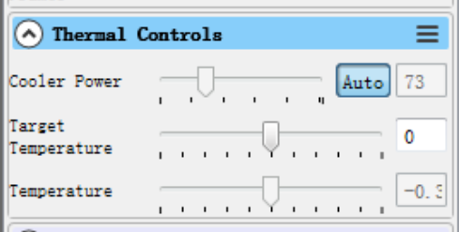
After the cooled camera is connected to a 12 V power supply, the temperature control circuit will be activated. You can control the CMOS sensor temperature by adjusting the settings shown below.
There are two main methods for temperature control:
Adjusting the cooler power
Setting a target temperature
If you wish to control the CMOS temperature by setting a target temperature, first click “Auto”, and then use the slider to set the desired target temperature.
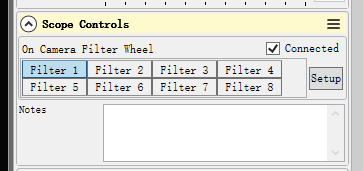
Scope Control: for filter wheel control
Select the corresponding filter wheel slot to control the rotation.
Note: The software must be started after the filter wheel has completed its rotation and returned to the home position; otherwise, the position will not be displayed correctly.
Using Ascom
QHY devices can operate with many software applications that support the ASCOM platform. MAXIM DL is used as an example below.
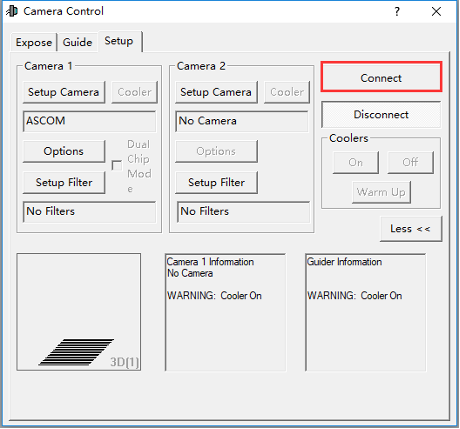
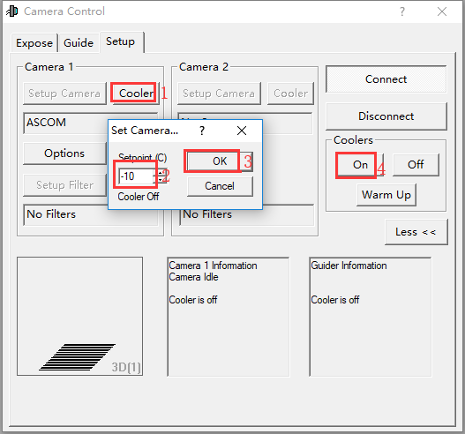
First, make sure that both the ASCOM platform and the QHY ASCOM driver have been successfully installed. Launch MAXIM DL and follow the instructions shown in the figure below to complete the setup.
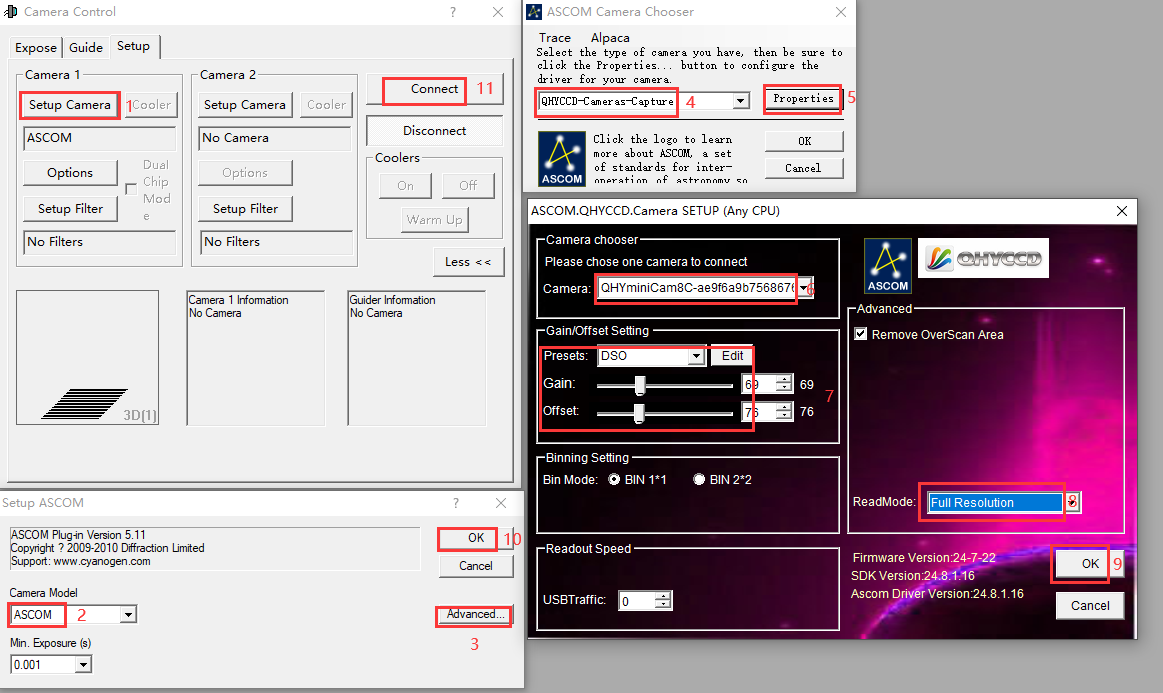
Click “Connect”
Set the cooling temperature.
Using EZCAP
EZCAP_QT is software developed by QHYCCD. For QHYCCD cameras, it provides basic image capture functions.
Install the EZCAP_QT software and connect the camera to your computer using a USB 3.0 cable. Launch EZCAP_QT, then click “Connect” under Menu → Camera.
If the camera is successfully connected, the EZCAP_QT title bar will display the camera firmware version and camera ID, as shown in the figure below.

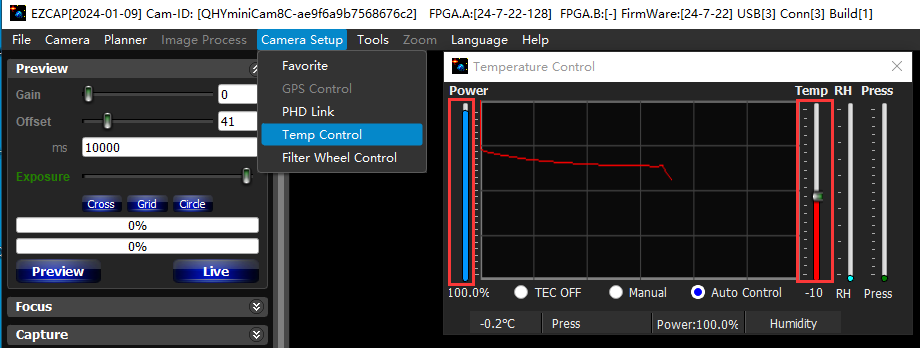
In Camera Setup, click Temp Control to set the CMOS sensor temperature.
You can enable Auto to define a target temperature. For example, here we set the target temperature to –10 °C. The CMOS sensor temperature will quickly drop to the target value, typically within 2–3 minutes.
To disable cooling, select Stop. If you prefer to control the cooling power without setting a target temperature, you can manually set the cooling power as a percentage.
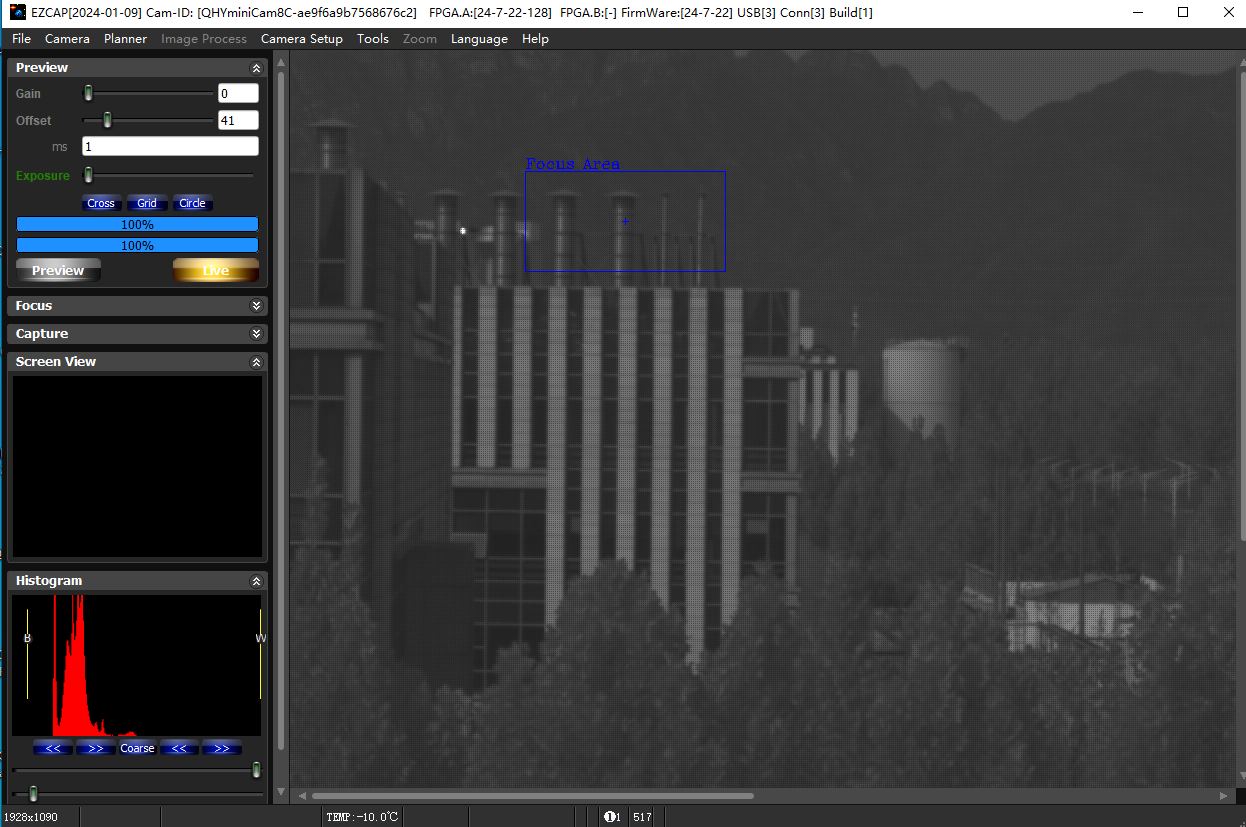
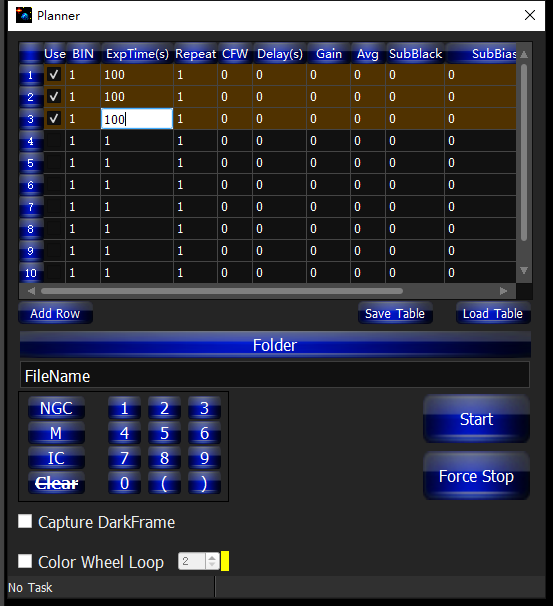
In EZCAP_QT, there is an Image Task Planner for sequence imaging.
Check Use to enable the task.
Set the following parameters:
Bin
ExpTime – exposure time
Repeat – number of frames
CFW – filter wheel position
Gain – gain value for the sequence
Click Folder to set the save path. (It is recommended to avoid special characters in the path and use English letters.)
Click Start to begin the sequence capture, and Force Stop to close the current task.
User Guide: How to Set Gain and Offset
Unity Gain of Some 16bit Models
| Model | Unity Gain |
| QHY600M/C | 25 |
| QHY268M/C | 30 |
| QHY461PH | 26 |
Now with the improvement of the CMOS technology, the 16bit CMOS cameras like QHY600/268/411/461, can be directly set gain 0 under default Photographic DSO mode. Even in lowest gain(zero) they’re beyond the requirement (less than 1e/ADU due to sufficient samples).
However, when you use QHY600/268/411/461 under Extended Fullwell Mode, we recommend their unit gain as default.
OFFSET Setting
There is no fixed “best value” for OFFSET. To set OFFSET, you should take the bias frame and dark frame at a certain GAIN value, then check the histogram of the frames.
The histogram distribution is a peak-like curve. While changing the OFFSET value, the histogram will move left or right. We need to guarantee the range of the whole curve won’t be chopped off at the end. At the same time, we need to keep a little residue on the left side, just over 0 a bit.
Pay attention that under different GAIN values, the width of this peak varies. The higher the GAIN is, the wider the distribution will be. So OFFSET value at low GAIN is not suitable for high GAIN because the curve is easily to be chopped off.
Camera Maintenance
Drying the camera CMOS chamber
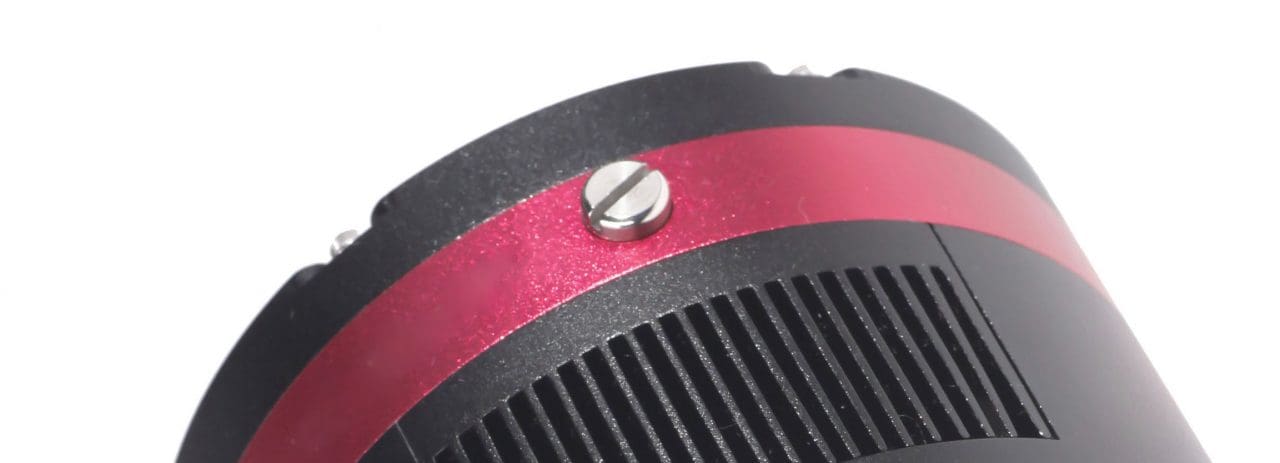
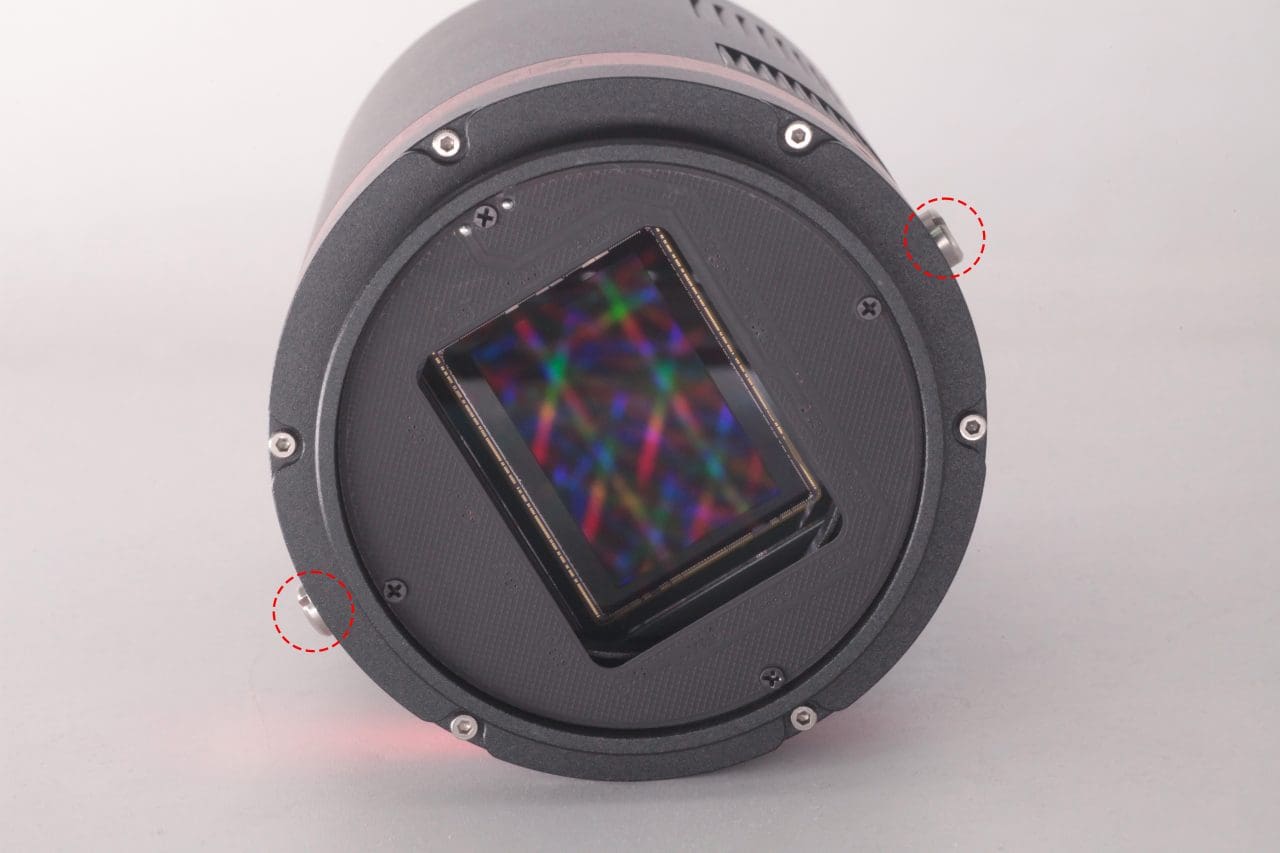
- There are holes in the two sides of the camera near the front plate that is normally plugged by a screw with an o-ring. If there’s moisture in the CMOS chamber that causes fog, you can connect the desiccant tube to this hole for drying. There would better be some cotton inside to prevent the desiccants from entering the CMOS chamber.
 Please note that you may need to prepare desiccants yourself, because for most countries and regions desiccants are prohibited by air transport. Since QHY always deliver your goods by air, sorry that we can’t provide desiccants for you directly.
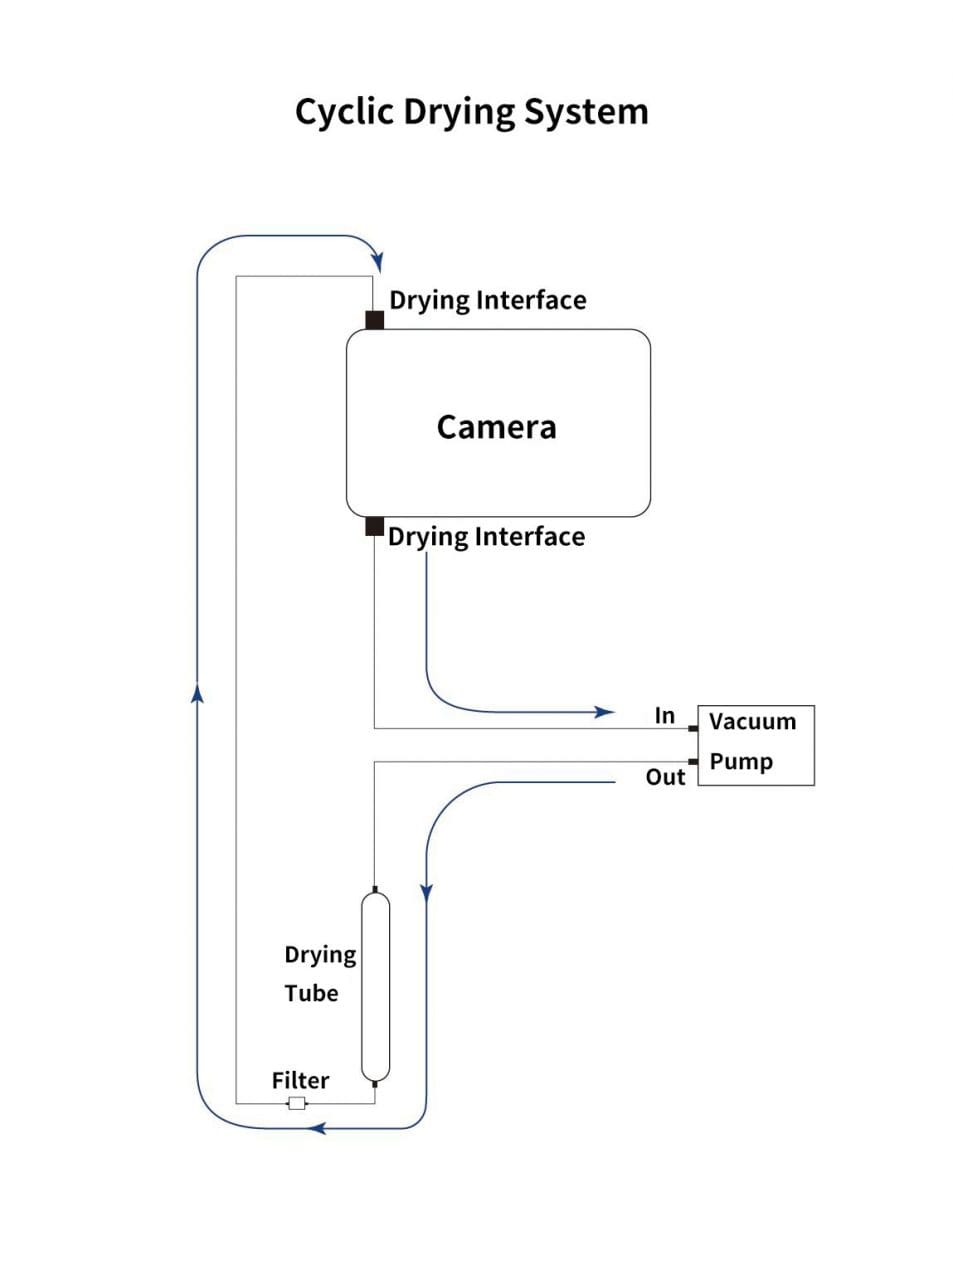
- Cyclic Drying: The front end of the camera body is equipped with two drying interfaces with M5 threads, which are used in conjunction with drying tubes and circulation pumps for drying treatment inside the sensor chamber. The position of the drying interface is indicated by the red circle in the figure below (take the QHY600 as an example):Under the vacuum pump, the gas inside the sensor chamber is drawn out through one drying interface, enters the drying tube, and then undergoes filtration. It is then reintroduced into the camera through the other drying interface, circulating back and forth for drying.
Note:1.Do not reverse the order of the intake and exhaust ports
2.Before circulating drying, it is necessary to turn off the refrigerator, and then turn on circulating drying after the temperature returns to normal temperature. Only by following this step can the water vapor in the sealed chamber be effectively removed. If the cooler is turned on, the cooler inside the camera will absorb water vapor, causing more water vapor to condense inside the camera instead of being absorbed by the desiccant.
Cleaning the CMOS sensor and optical window
If you find dust on the CMOS sensor, you can first unscrew the front plate of the cam and then clean the CMOS sensor with a cleaning kit for SLR camera sensors. Because the CMOS sensor has an AR (or AR/IR) coating, you need to be careful when cleaning. This coating can scratch easily so you should not use excessive force when cleaning dust from its surface.
Preventing fogging of the CMOS chamber
All QHY cooling cameras have built-in heating plates to prevent fogging. However, If the ambient humidity is very high, the optical window of the CMOS chamber may have condensation issues. Then try the following:
1. Avoid directing the camera towards the ground. The density of cold air is greater than of hot air. If the camera is facing down, cold air will be more accessible to the glass, causing it to cool down and fog.
2. Slightly increase the temperature of the CMOS sensor .
3. Check if the heating plate is normally working. If the heating plate is not working, the glass will be very easy to fog, the temperature of the heating plate can reach 65-70 °C in the environment of 25 °C. If it does not reach this, the heating plate may be damaged. Please contact us for maintenance.
TE Cooler Maintenance
Please avoid thermal shock during use. Thermal shock refers to the internal stress that the TE cooler has to withstand due to the thermal expansion and contraction when the temperature of the TEC suddenly rises or falls. Thermal shock may shorten the life of the TEC or even damage it.
Therefore, when you start using the TEC to adjust the CMOS temperature, you should gradually increase the TEC power rather than turning the TEC to maximum power. If the power of the TEC is high before disconnecting the power supply, you should also gradually reduce the power of the TEC and then disconnect the power supply.
Others
Technical Support
You can login QHYCCD Help Center for any technical support.
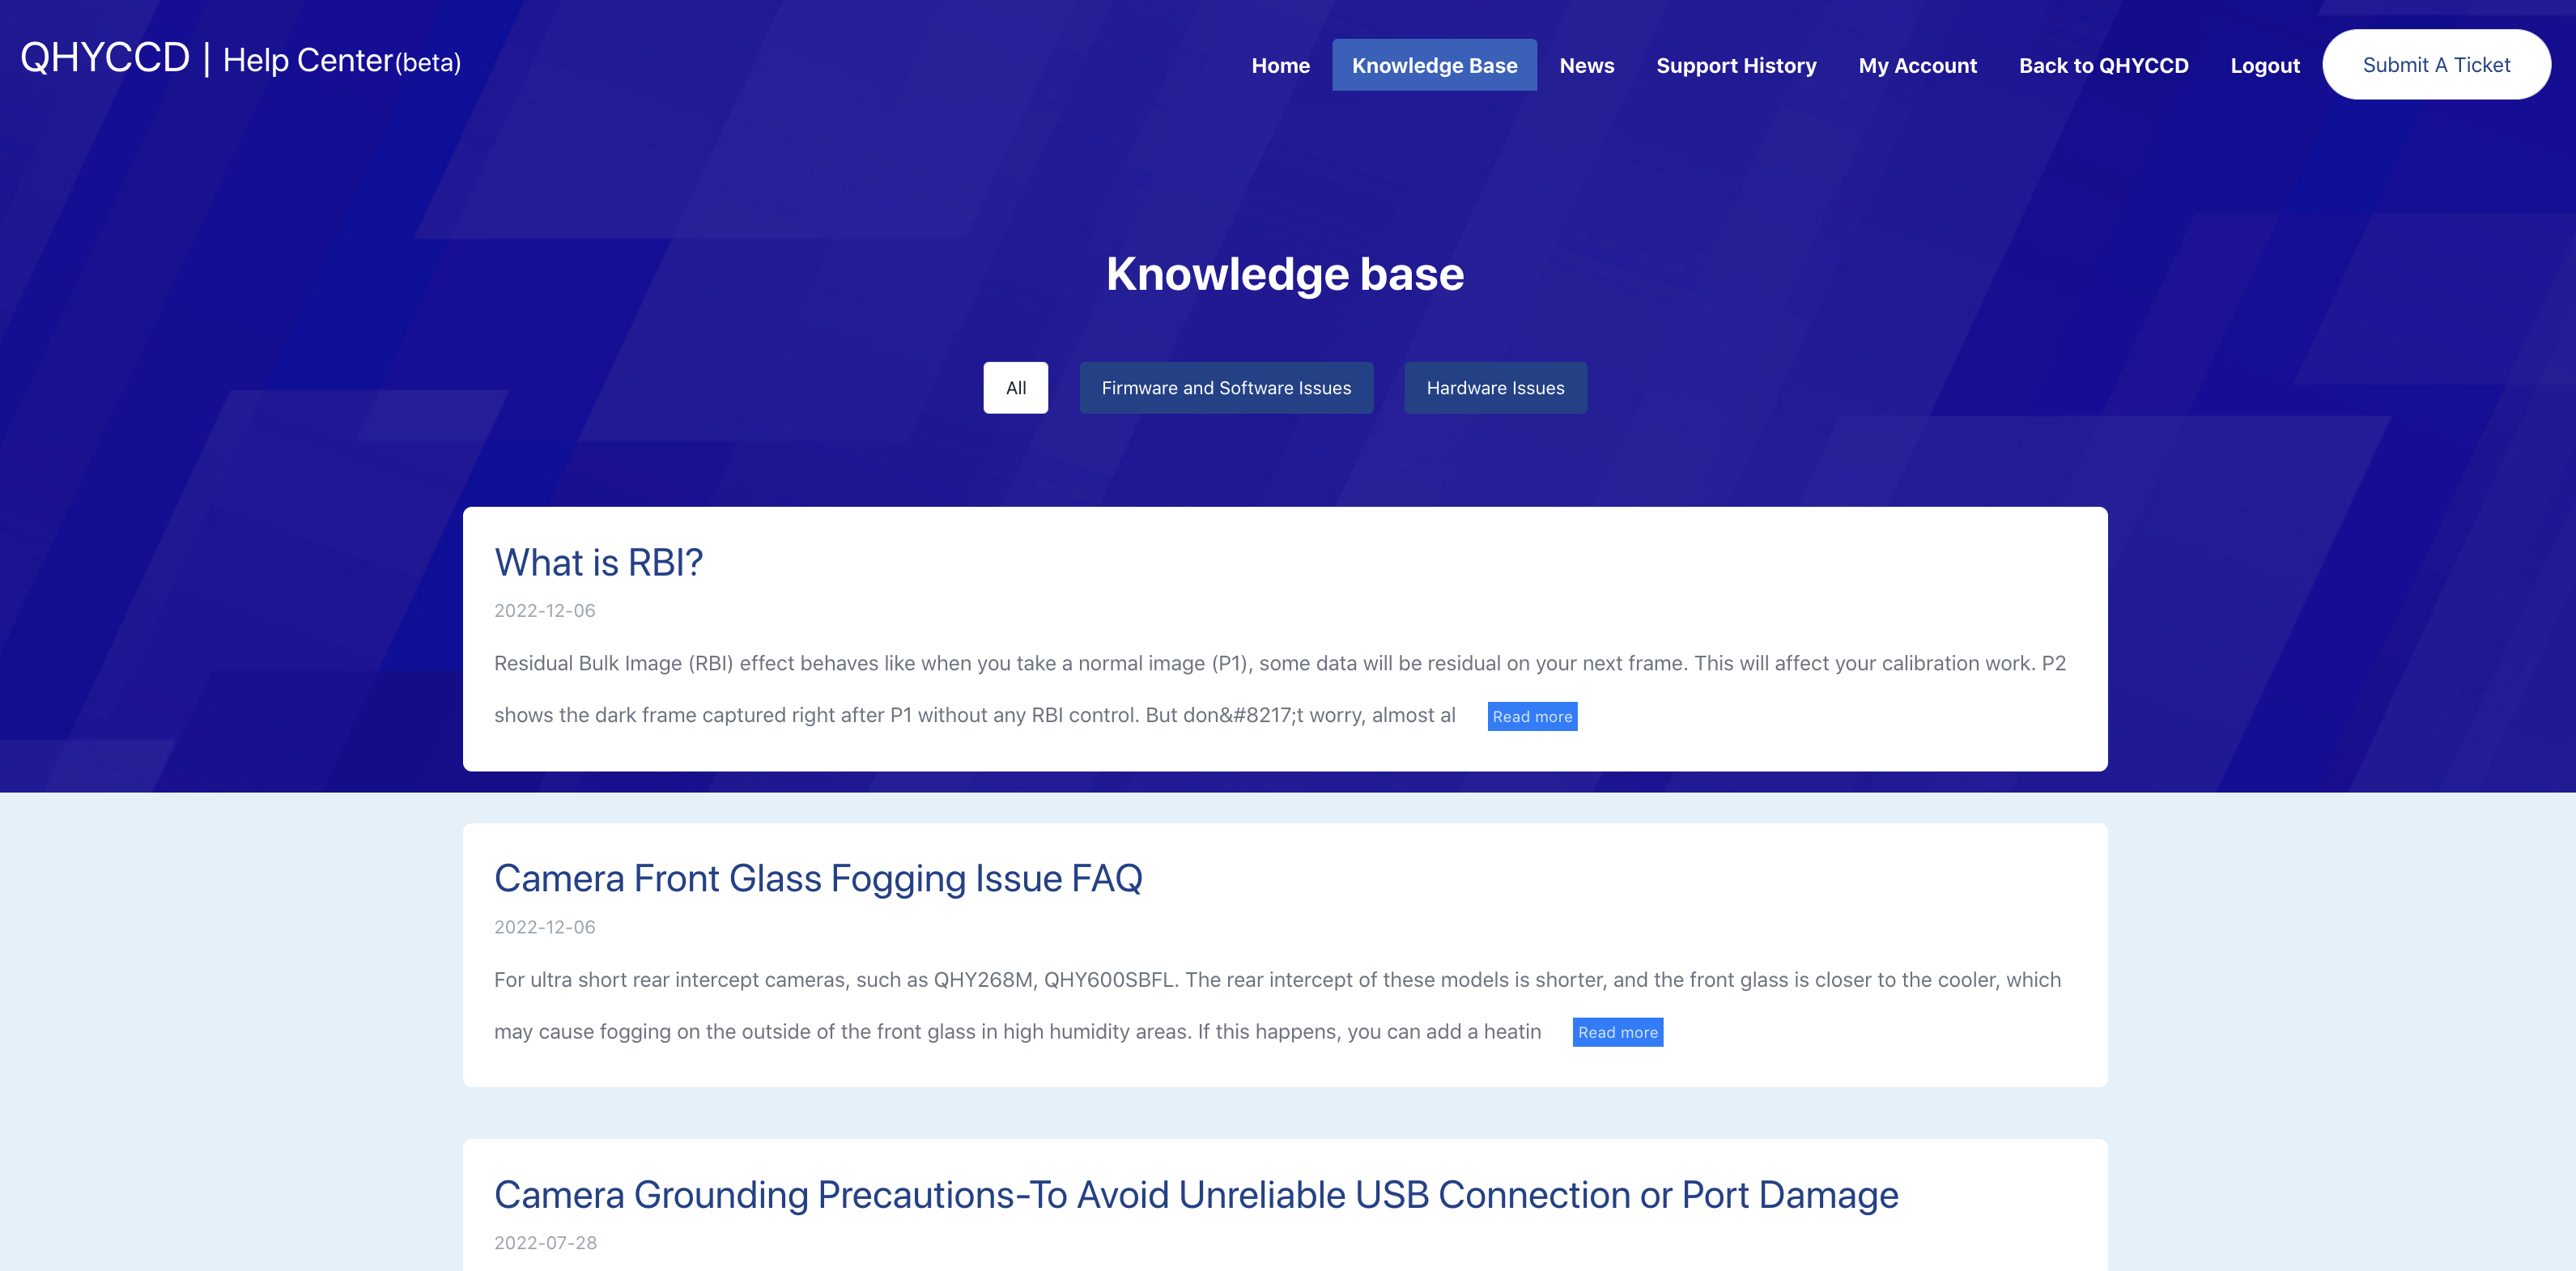
Submit a Ticket: Describe the issue you met while you’re using them. Our technicans will reply you in 48 hours during working days. You don’t have to check the Ticket update everyday—they can receive email notifications and know if there’s any update.
Knowledge Base: Here lists some tips for using your gears, or solutions to issues that you may met. Help your self!
Support History: Check your ticket’s status.
Other Links
Instructions for adapter system:
https://www.qhyccd.com/astronomical-camera-adapter-bfl-solution/
Driver download:
https://www.qhyccd.com/download/
Appendix: UVLO Introduction and How to Improve the Power Supply
UVLO(Under Voltage Locking), is primarily intended to protect the electronic device from damage caused by abnormally low voltages. Now only QHY600, QHY268, QHY410, QHY411, QHY461, QHY533 cameras have UVLO Protection.
UVLO warning execution
After a warning is given, the camera firmware will automatically turn off the cooler and will turn on the camera’s TEC protection mode. After the camera is reconnected, it will always work in TEC protection mode (maximum power cooler power will be limited to 70%). Since many times the voltage shortage is caused by the high resistance of the power supply cable itself, resulting in a large voltage drop at high currents, the voltage will usually rise after the power is limited. But limiting the power will affect the cooling temperature difference. Therefore, it is recommended that users first check the power supply cable to solve the problem of excessive resistance of the power supply cable.
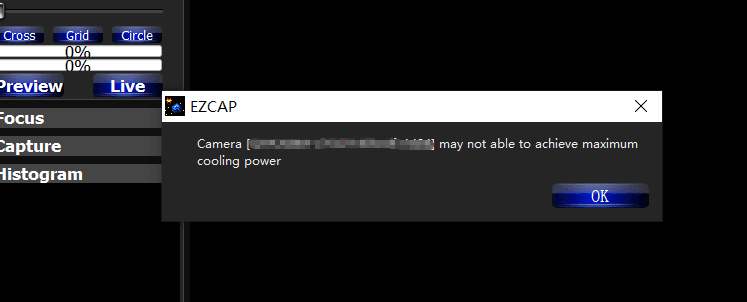
If the user has solved the problem of insufficient supply voltage, the TEC protection mode can be removed through the menu of EZCAP_QT.
How to improve the power supply?
- Make sure the output voltage of the AC adapter is not less than 12V and the maximum output current can reach 4A or more. Otherwise, the AC adapter itself will not meet the power demand of the camera and it may cause a low voltage problem.
- Make sure that the 12V power supply cable connecting the AC adapter to the camera has a low impedance. The impedance of the positive and negative paths should not exceed 0.1 ohms each. Or the total impedance (positive + negative) should not exceed 0.2 ohms. Otherwise, the power supply cable should be thickened.
- When using battery power, it is recommended to add a 12V output voltage regulator. If the battery is connected directly, usually the battery voltage reaches 13.8V when fully charged, and will gradually drop during use. It is easy to cause the camera to reach the low-voltage detection threshold.
How to clear the TEC protection status triggered by UVLO?
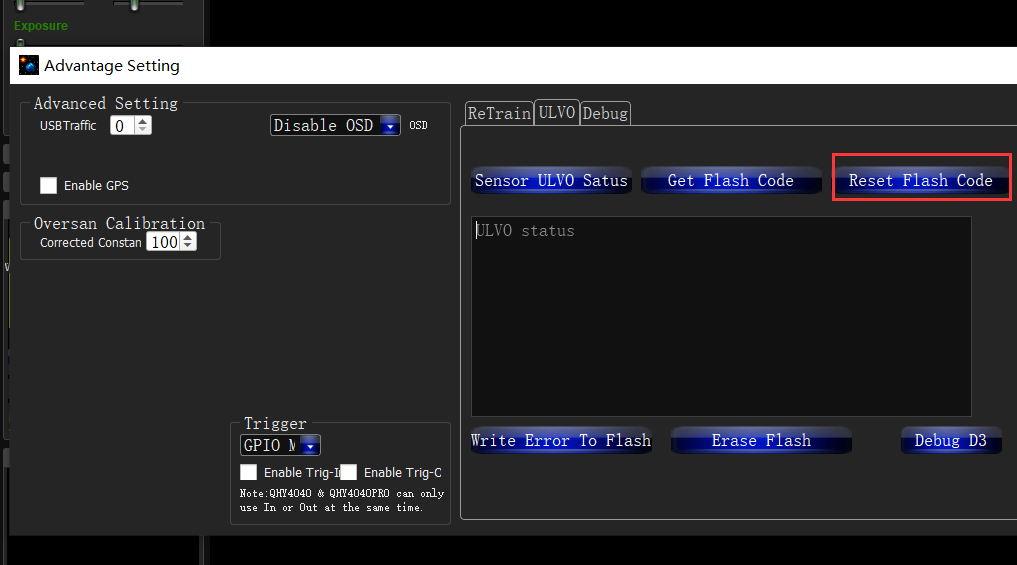
Once a UVLO event occurs, the camera will automatically memorize it and will work in a protected mode at a maximum of 70% power after reconnection. This memory can be erased as follows:
After you find the system error, you need to turn off the device and check the power supply. After inspecting the problem, open the ezcap software and select “Camera Settings” – “Preferences” – “Reset Flash Code” to reset the error status.
Why does the warning appear even though the power supply voltage is 12 V?
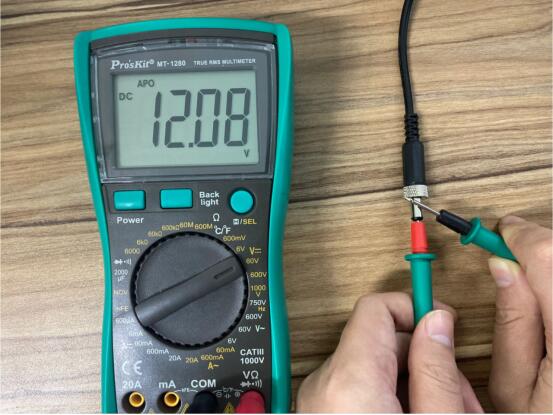
- The voltage measured inside the camera is the voltage reaching the camera, not the voltage at the power adapter end. Therefore, the voltage measured at the power adapter end does not reflect the voltage received at the camera end. This is because the power cable has its own resistance. If the resistance is large, it will cause a large voltage drop. The voltage drop can be calculated by U = I * R. So if the power cable has a resistance of 0.2 ohms, it will produce a voltage drop of 3.3 * 0.2 = 0.66V. If the power adapter output is 12 V, the voltage reaching the camera is 12 – 0.66 = 11.34 V. To actually measure the input voltage at the camera end, you can refer to the photo below.
- For cameras produced after September 2021, the UVLO is detected by communicating directly with the power manager, and the UVLO code that appears is 9, while for cameras produced before, the indirect detection method is used, and the UVLO code that appears is 3. The indirect detection method will detect UVLO except for the low voltage problem, and any other accident that causes CMOS not to work will also trigger the UVLO=3 alarm, for example, the camera is subject to severe electromagnetic interference, causing registers inside the CMOS not to work. Therefore, if UVLO=3 occurs, it is recommended to contact QHYCCD technical support for further judgment.
- Using older versions of drivers and firmware may cause false positives (UVLO=9). Please make sure that ALL-in-one SDK version is out of stable version 2021.10.23 or higher. Please disconnect the 12V power supply during the driver installation.
Appendix: Bayer Sequences of Some Colored Cameras
| Cooled CMOS Camera | Bayer |
| QHY600C/QHY268C/QHY410C/
QHY367Pro/QHY128Pro/QHY294C/ QHY247C/QHY168C/QHY165C/QHY183C/QHY174C |
RGGB |
| QHY533C/QHY178C/QHY290C/QHY224C | GBRG |
| QHY163C | GRBG |
| QHY1920C | BGGR |
| Cooled CCD Camera | |
| QHY8L-C | GBRG |
| QHY10-C | RGGB |
| QHY12-C | BGGR |
| Planetary and Guiding | |
| QHY5III174C | RGGB |
| QHY5III178C | GBRG |
| QHY5III224C | GBRG |
| QHY5III290C | GBRG |
| QHY5III462C | GBRG |
| QHY5III485C | RGGB |
| QHY5L-II-C | GRBG |
| QHY5P-II-C | GBRG |
| QHY5III585C | RGGB |
| QHY5III678C | RGGB |
| QHY5III715C | GBRG |
| QHY5III568C | RGGB |